When it comes to creating a visually appealing and professional-looking website, the layout of the page and the elements within it are of utmost importance. But while creating layout designs with WordPress blocks, making columns equal height can be challenging. You might have to revert to some hacky custom CSS solutions.
So here we’ll see how you can use The Plus Blocks for Gutenberg Equal Height feature to counter this problem and create beautiful equal column height layouts.
Required Setup
- Make sure the default WordPress Block editor is active.
- You need to have The Plus Blocks for Gutenberg plugin installed and activated.
- This is a premium feature, you need the PRO version of The Plus Blocks for Gutenberg.
- You have to use The Plus Blocks for Gutenberg Blocks.
Learn via Video Tutorial:
How to Activate the Equal Height Extension?
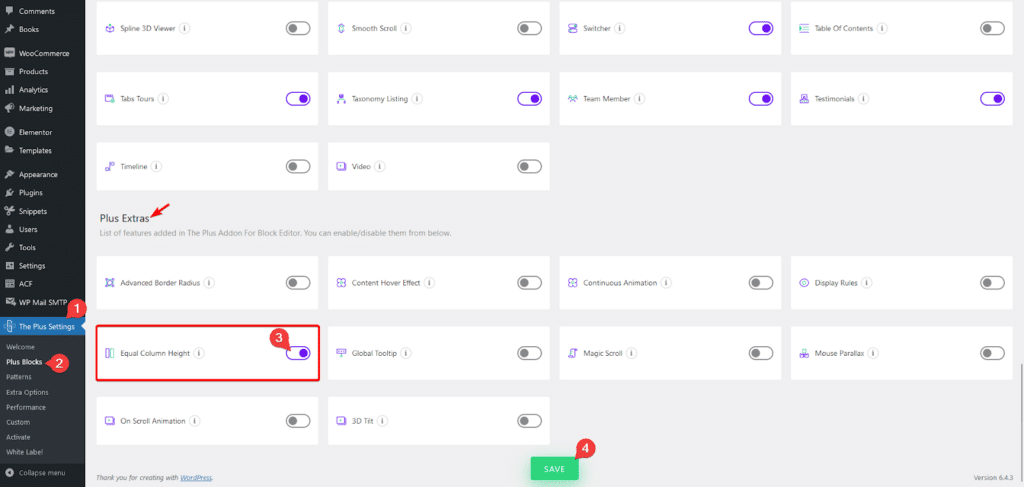
Go to
- The Plus Settings → Plus Blocks
- Scroll down to Plus Extras and look for the extension turn on the toggle then click Save.
Why do you need Equal Height Option In WordPress?
The WordPress Block editor or the Gutenberg Editor as previously called has improved leaps and bounce in recent times so much so that it is starting to compete with other big WordPress page builders.
But even with this impressive progress addressing the equal height column issue is not very simple in WordPress block editor.
That is why you need addons like The Plus Blocks for Gutenberg which gives you a lot of options with its unique set of blocks and features, one such feature is the equal height feature by using this you can easily fix this equal height column issue in WordPress.
How to Make Column Height Equal in WordPress?
To use the Equal Height option of The Plus Blocks for Gutenberg you have to use its own blocks which can have columns like the Container block. You’ll get the equal height option in the parent container that contains your elements.
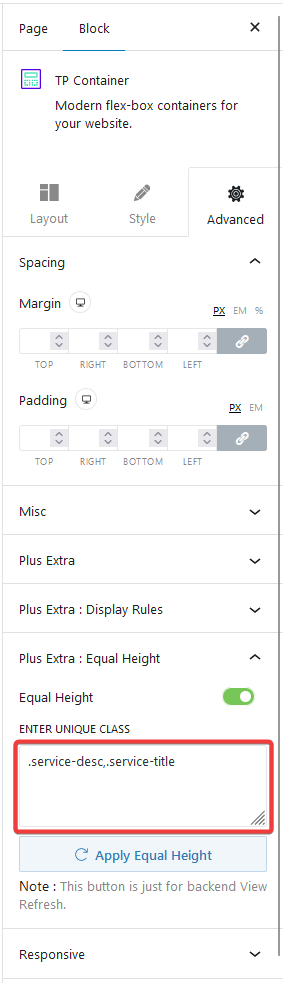
So select the parent container and go to Advanced > Plus Extra : Equal Height > Equal Height and turn on the toggle.
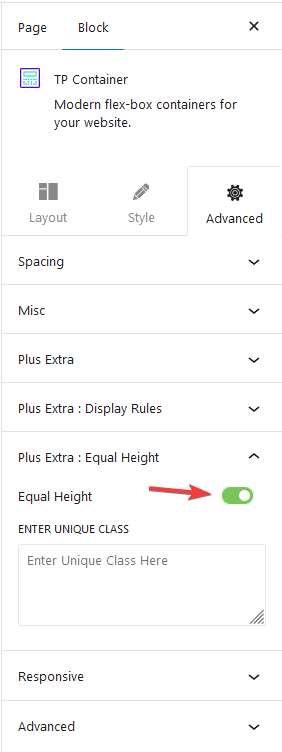
Now you’ll find an option to add a CSS class under Enter Unique Class field, by using this you can make equal heights for your columns.
Note: In order to use this method you have to use the browser inspect element tools, so familiarity with the browser dev tools would be an added advantage.
Let’s see how this process works.
How to find Unique Class to make equal column height in WordPress (Gutenberg)?
This is a very simple method, you have to find the element that is creating the height issue or you can select its parent container as well using the browser Inspect Element tool.
Once you identify the element copy its class using the browser Inspect Element tool and paste the same in the Enter Unique Class field.
Make sure to add the class name with .(dot) in front, once the class is added click on the Apply Equal Height Button to see the changes.
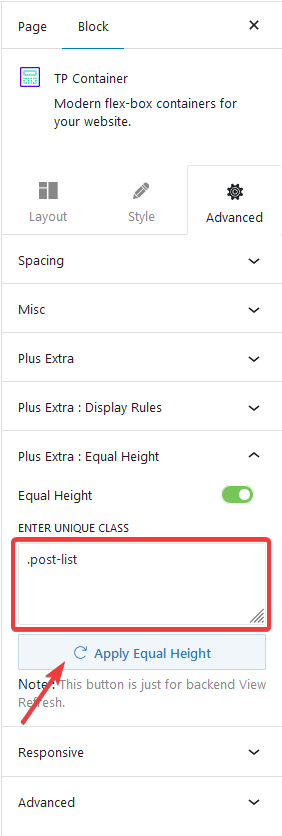
Note: You can add the selected elements parent classes as well to make it more specific.
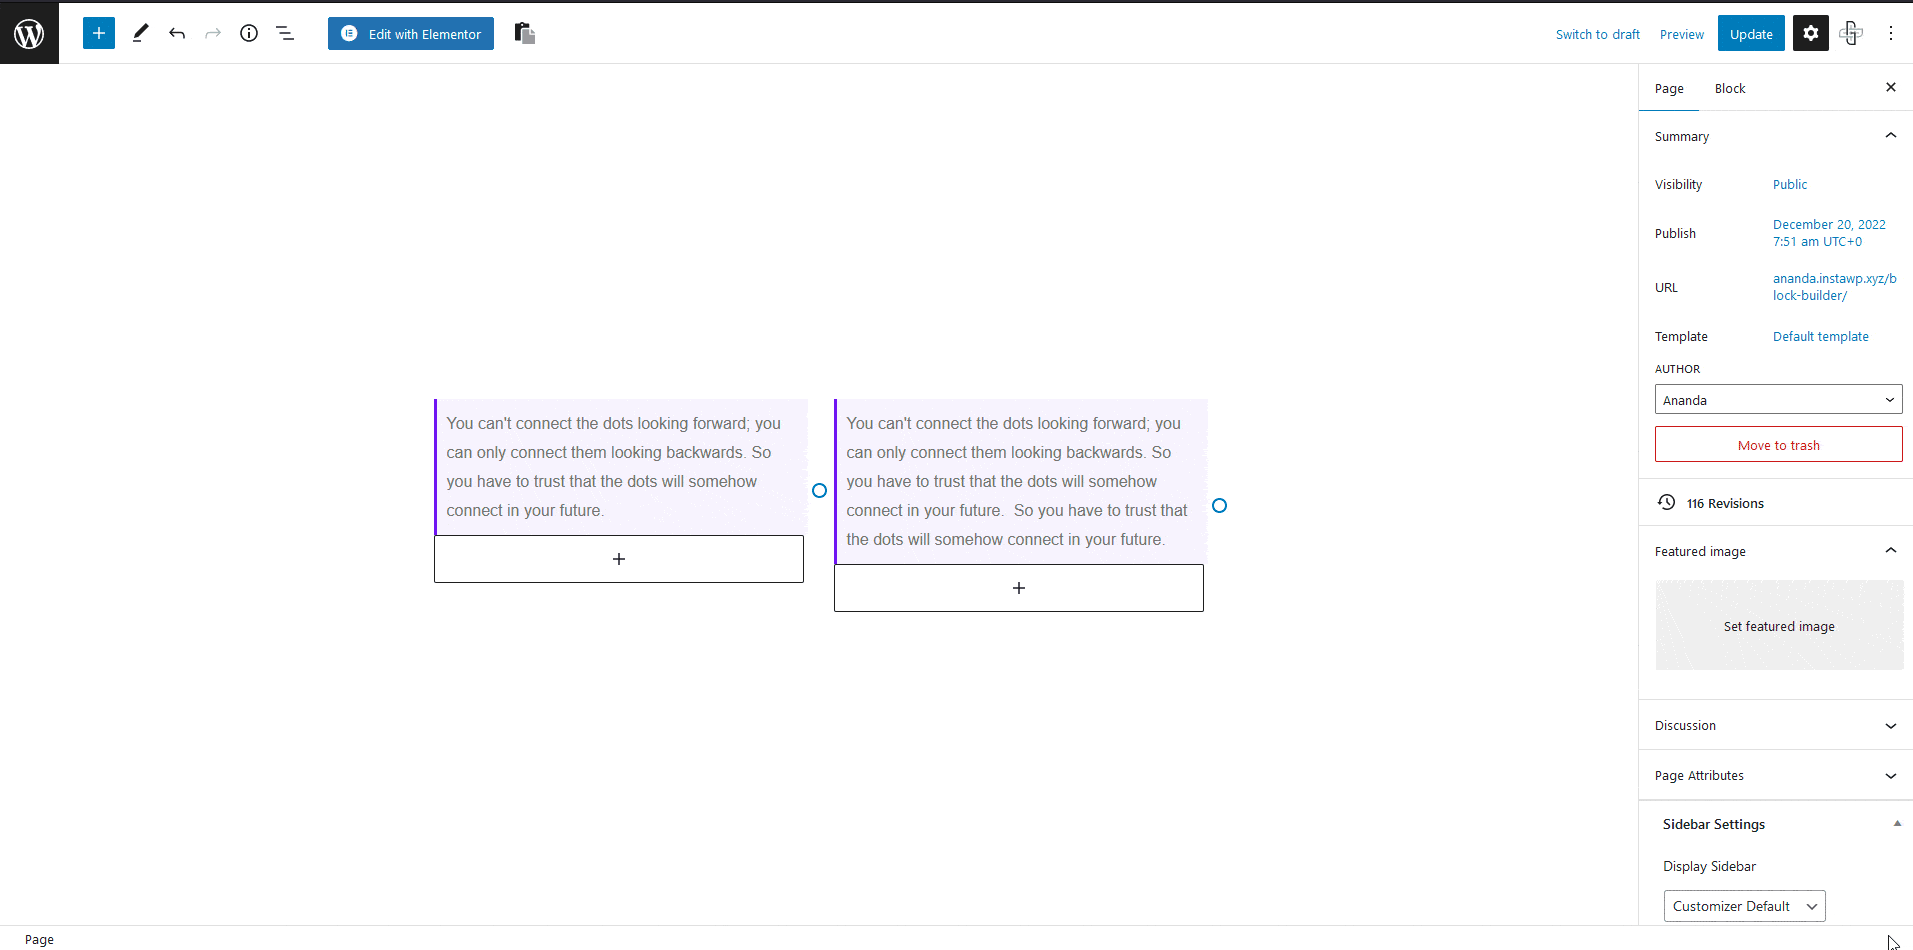
Let’s see this with an example, let’s say we have two blockquotes side by side and they are of uneven height due to the amount of content.
Now right-click on the element that is causing the height issue and click on Inspect (this will work on most browsers) you can do this directly in the backend or if you prefer you can do it in the frontend as well.
Find the class name in the HTML and copy it, then select the parent container, here it is The Plus Blocks for Gutenberg Container block and go to Advanced > Plus Extra : Equal Height > Equal Height and turn on the toggle.
Then paste the class name with .(dot) in front in the Enter Unique Class field and then click on Apply Equal Height Button to see the changes.
Remember to update the page to save the changes as the Apply Equal Height Button is just for previewing the result on the backend.
You can learn more about this method from our video.
Real World Use Cases for WordPress Equal Height
Let’s understand the concept with a few more examples.
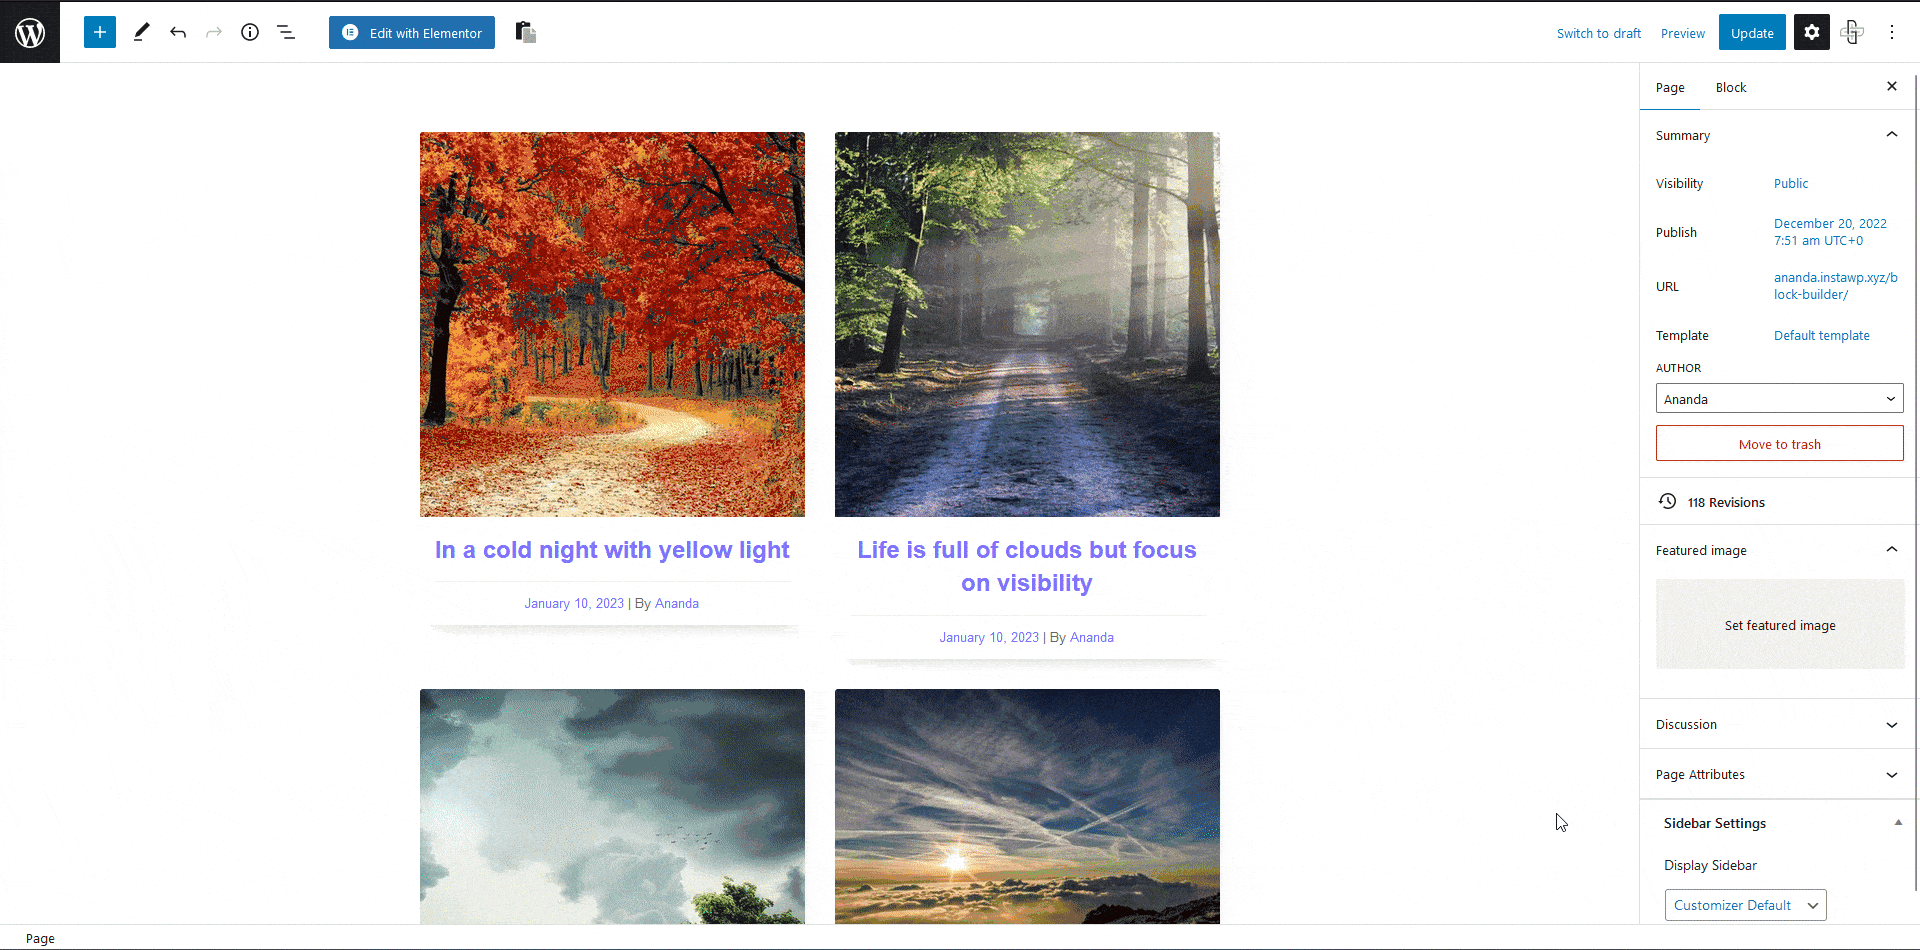
Fixing Equal Height for WordPress Blog Post Listing

In this example, we have 4 blog posts with 2 items in each row but the height of the blog post items is not equal, let’s fix this.
Note: We’ll be using the Inspect Element directly from the backend but you can do it from the frontend as well.
As we can see the issue is caused by the difference in the post title height so let’s right-click on it and click on Inspect.
Copy the class name, here it is tpgb-post-title.
Note: As you can see in the example you can have multiple classes in a div you can use multiple classes or anyone to target the element.
Since this is a single block that contains all the elements, select the Post Listing block and go to Advanced > Plus Extra : Equal Height > Equal Height and turn on the toggle.
Then paste the class name with .(dot) in front, like this .tpgb-post-title in the Enter Unique Class field and then click on Apply Equal Height Button to see the changes.
This will make all the post titles have the same height and in that process, all the post listings will be of the same height as well.
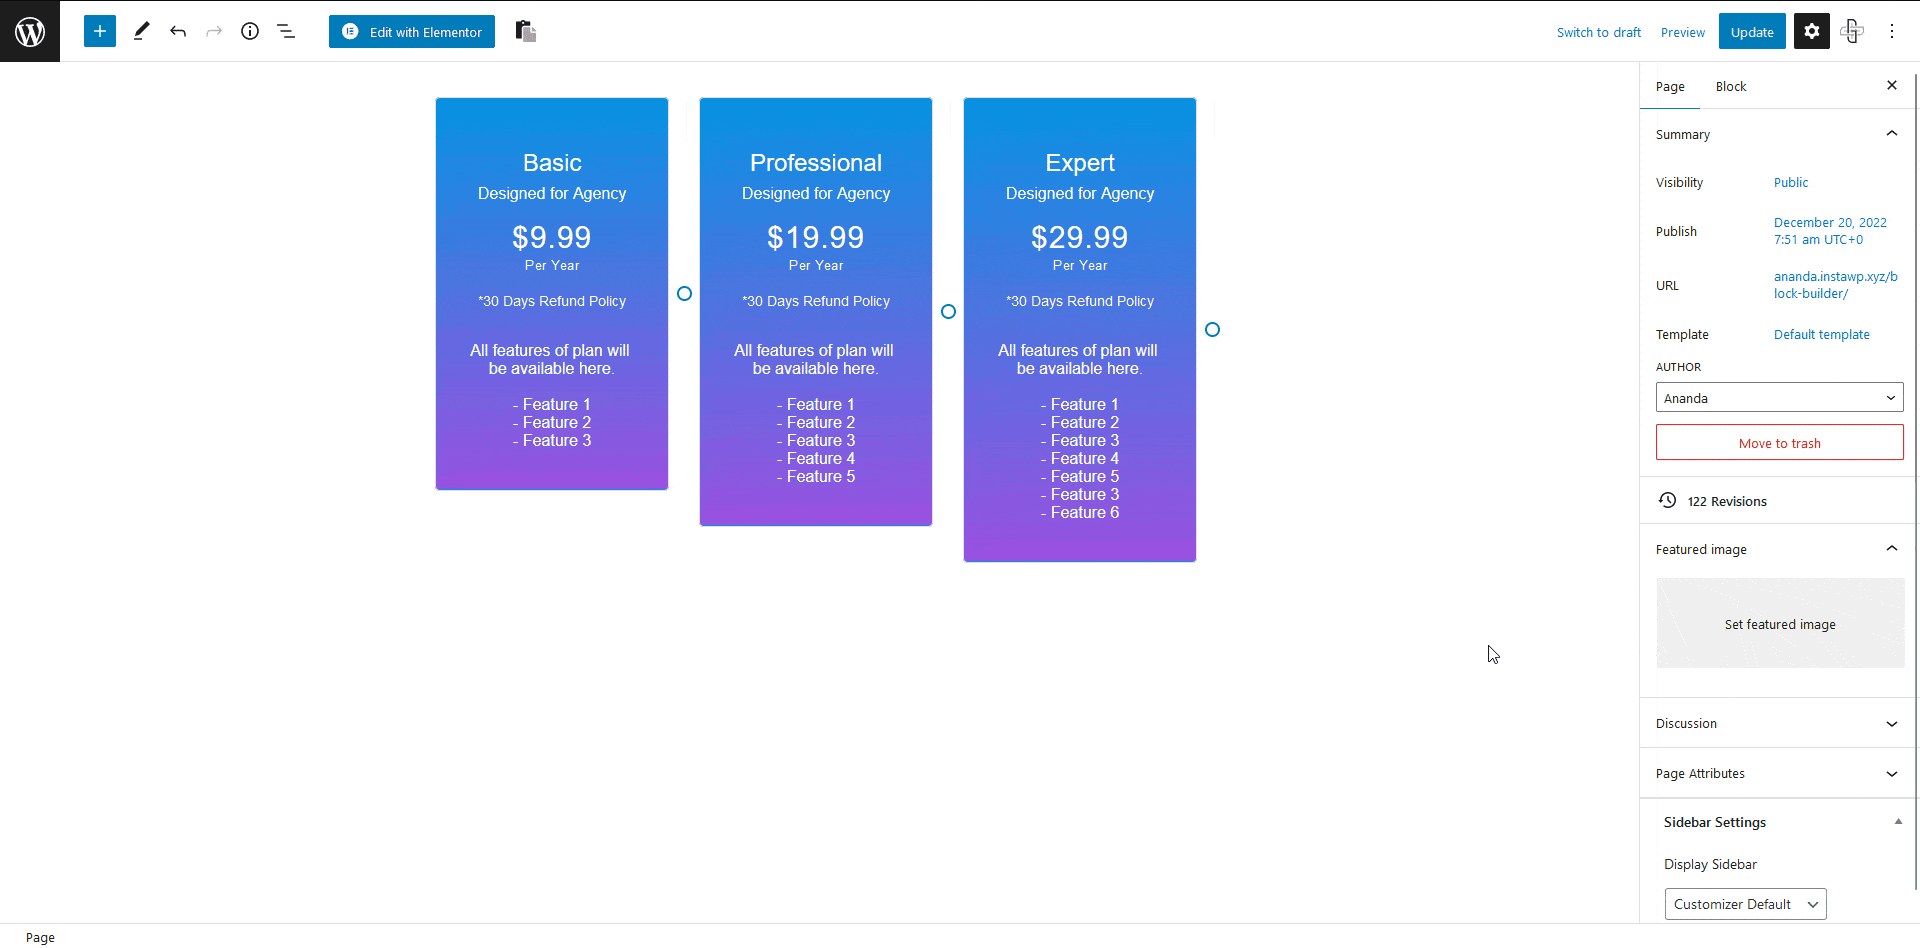
Fixing Equal Height for WordPress Pricing Table
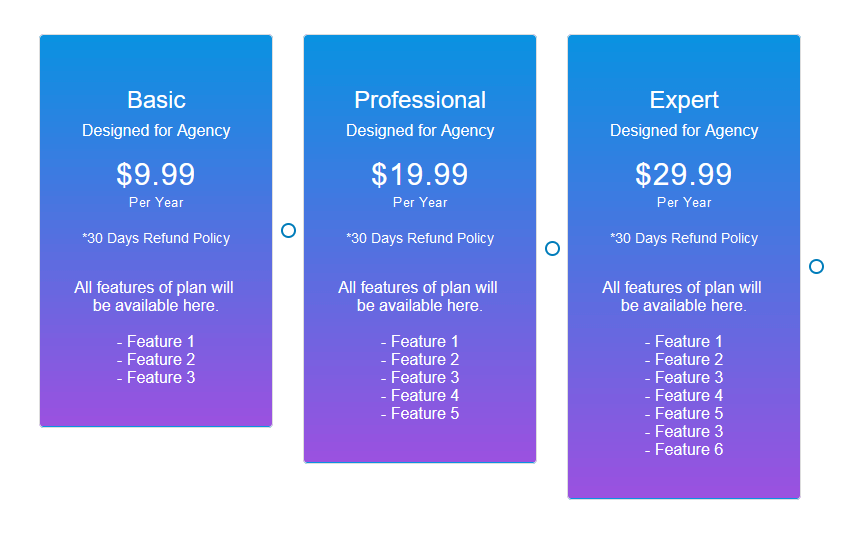
Here we have a pricing table with 3 different pricing plans and since they are offering different features in each plan they are not equal in height.
We’ll use The Plus Blocks for Gutenberg’s Equal Height feature to make all of them equal in height.
We can see the difference in features is causing the height issue so let’s right-click on it to open the Inspect Element and copy its parent container class name.
Here the class name is pricing-content-wrap.
Now since these are individual blocks placed inside the Container block we’ll select the main container and go to Advanced > Plus Extra : Equal Height > Equal Height and turn on the toggle.
Then paste the class name with .(dot) in front, like this .pricing-content-wrap in the Enter Unique Class field and then click on Apply Equal Height Button to see the changes.
How to Target Mulitple CSS Class for Equal Height in WordPress (Gutenberg)

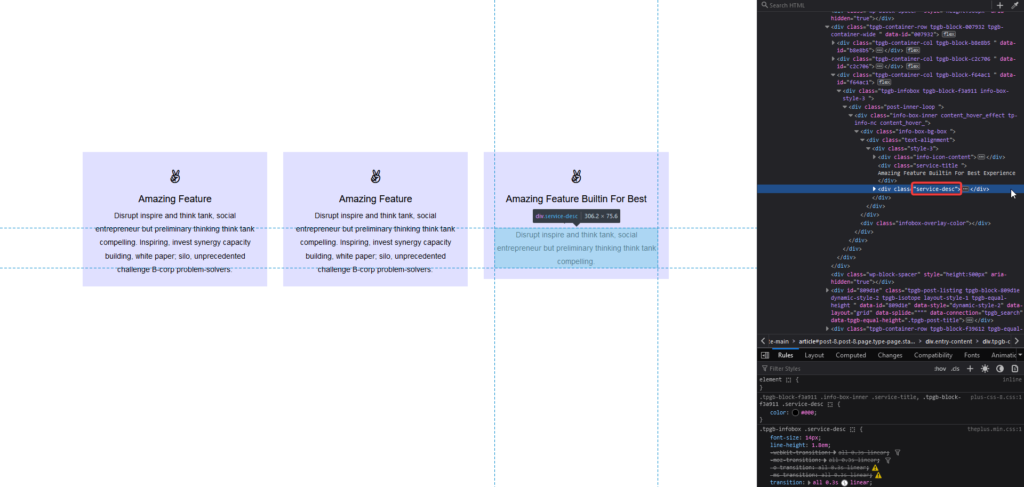
In this example, we have 3 infobox blocks with uneven height but it is a bit unique. As we can see the difference in height is not caused by just one element here both titles and descriptions are causing the height issue.
To match the background height we can simply make the containers equal in height but instead to maintain uniformity in the design we should make all the titles equal in height and descriptions as well.
So we have to target multiple elements here and with The Plus Blocks for Gutenberg’s Equal Height option, you can easily target multiple elements by using multiple classes.
Let’s go to the frontend and right-click on the description first to open the Inspect Element and copy the class name service-desc.
Then go back to the WordPress editor and select the main container and go to Advanced > Plus Extra : Equal Height > Equal Height and turn on the toggle.
Then paste the class name with .(dot) in front, like this .service-desc in the Enter Unique Class field.
Now we have to target the title as well, from the frontend inspect the class name of the title i.e. service-title.
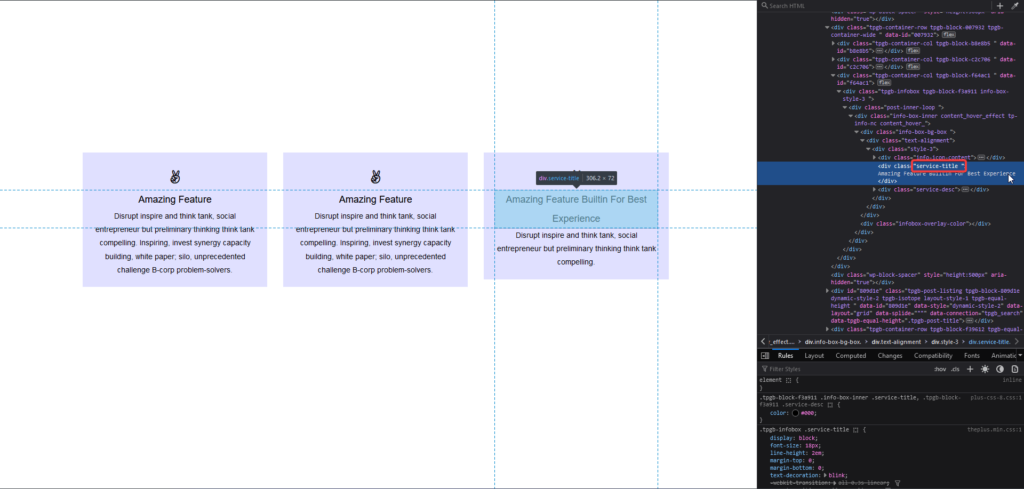
Go back to the editor and now to add the second class in the Enter Unique Class field, put a ,(comma) after the first class name and then paste the second class name with .(dot) in front without any space like this .service-desc,.service-title in case of our example.
Then click on Apply Equal Height Button and you’ll see all the infoboxes are of equal height with titles and descriptions properly aligned.
Frequently Asked Questions
Is this Equal Height option responsive?
Yes, The Plus Blocks for Gutenberg’s Equal Height option is fully responsive as it dynamically calculates the height of the element.
How to make columns equal height in WordPress?
With the help of The Plus Blocks for Gutenberg’s Equal Height option you can easily make columns equal height in WordPress using a CSS class.
How to add multiple classes in the Equal Height option?
The Equal Height feature of The Plus Blocks for Gutenberg allows you to target multiple elements by adding multiple classes, to add multiple classes in the Enter Unique Class field, you have to put a ,(comma) after the first class name and then paste the second class name with .(dot) in front without any space like this .service-desc,.service-title. This way you can add multiple classes.