Skip to content
theplus logo smallTPAG Black Logo

  • Blocks
    • Login Signup Latest
    • Dark Mode
    • Audio Player
    • Coupon Code
    • Preloader
    • Data Table Popular
    • Table of Contents
    • Video Player
    • Social Sharing
    • Advanced Typography
    • Scroll Sequence
    • Dynamic Device
    • Google & Facebook Review
    • Row Background Unique
    • Form Styler
    • Social Feeds
    • Social Embed
    • Accordions Unique
    • Switcher
    • Tabs & Tours Unique
    • Advance Chart
    • Custom Cursor
    • Carousel Anything Popular
    • View all 85+ Blocks
    Ready to get started?
    Download Now
    View all 85+ Blocks
    Questions? Ask Now
  • Listing
    • Blog Posts
    • WooCommerce Products
    • Custom Loop Skins Powerful
    • Ajax Search Bar
    • Testimonials Unique
    • Team Members
    • Image Gallery
    • Video Gallery
    • View All Listings
    Ready to get started?
    Download Now
  • Builder
    • Blog Builder
    • WooCommerce Builder Coming Soon
    • Header Builder Unique
    • Mega Menu Builder Popular
    • Popup Builder
    Ready to get started?
    Download Now
  • Extras
    • White Label
    • Equal Height
    • Global Typography & Colors
    • Cross Domain Copy Paste
    • Magic Scroll Animations Unique
    • Grid Design Tool
    • Floating Effects
    • Mouse Hover Parallax
    • Sticky Column
    • Advanced Display Condition
    • On Scroll Animations
    • Global Tooltips
    • Shape Divider
    • Dynamic Content
    • Advanced Border Radius
    • Global Tilt 3D Effect
    • View All Extensions
    Ready to get started?
    Download Now
    View all 85+ Blocks
    Questions? Ask Now
  • Design
    • 18+ Page Templates
    • Sliders Unique
    • UI Blocks
    • Hero Sections
    • Carousel Active Background
    • Main Content
    • Creative Content
    • Features Content
    • Wdesignkit Coming Soon
    • View All Designs
    Ready to get started?
    Download Now
  • Resources
    • Integrations
    • Whats New? Recently Updated
    • Feature Request
    • Blog Helpful
    • Join Affiliate Start Earning
    Ready to get started?
    Download Now
  • Support
    • Facebook Community
    • Video Tutorials Weekly Videos
    • Helpdesk Technical Support
    • Documentations
    • Live Chat PreSale Support
    Ready to get started?
    Download Now
  • Pricing
Home
Blocks
Listing
Builder
Extras
Design
Docs
Support
Changelog
Get Pro Now
60 Days Money-Back Guarantee

Download Now
Account

How to add Google login to a WordPress website?

Updated on March 4, 2023

Home » Documents » Plus Blocks » Login & Signup » How to add Google login to a WordPress website?

Table of Contents

With WordPress powering a growing number of websites on the internet, it’s no surprise that it is one of the most popular content management systems in use. To make it easier for users to access your website, offering a wide range of login methods is important. One of the most popular methods is to add a Google login option to your WordPress website. This allows users to log in using their existing Google account, reducing the need to create yet another username and password combination.

With the Login & Signup block from The Plus Addons for Block Editor, you can easily add a Google login option to your login or registration form.

To check the complete feature overview documentation of The Plus Addons for Block Editor Login & Signup block, click here.

Requirement  – This widget is a part of The Plus Addons for Block Editor, make sure its installed & activated to enjoy all its powers.

LIVE BLOCK LINK

First, you have to generate your Google Client ID.

Generate Google Client ID

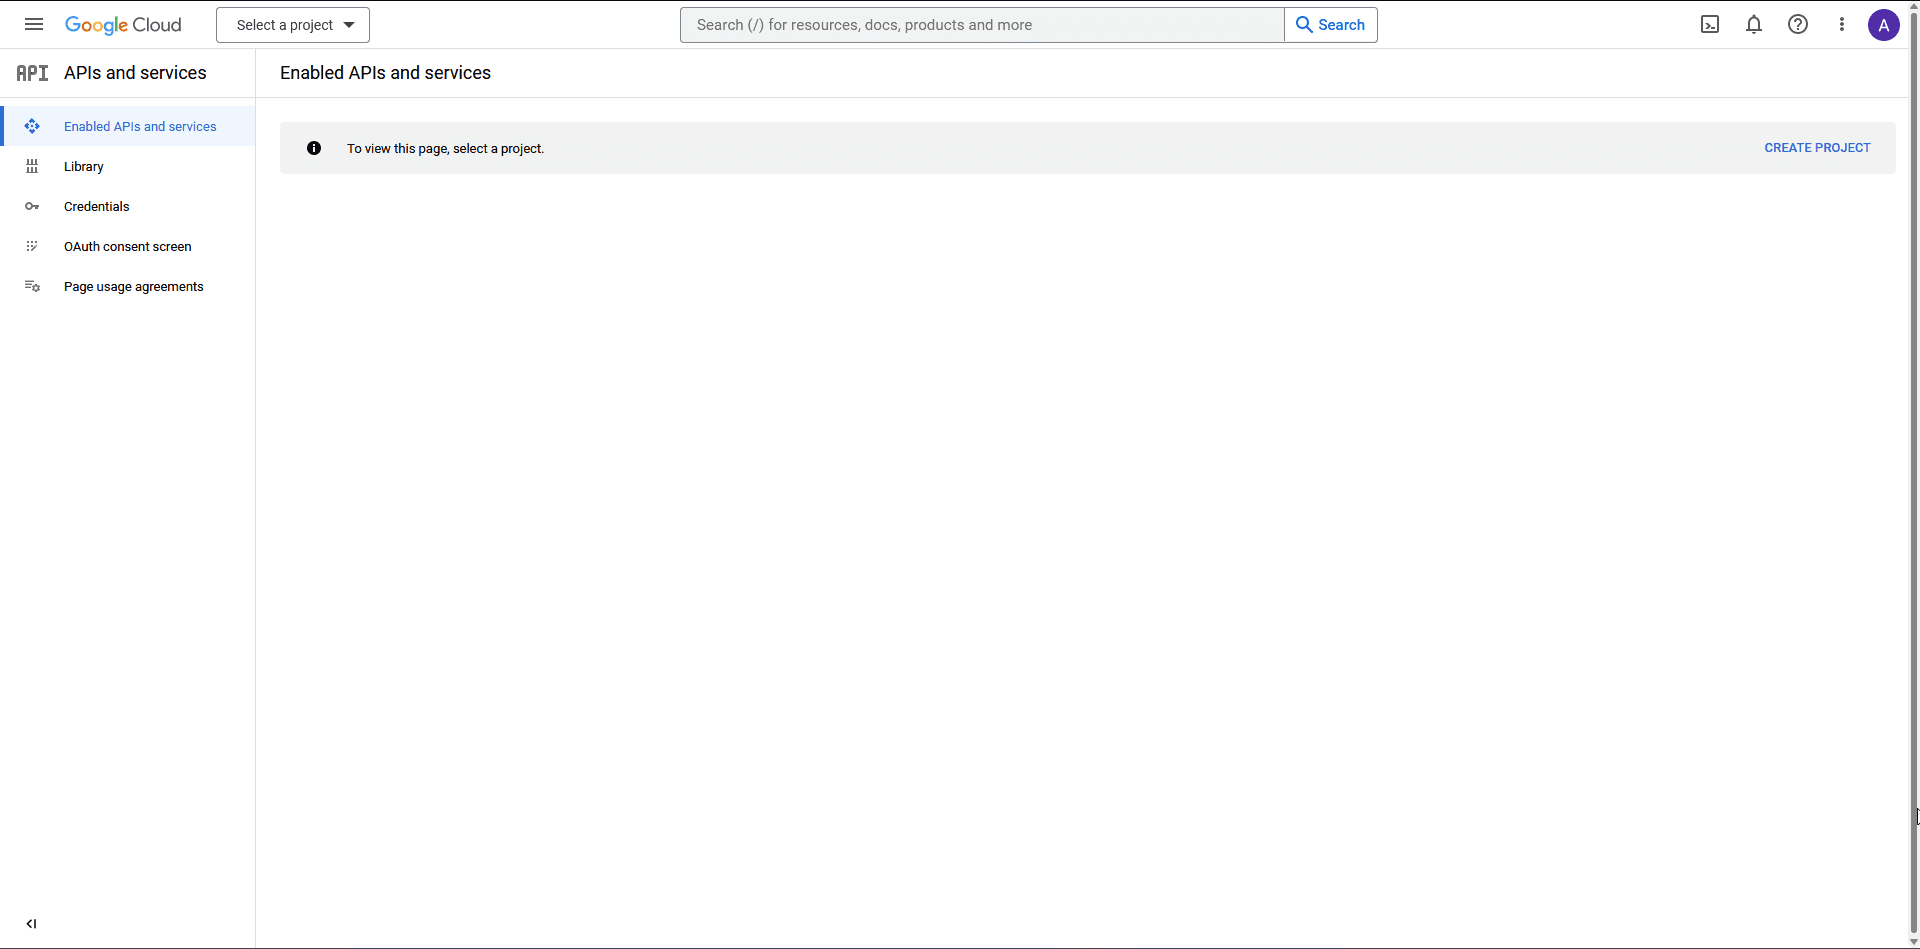
1. For this, you have to login to your Google account and go to the Google Developers Console.

2. If you don’t have any project created, then click on CREATE PROJECT link.

google client id 1

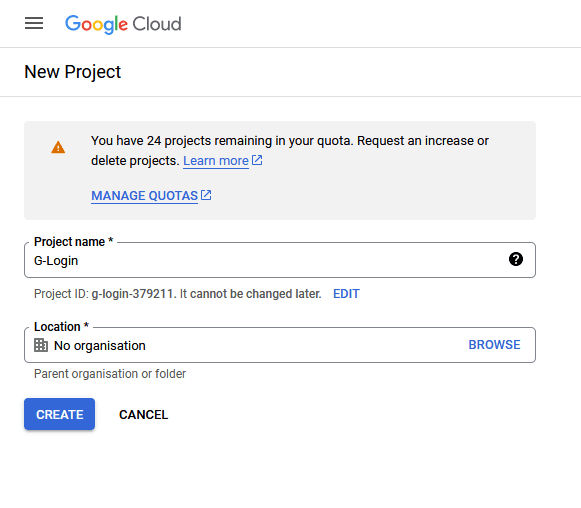
3. On the next screen, add your Project name and click the CREATE button.

google client id 2

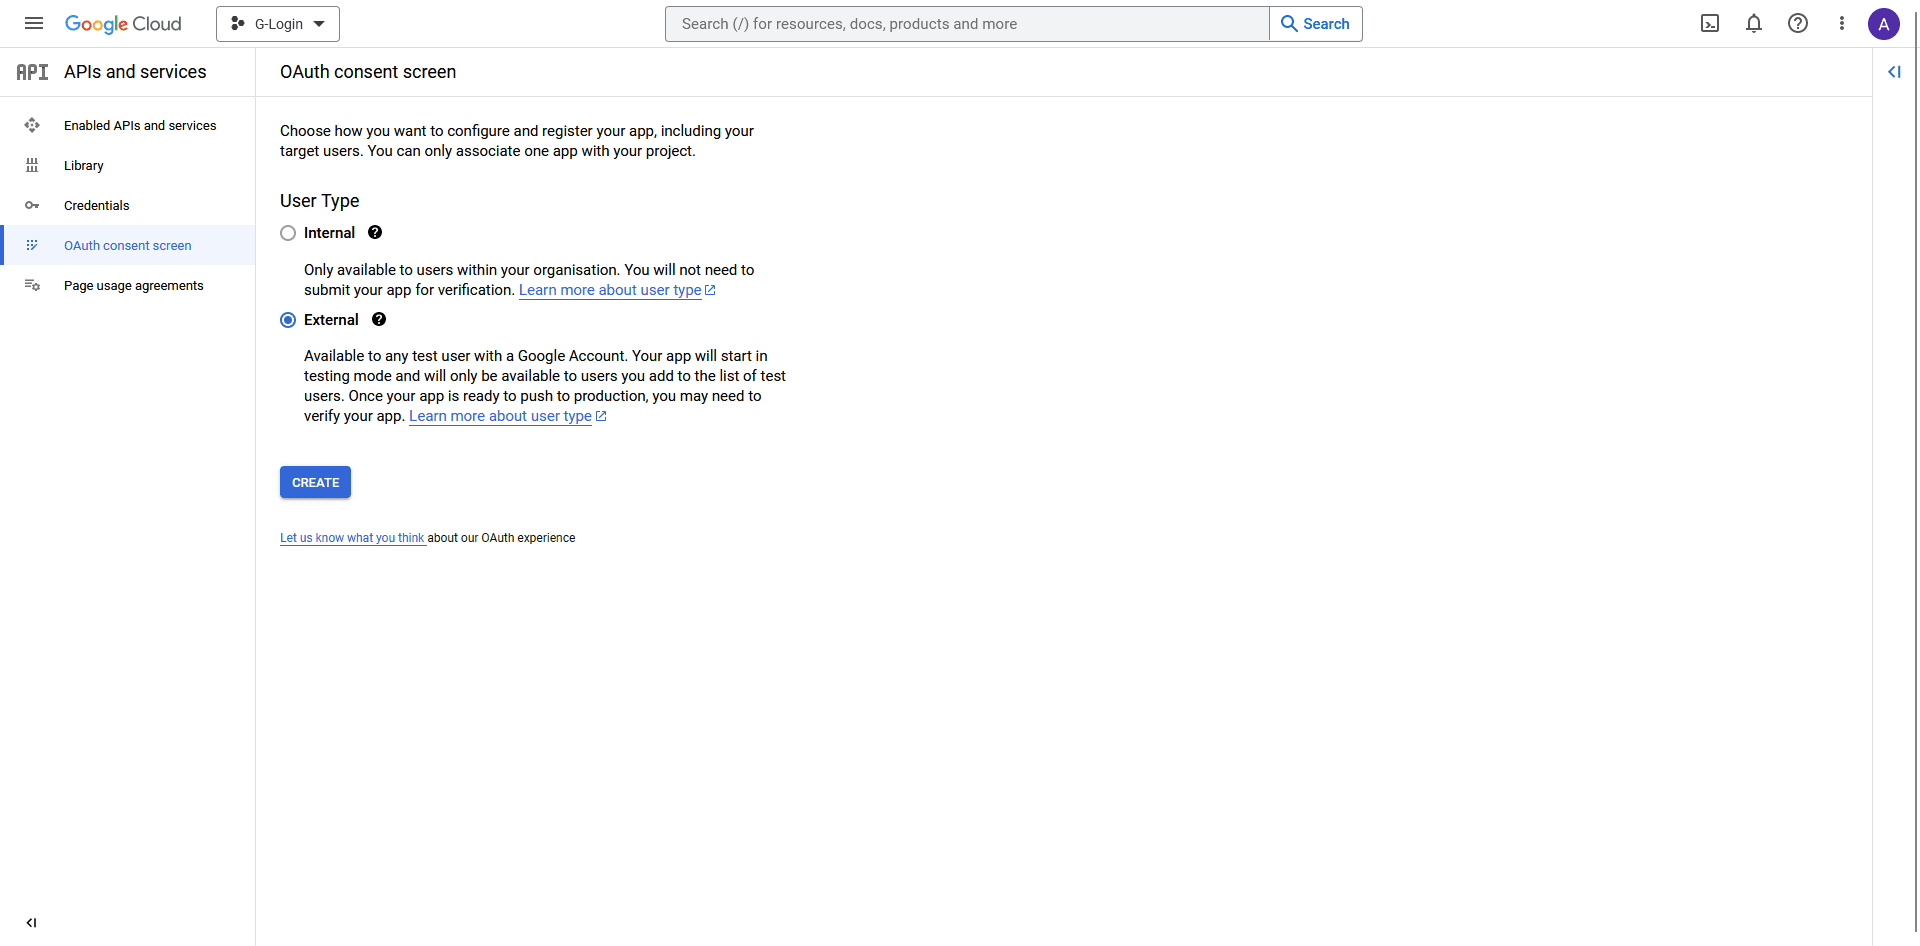
4. Then click on the OAuth consent screen on the left sidebar.

google client id 3

5. On that page, select the User Type and click the CREATE button.

  • Internal – Only available to users within your organisation.
  • External – Available to any user with a Google Account.

google client id 4

6. On the next page, add your app information. App name, User support email and Developer contact information fields are mandatory rest are optional until you deploy your app.

Then click on the SAVE AND CONTINUE button. 

google client id 5

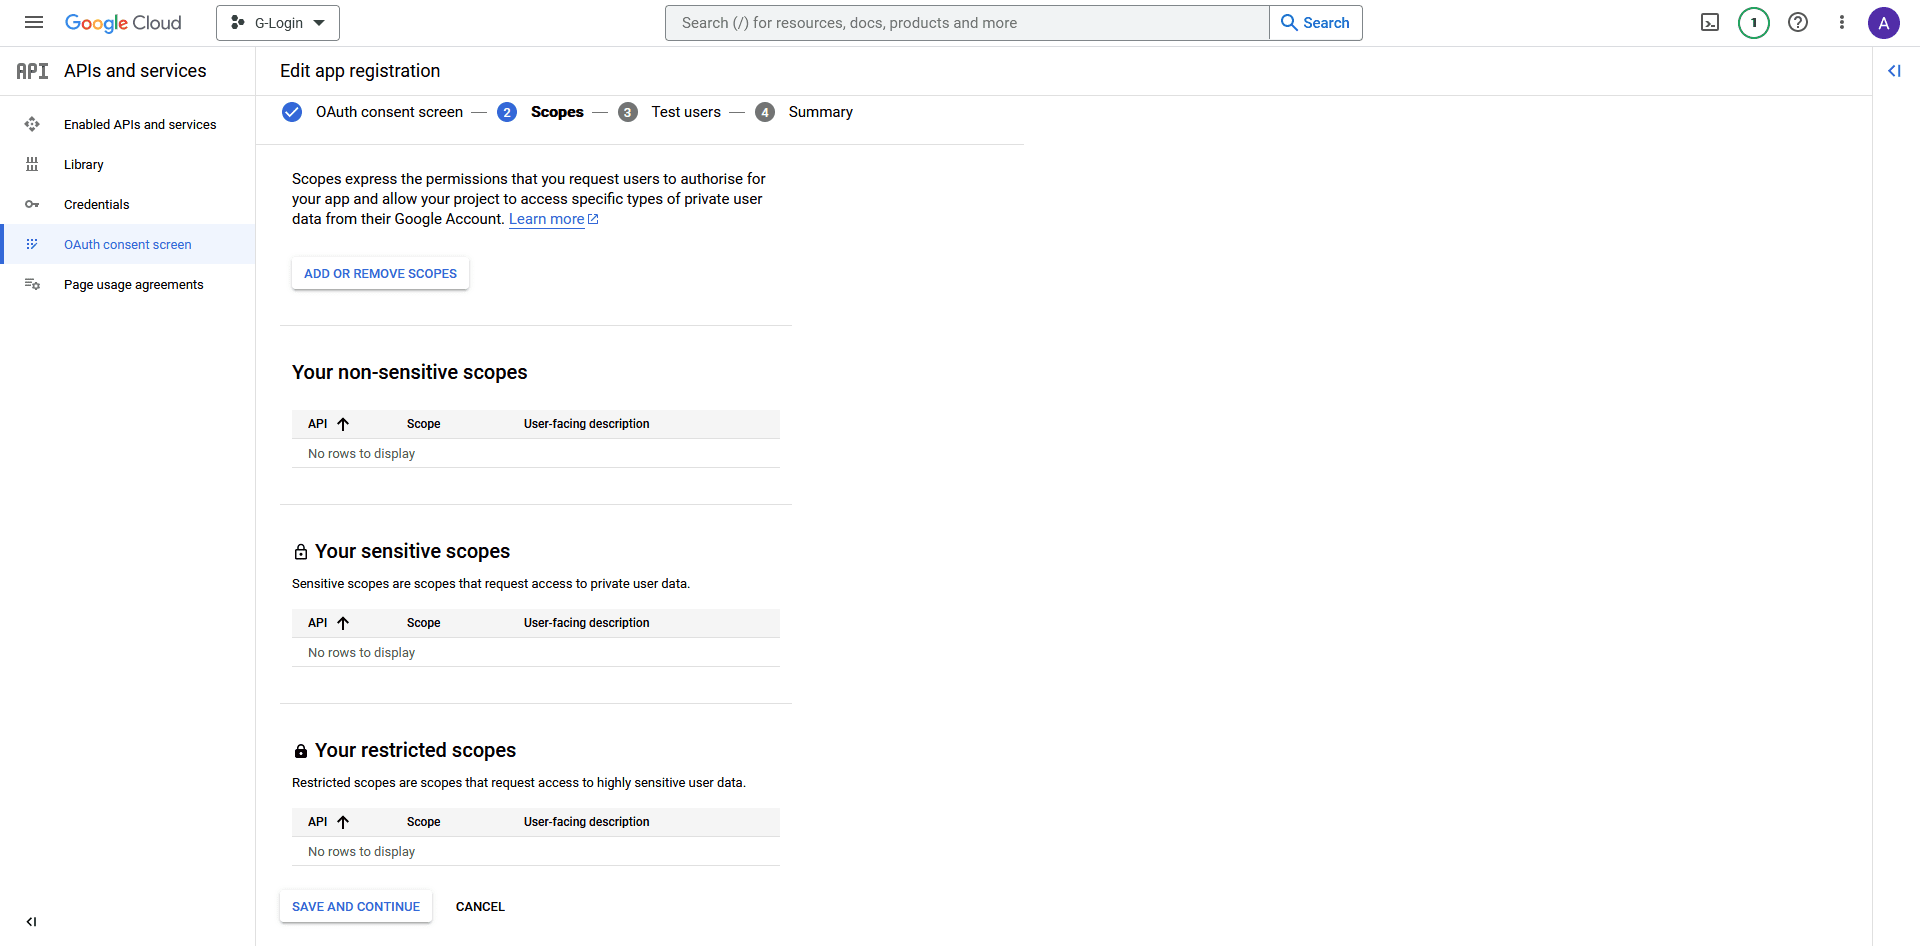
7. On the Scopes page, click the SAVE AND CONTINUE button.

google client id 6

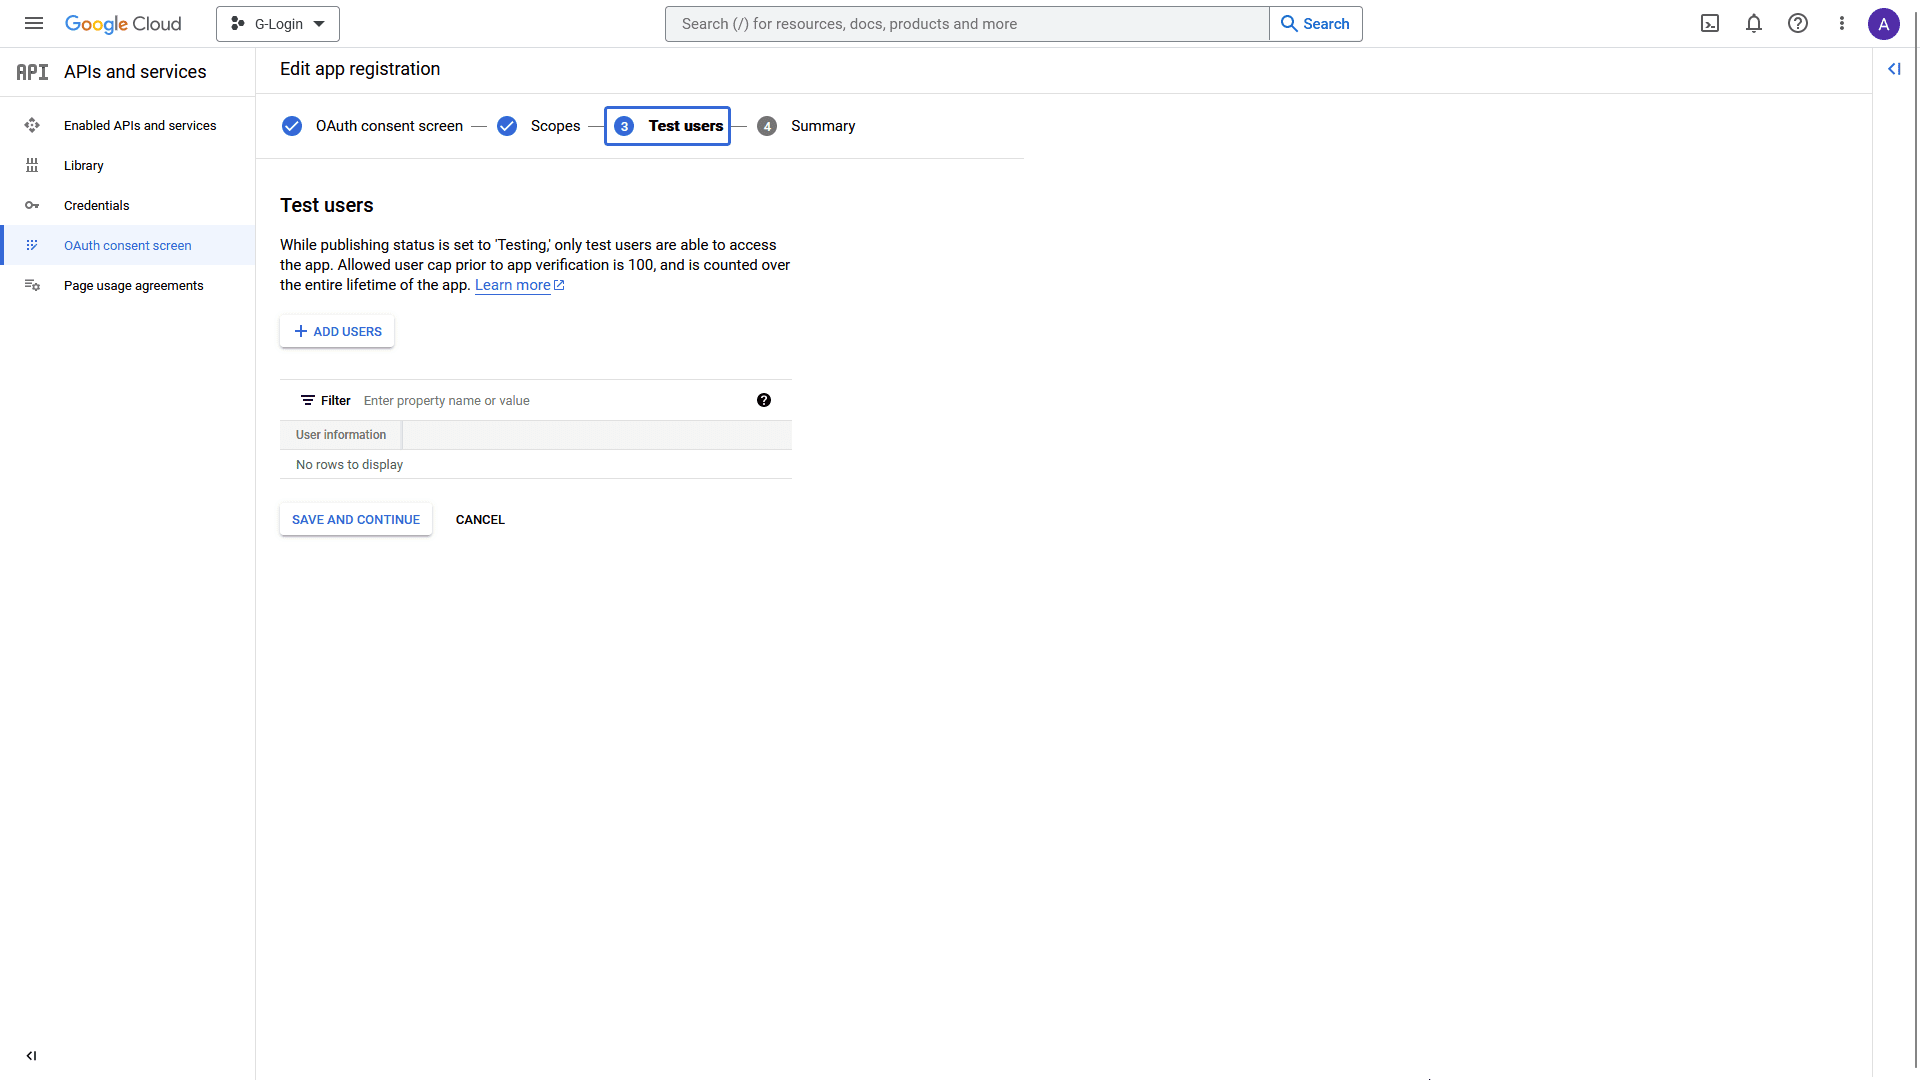
8. Also, on the Test users page, click the SAVE AND CONTINUE button.

google client id 7

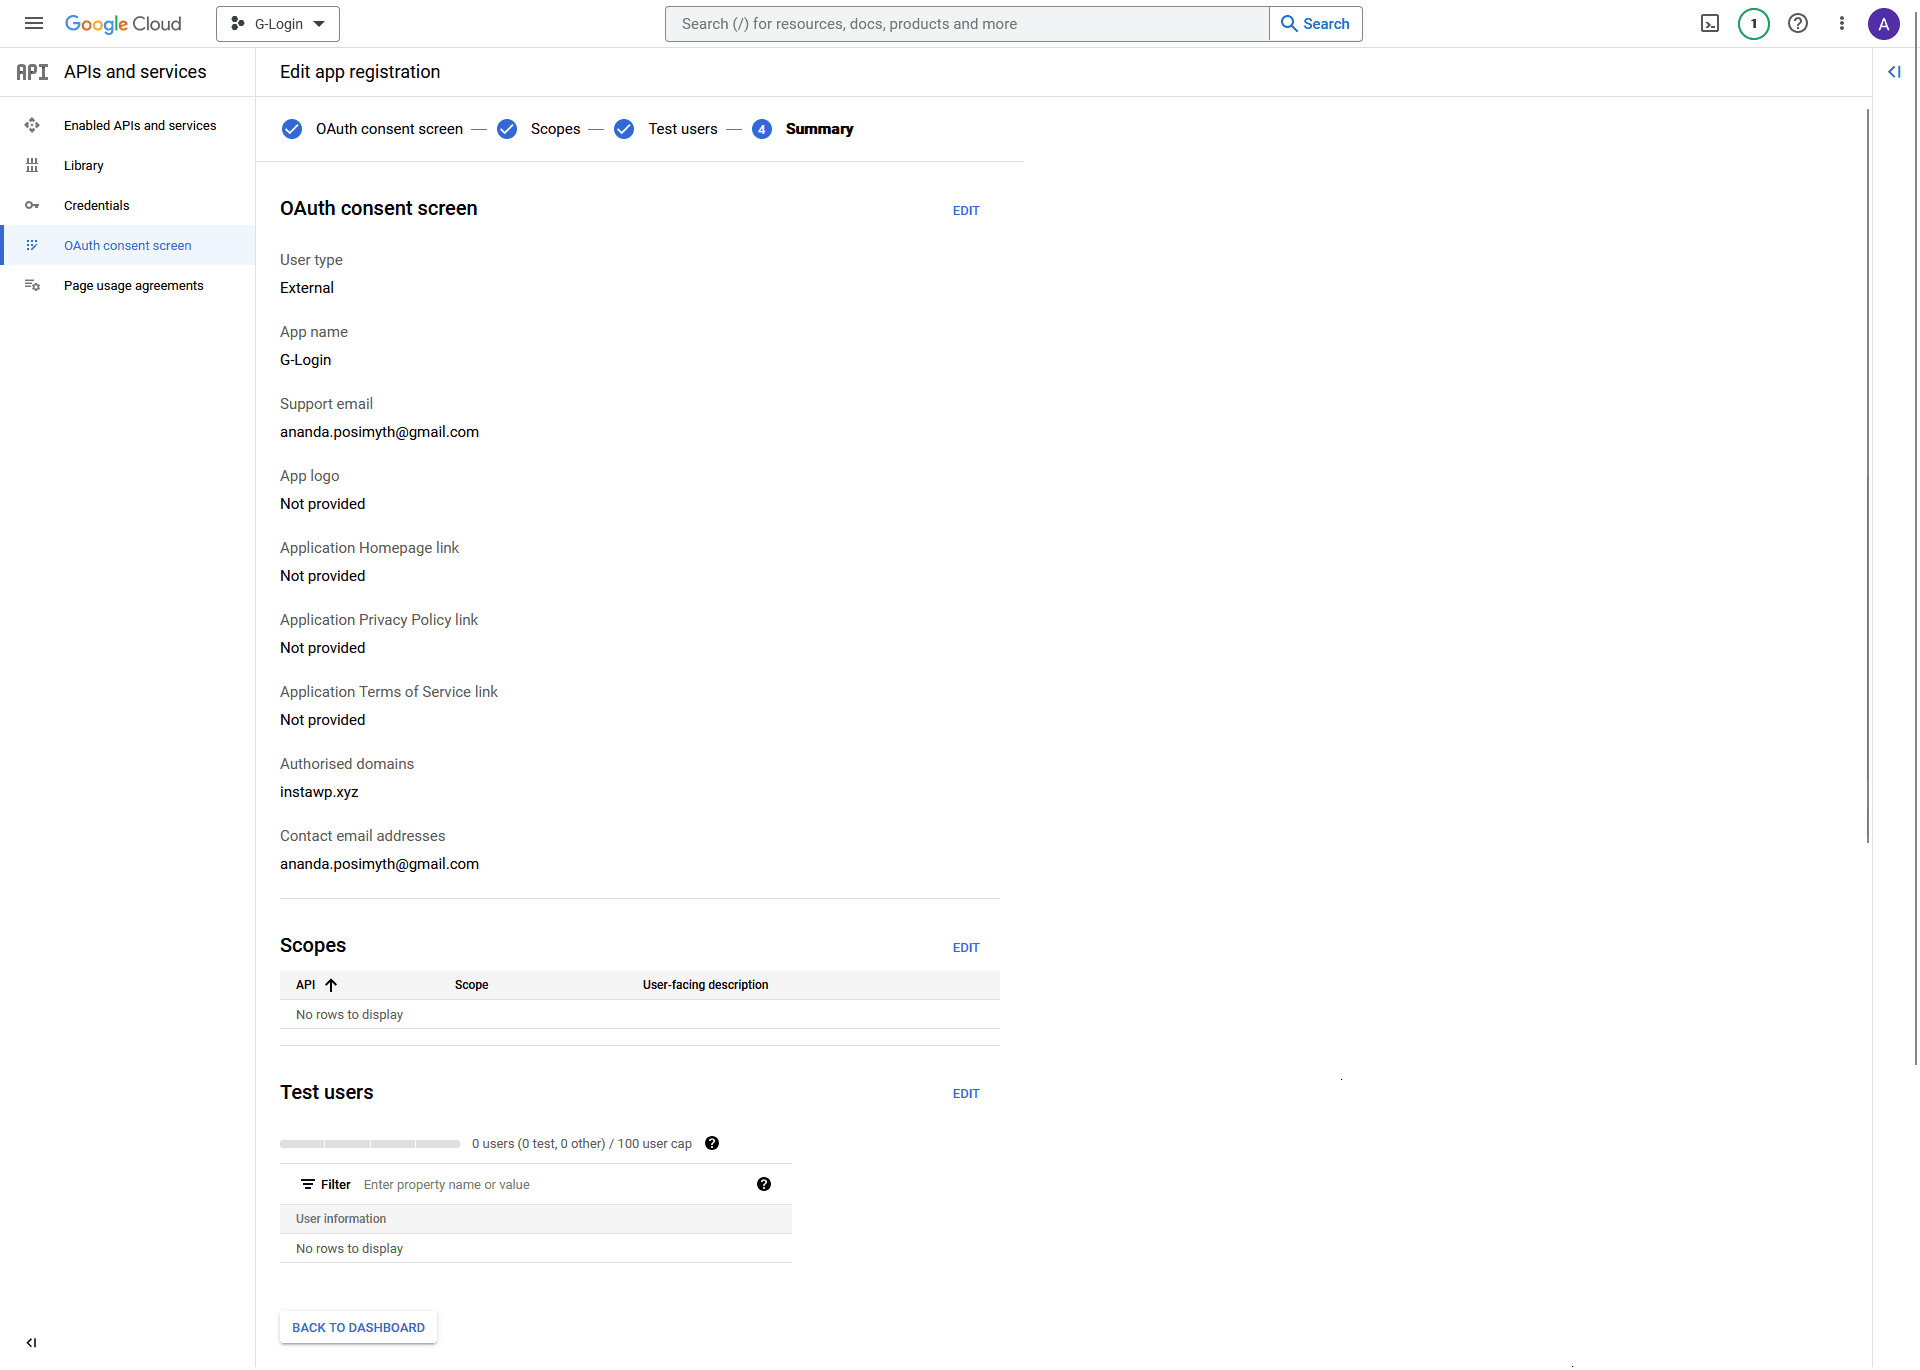
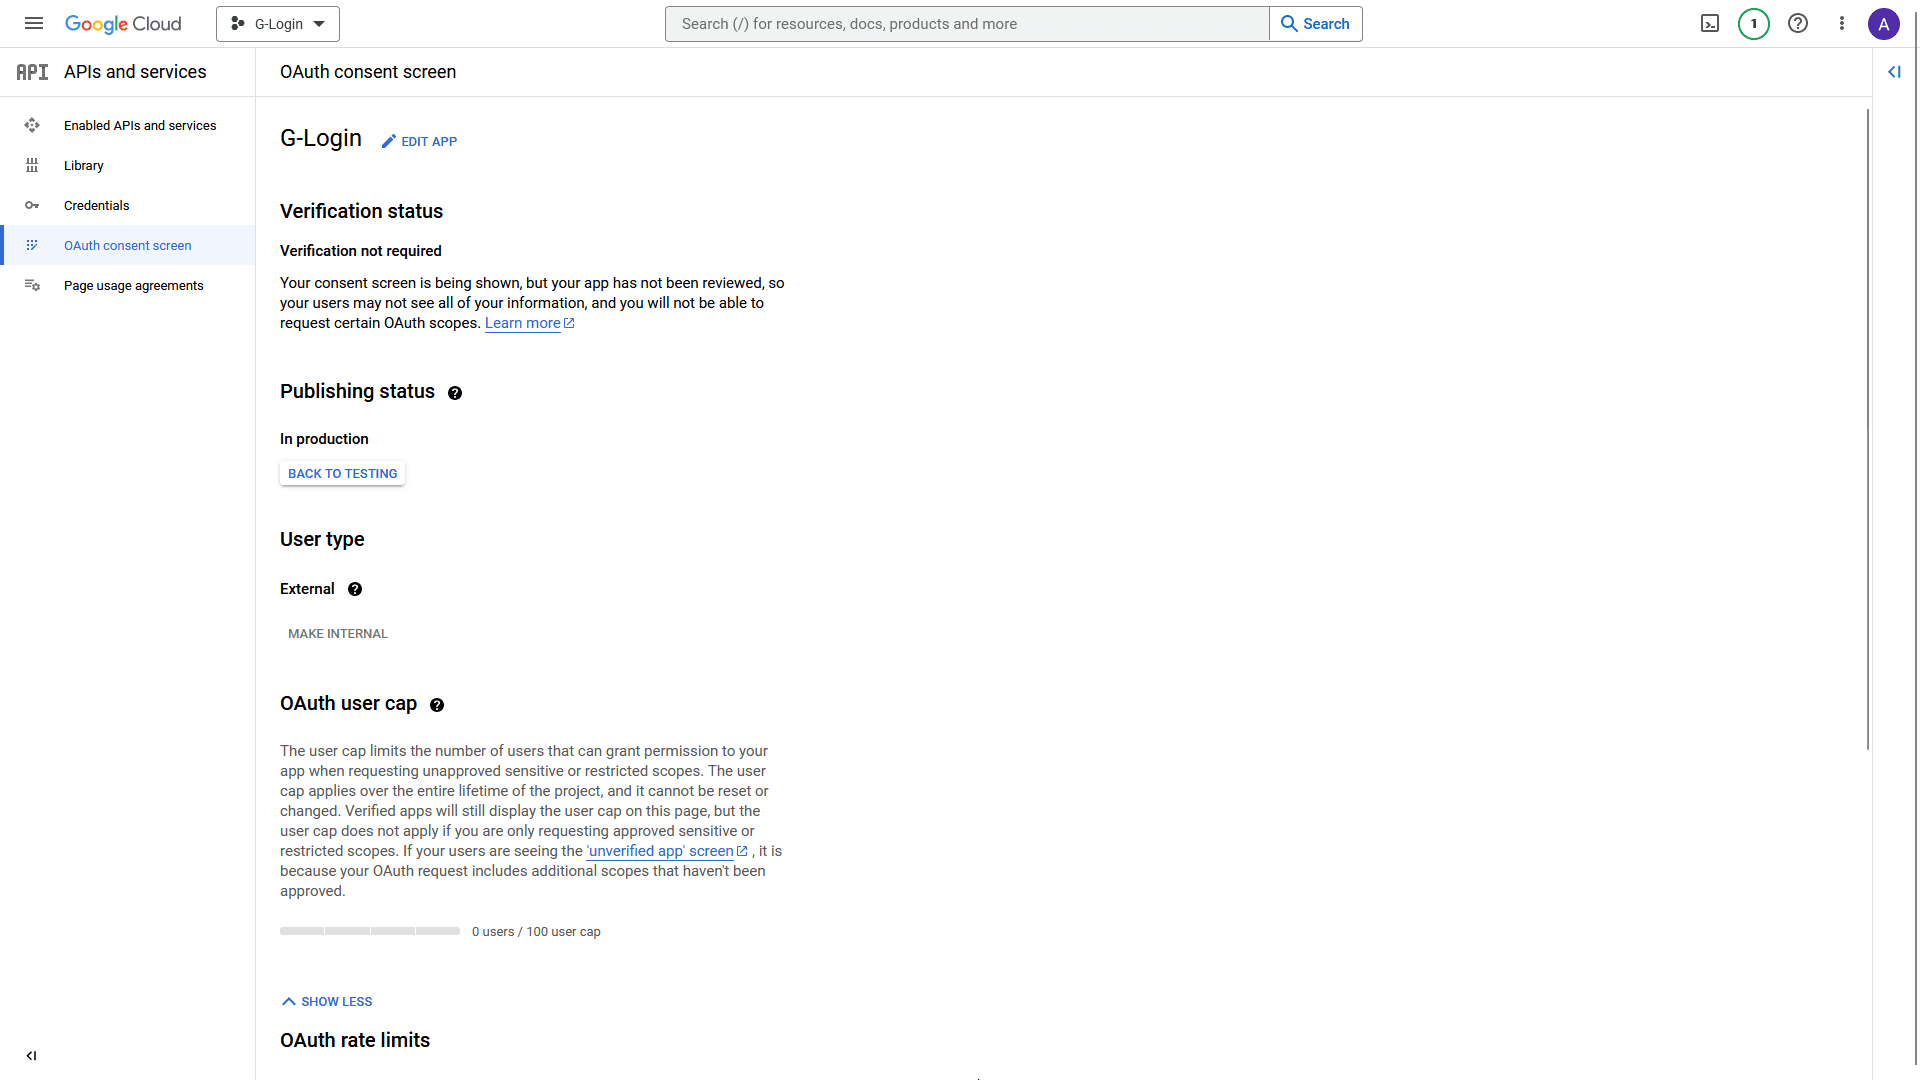
9. On the Summary page, click the BACK TO DASHBOARD button at the bottom.

google client id 8

10. On the next page, click on the PUBLISH APP button to publish your app.

google client id 9

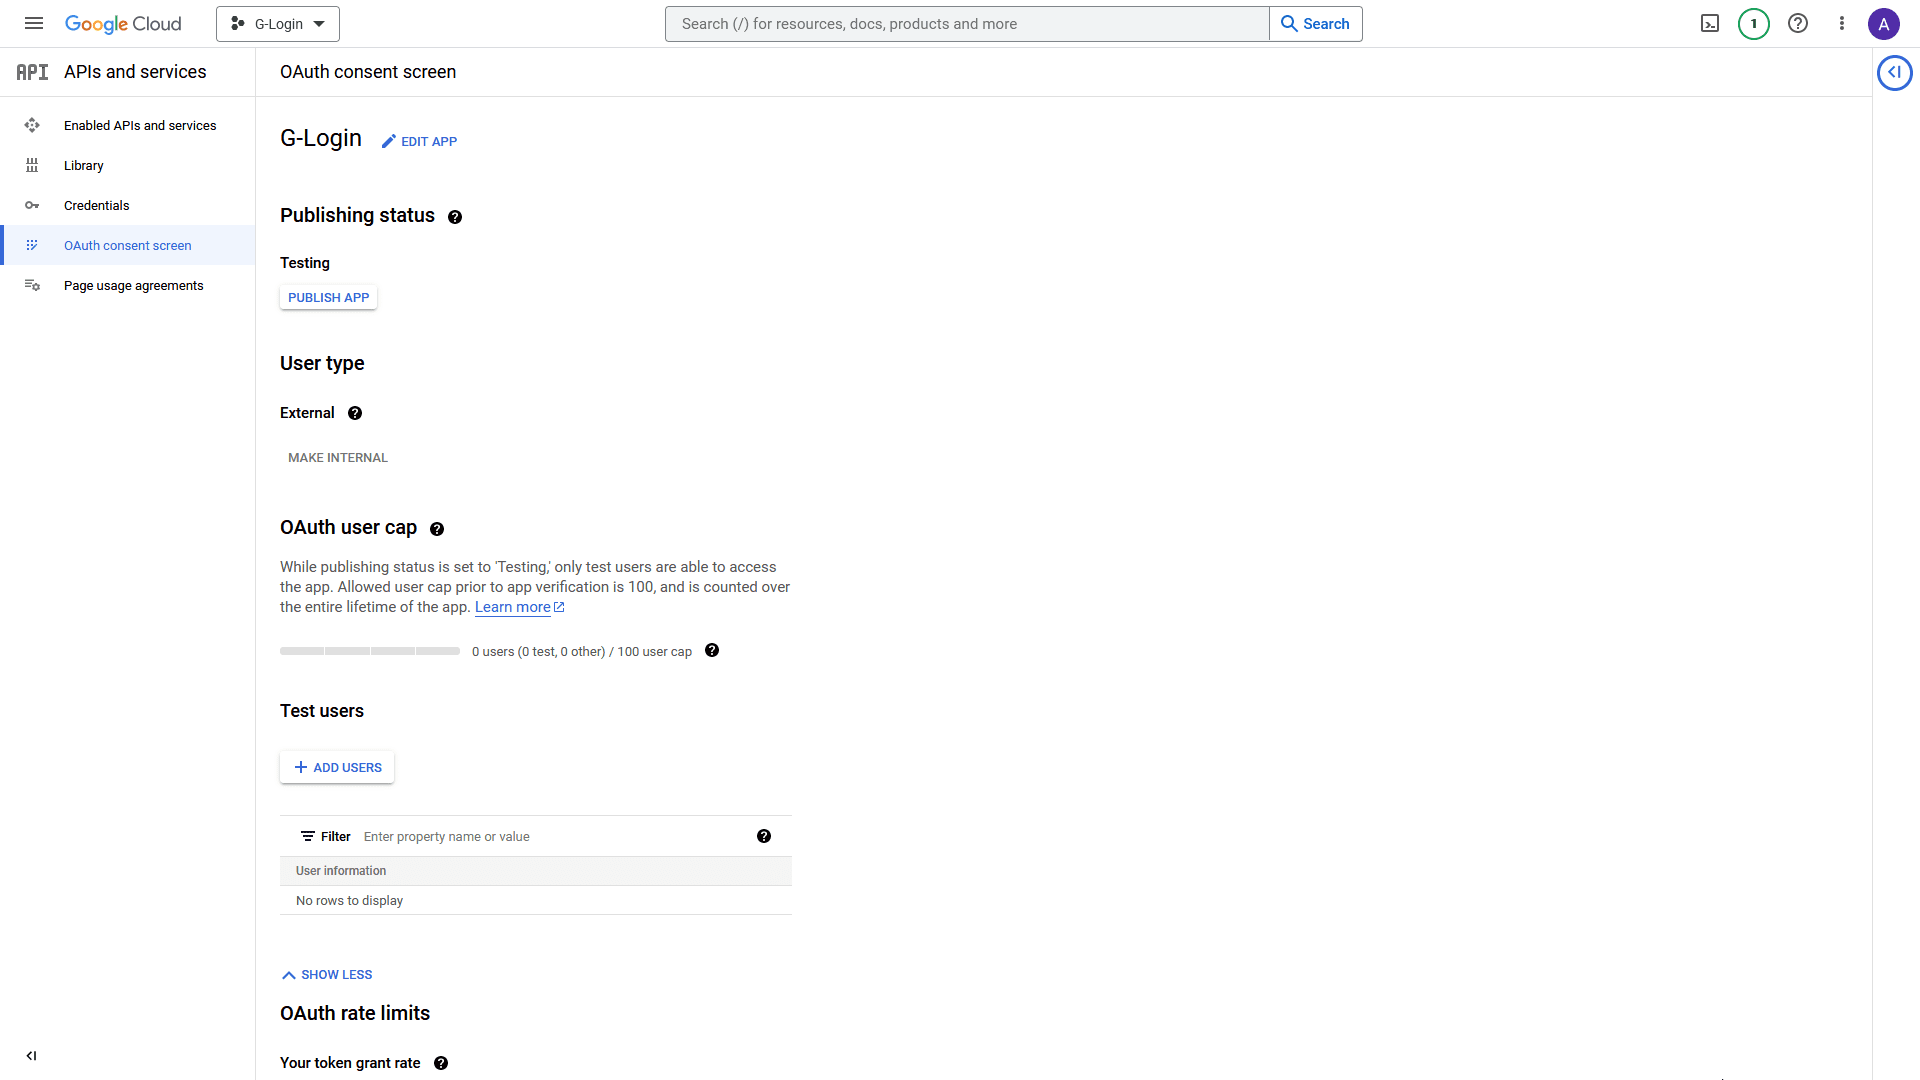
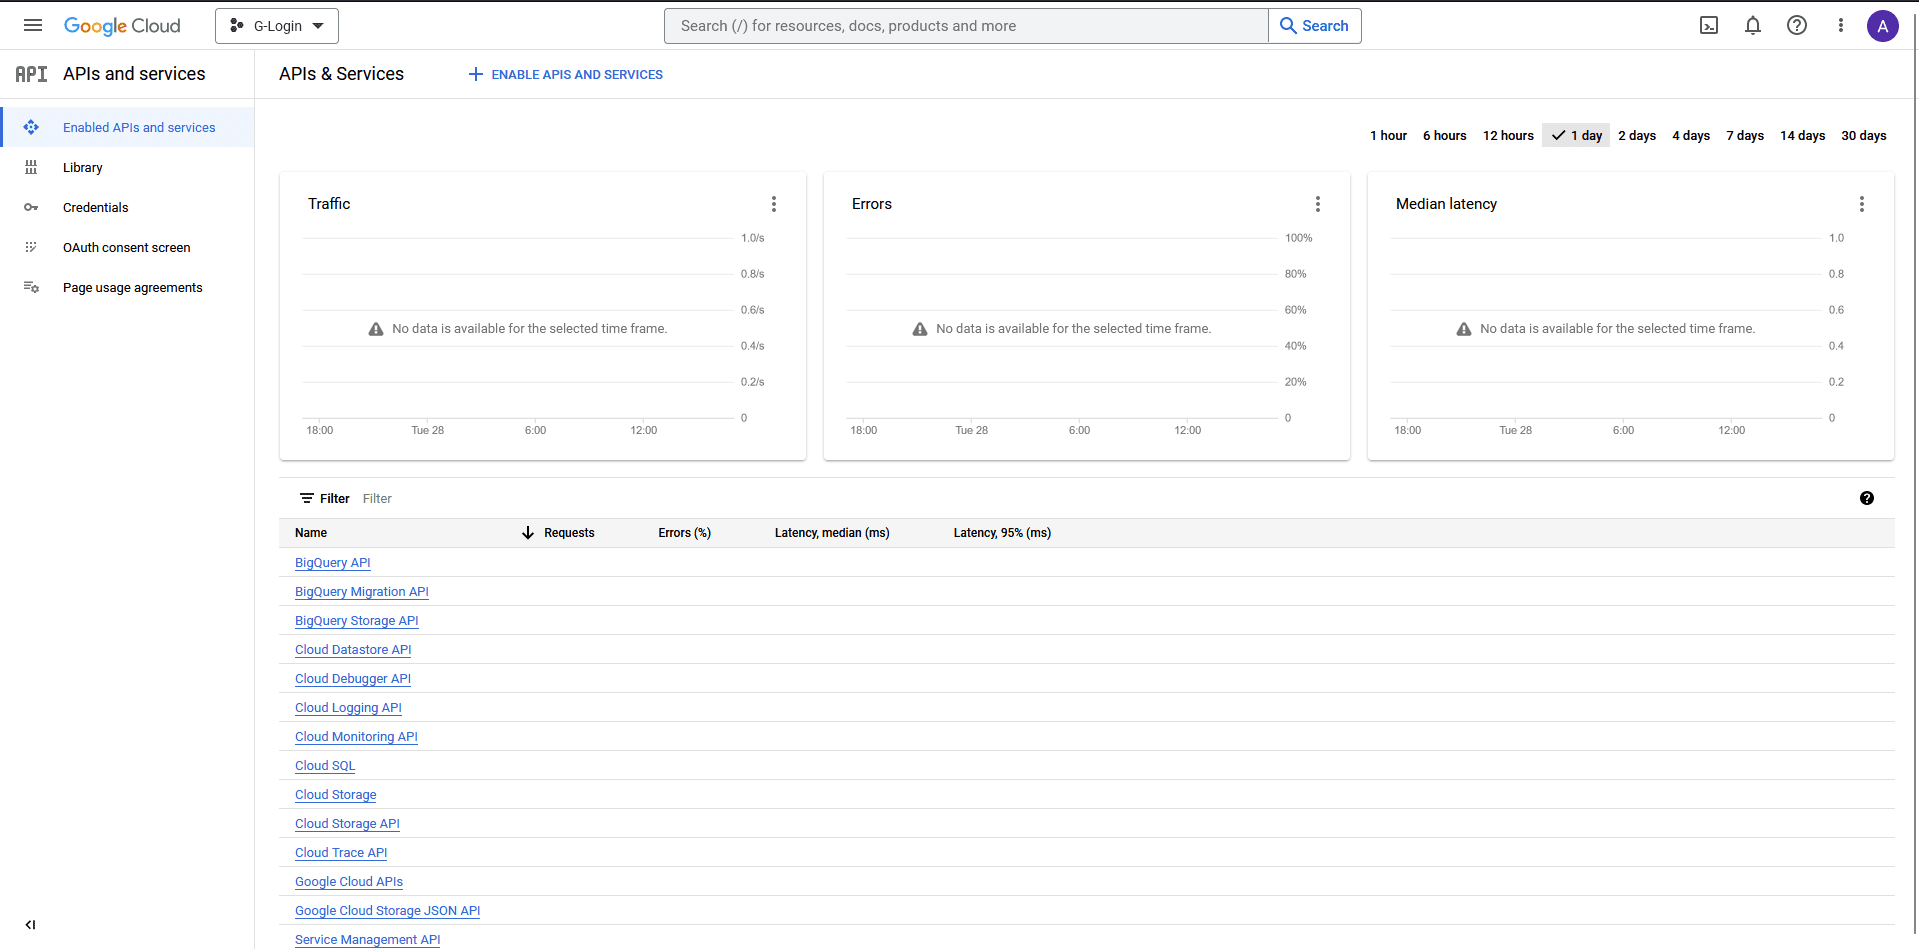
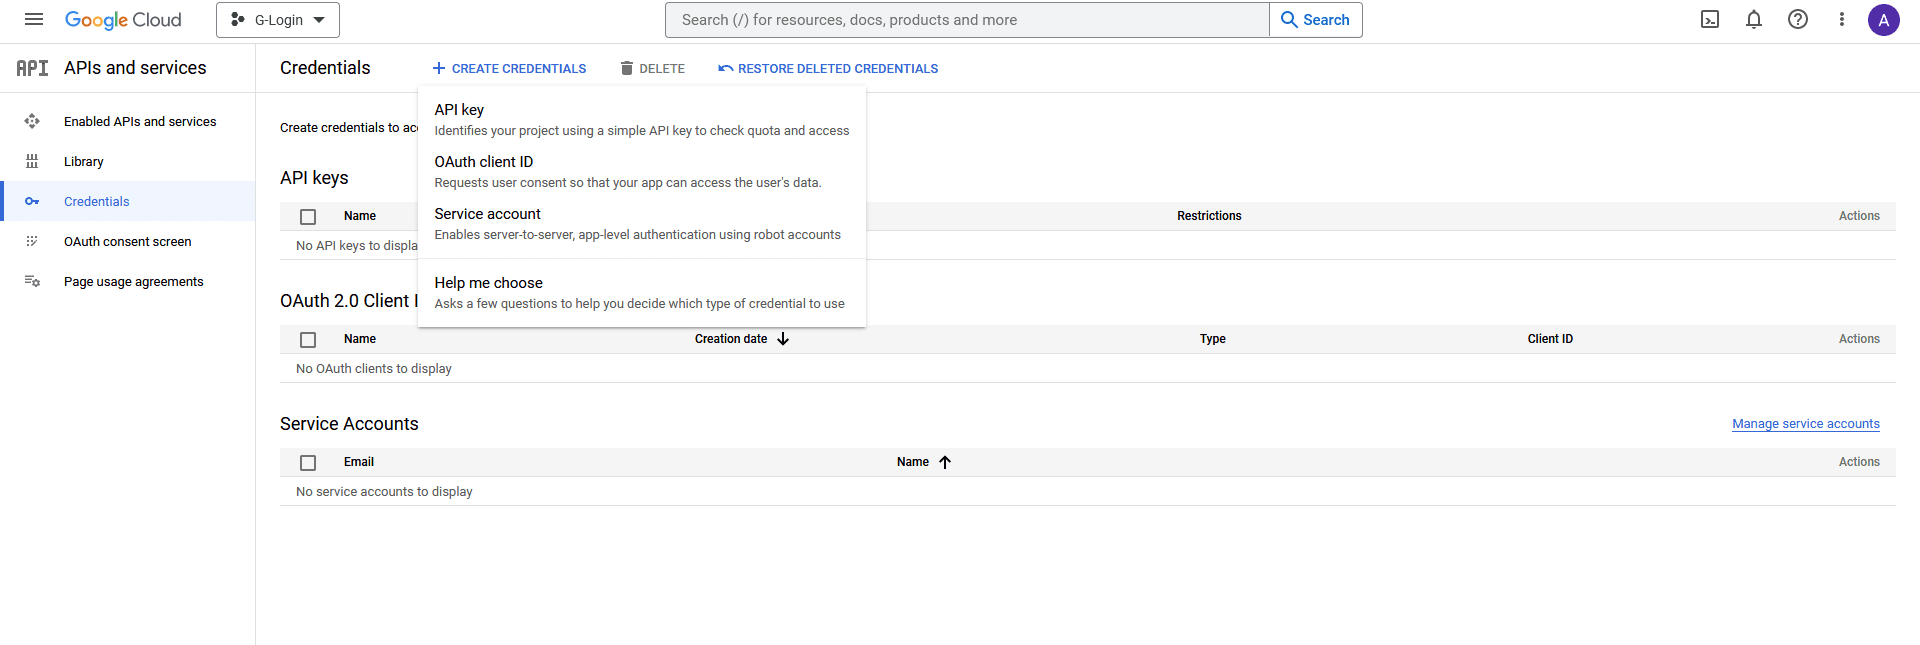
11. Once done, click on Credentials in the left sidebar.

google client id 10

10. On the Credentials page, from the top, click on + CREATE CREDENTIALS > OAuth client ID.

google client id 11

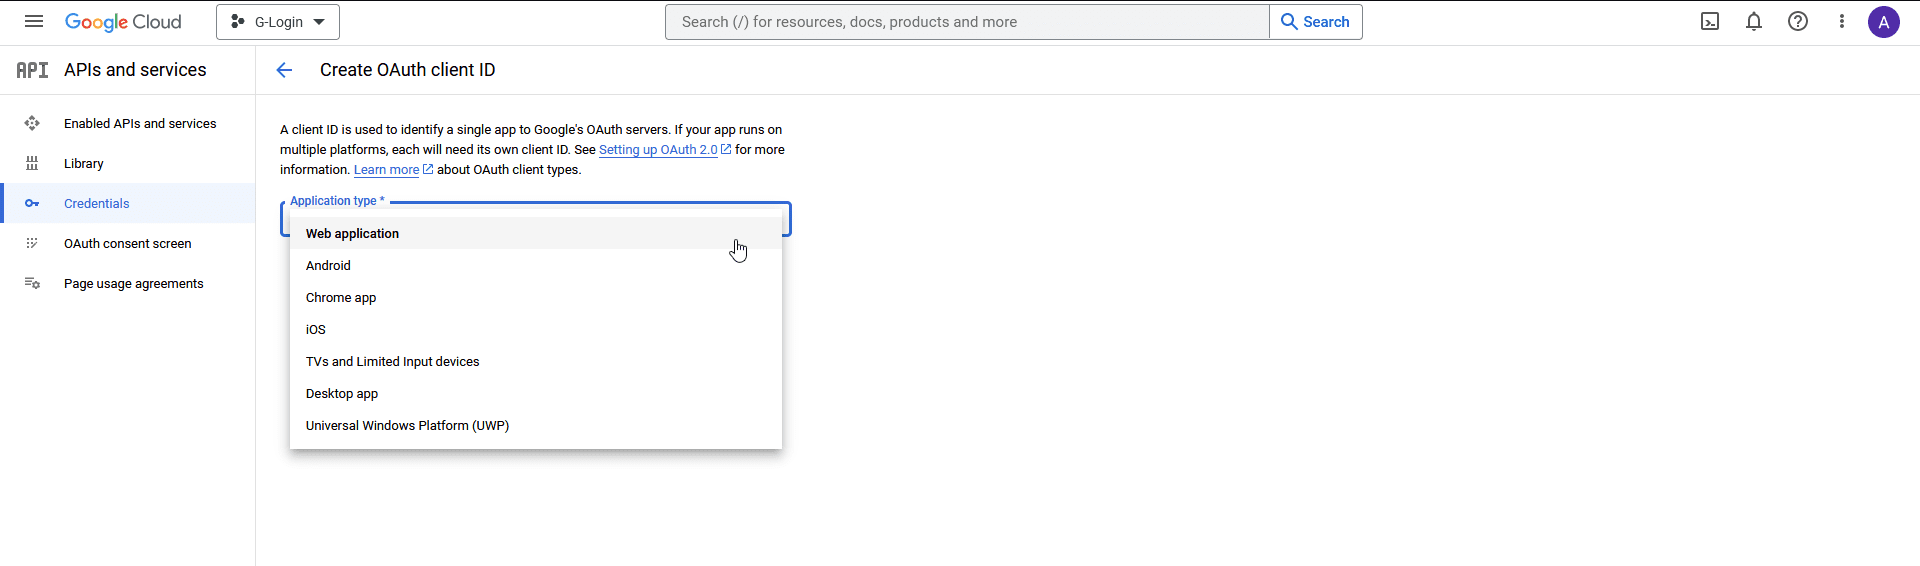
11. Then, from the Application type dropdown, select Web application.

google client id 12

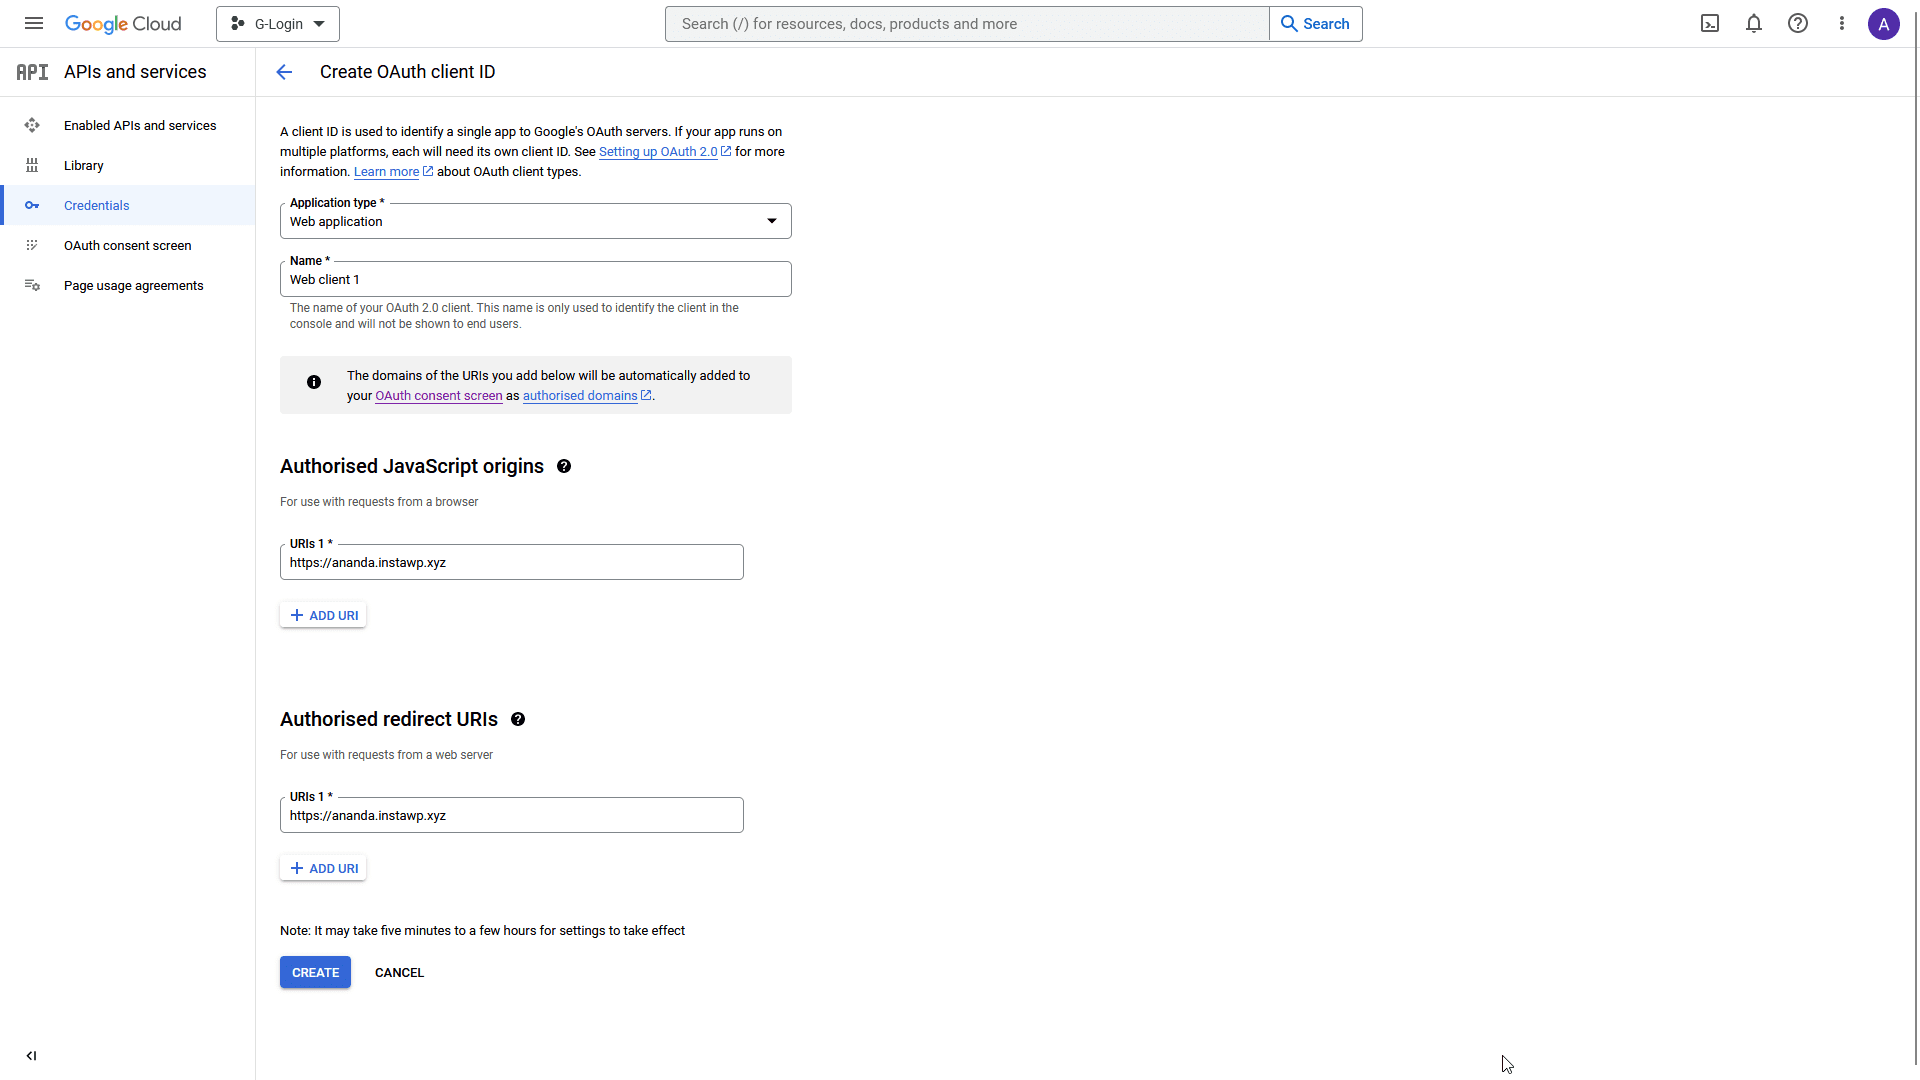
12. Once you select the option then, you have to add the following details.

  • Name – Add your application name.
  • Authorised JavaScript origins – Click the ADD URI button to add your website URL – Example: http://www.yourwebsite.com.
  • Authorised redirect URLs – Click the ADD URI button to add your website URL – Example: http://www.yourwebsite.com.

Once done, click on the CREATE button.

google client id 13

13. On the next page, you’ll get your Client ID and Client Secret, copy and paste them in a notepad. 

google client id 14

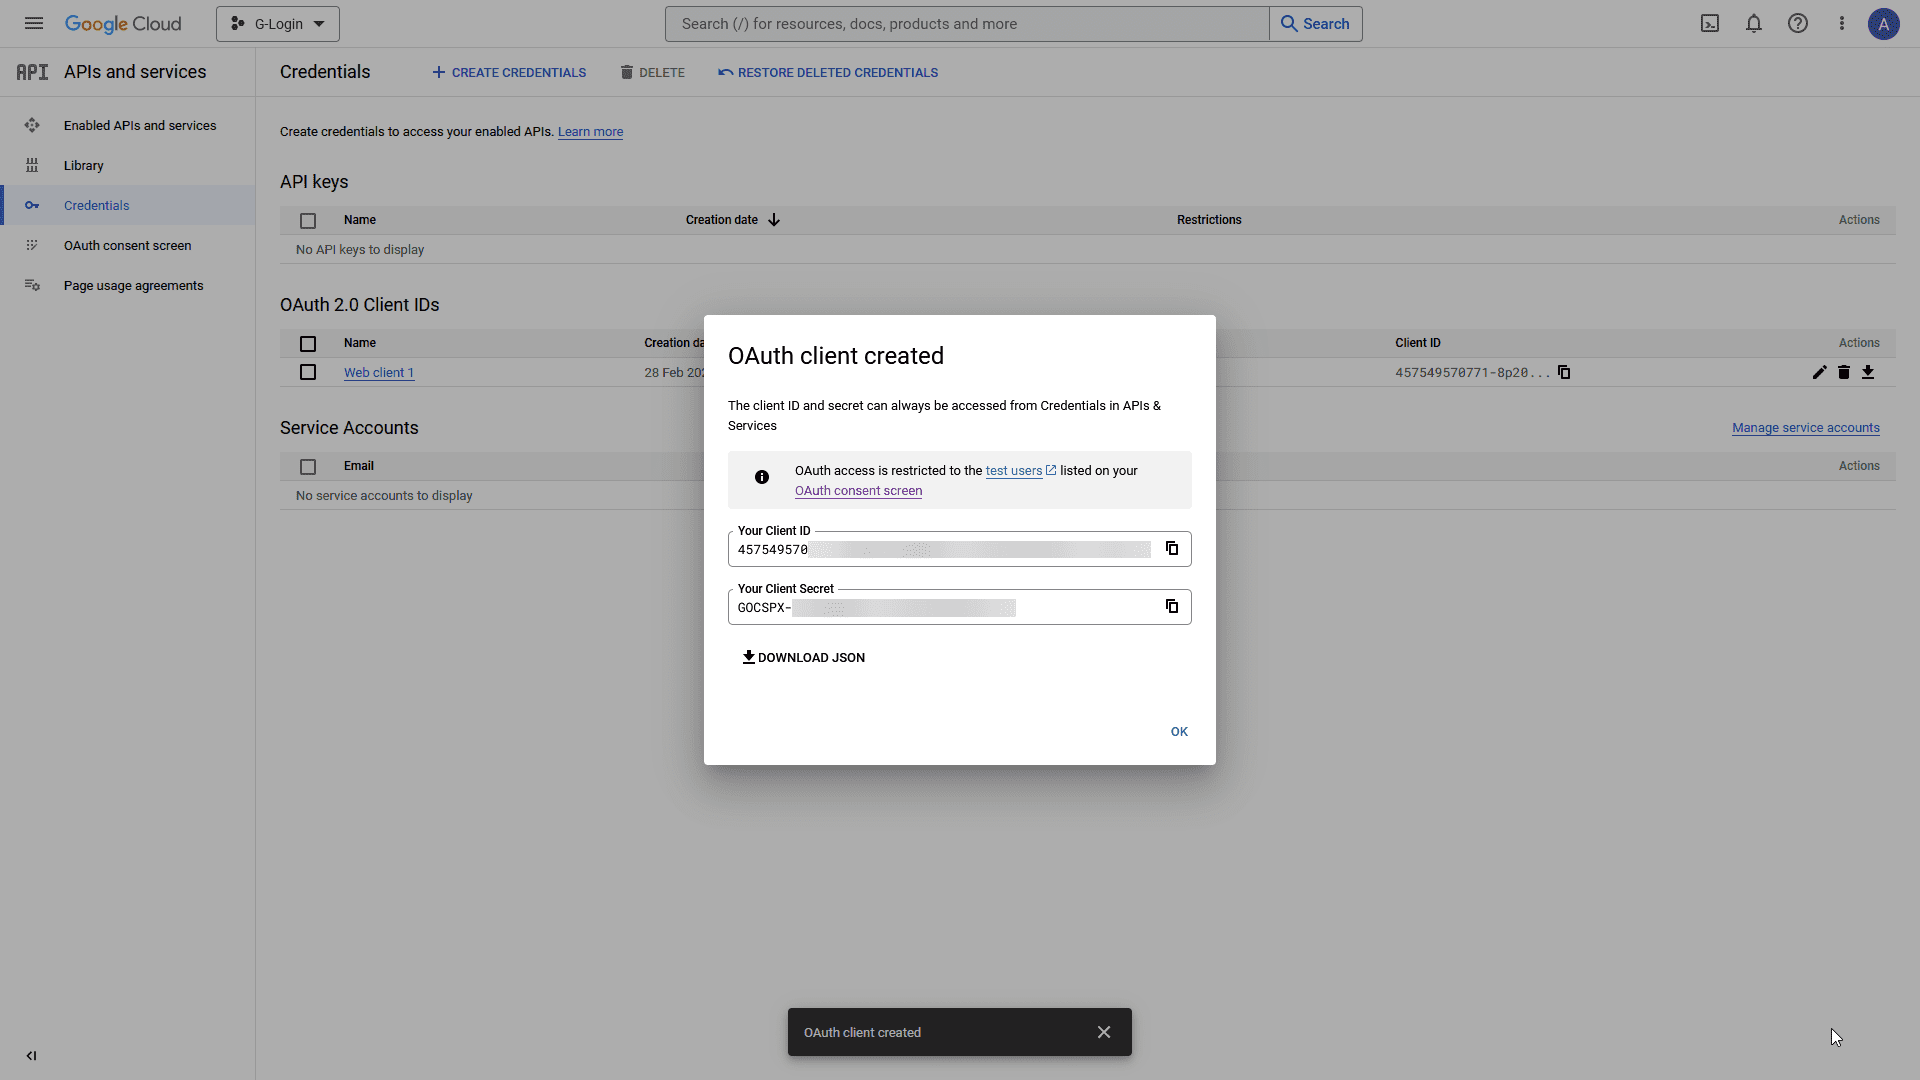
Note: For the Login & Signup block, you only need the Client ID.

Add the Client ID in the Login & Signup block

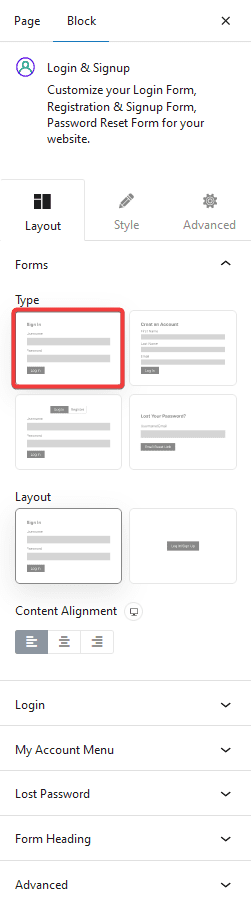
Once you have your Client ID, add the block on the page, got to Forms > Type and select any of the form types Login, Register or Login & Register. 

Select the appropriate layout from the Layout section. 

Note: Here, we are using the Login form, but following the same process, you can add Google login to both Register and Login & Register forms.

login signup login type

Once your form fields are ready, go to the Login tab and click the +Add Field button.

From the Field dropdown, select Social Login.

login signup google

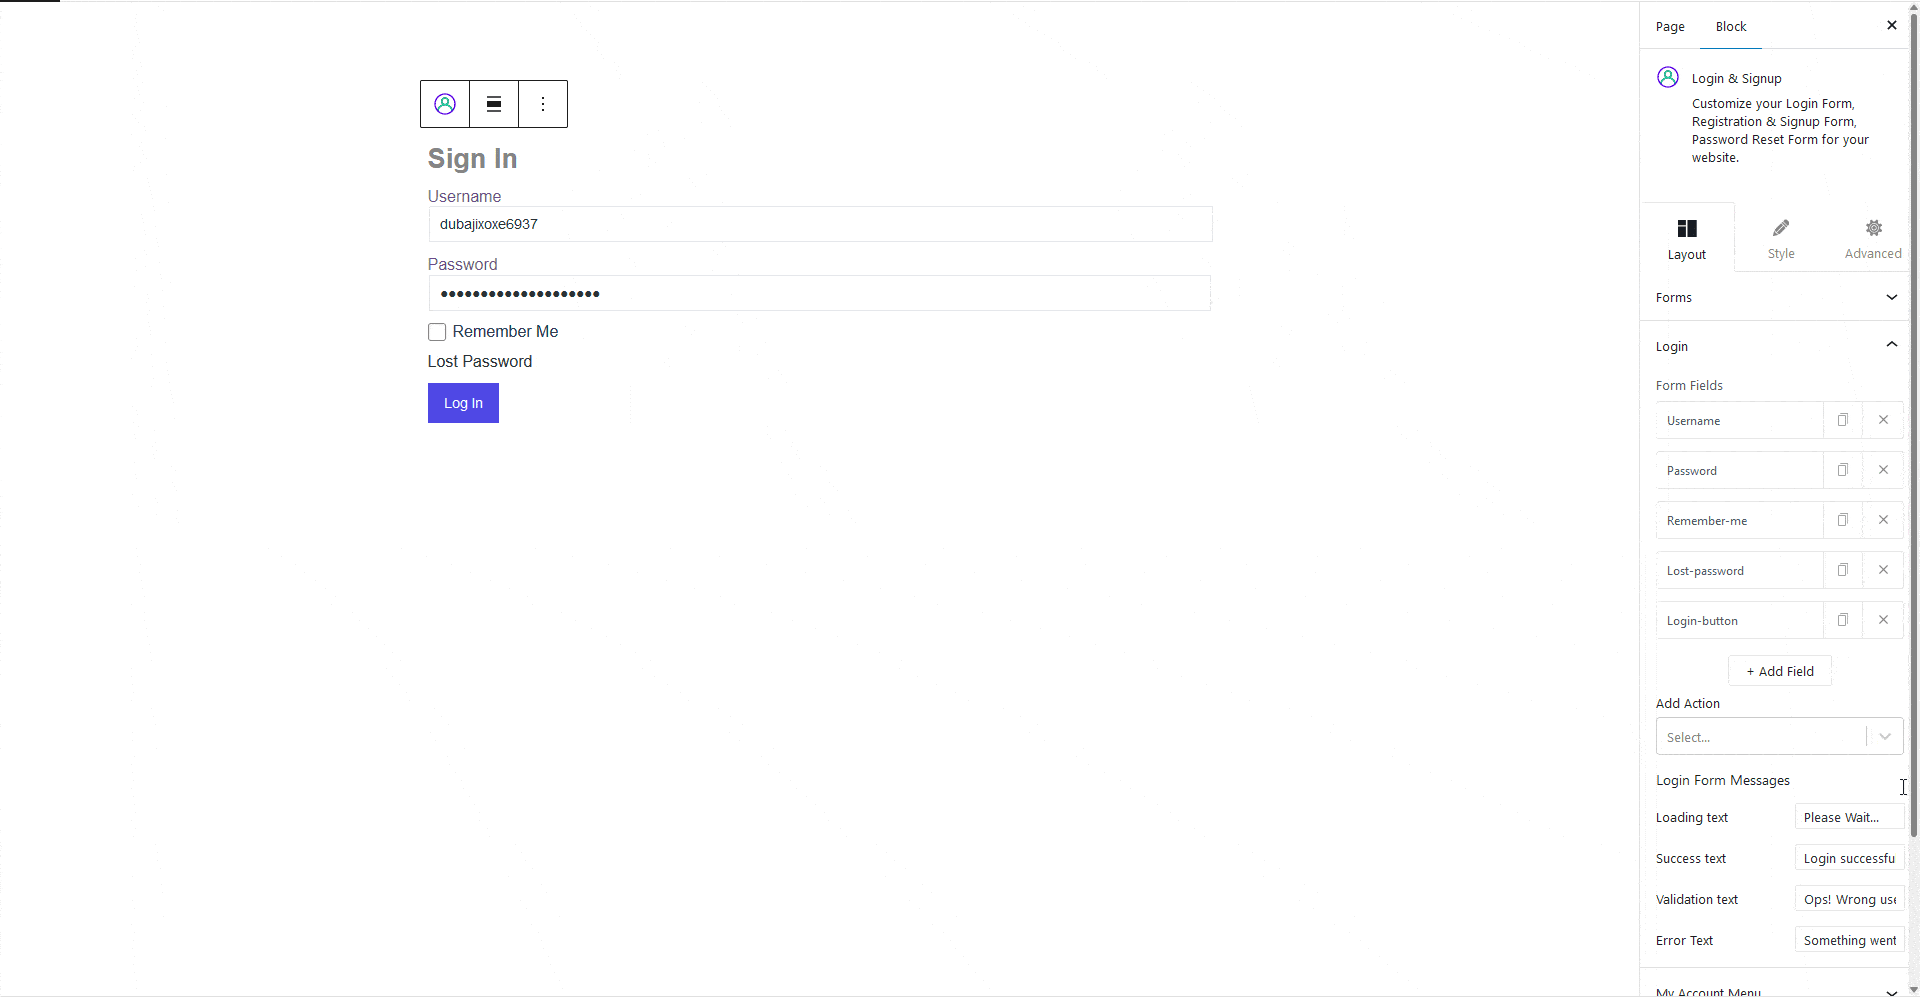
From there, turn on the Google toggle to enable login via Google. Add your id in the Google Client ID field.

You can also enable Google One Tap Popup by turning on the toggle. With this option, it will automatically show a popup asking the user to login via Google.

But if you don’t enable Google One Tap Popup, you’ll see a few more options.

Type – From here, you can choose the button type, Standard or Icon.

Theme – You can select the button theme.

Shape – For the Standard button shape.

Button Text – You can choose from different button texts for the Standard button.

Icon Shape – For the Icon button shape.

Size – For the button size.

Finally, in the Redirect URL field, you can add a page link to redirect users to a specific page after login.

From the Alignment, you can align the button in the form.

Also, check How to add Facebook login to a WordPress website.

Previous PostLogin & Signup Block Settings Overview
Read NextHow to Add Facebook Login to a WordPress website?

Still in Doubt? Let us Assist You — Raise a Ticket Now

Explore 85 Blocks from The Plus Blocks for Gutenberg Check Now
Join our WordPress Community!
- Ask and Learn Together.
Be a WordPress Expert!
Subscribe for Video Tutorials
Related Docs

How to add Login Button in WordPress Header Menu?

How to Enable Passwordless Login via Email in WordPress?

How to Make Custom Password Reset Email in WordPress Login Form?

How to make WordPress user registration GDPR compliant?

How to Redirect after Login in WordPress Login Form?

How to add Custom fields to WordPress registration form?

How to add Google reCAPTCHA in WordPress registration form?

How to make Custom Password Reset Form Page in WordPress?

How to Enable Email Verification Magic Login Link in WordPress Login Form?

How to Send WordPress New Account Registration Email to Mailchimp?

How to Add Facebook Login to a WordPress website?

Login & Signup Block Settings Overview

Ready to Supercharge your site?
With our #60daysMoneyBackGuarantee and perfect 5-star reviews, you can stay worry-free and purchase with complete confidence.
GET PRO NOW

60 Days Money Back
Guarantee

Upgrade or cancel anytime

4.5 Star Rated

The premium support you deserve

Our Friendly Support
Extensive Documentations
Detailed Video Tutorials
Active Users Community
Get Exclusive WordPress Tips, Tricks and Resources
Delivered Straight to Your Inbox!

NO SPAM GUARANTEE

    Features

    Plus Creatives

    Plus Blocks

    Plus Core

    Plus Sections

    Marketing Blocks

    Plus Listings

    Plus Builder

    Plus Extras

    Plus Design

    Popular Blocks

    Mega Menu

    Carousel Anything

    Blog Builder

    FREE

    Advanced Charts

    Live Copy Paste

    Dynamic Content

    Display Conditions

    Popup Builder

    Dark Mode

    Lottie Animations

    Resources

    Pricing

    Integrations

    Free vs Pro

    Changelog

    NEW

    Feature Request

    Roadmap

    🔥 HOT

    Join Affiliate

    💰

    Our Blogs

    Uptime

    99.99%

    Brand Kit

    Get Support

    Login to Portal

    Helpdesk

    Documentation

    Facebook Community

    Video Tutorials

    Our Products

    The Plus Addons for Elementor

    The Plus Blocks for Gutenberg

    NexterWP Theme

    WDesignKit

    Company

    Website

    About Us

    Team

    Career

    Hiring Now

    POSIMYTH Security Program

    Terms of Services

    Privacy Policy

    Cookie Policy

    Refund Policy

    Support Policy

    Tpag footer logos
    Tpag logo

    This website uses cookies to ensure you get the best experience on our website Cookie Policy

    Click to copy
    Copy
    How it works?