WordPress is a powerful web content management platform, and one of its strengths is its ability to display content in a variety of ways. With the proper knowledge and understanding of WordPress display conditions, you can display content in a way that suits the needs of your website. WordPress display rules allow you to control what type of content is shown on different pages and posts, allowing you to tailor the content to the specific needs of a particular page or post.
But implementing the display conditions in the right way can be challenging for a non technical WordPress user. You can use the Display Rules extension from The Plus Blocks for Gutenberg to make your life easier. It has all the options you need to create complex display conditions on your WordPress website.
Required Setup
- Make sure the default WordPress Block editor is active.
- You need to have The Plus Blocks for Gutenberg plugin installed and activated.
- This is a freemium feature, to unlock the extra options, you need the PRO version of The Plus Blocks for Gutenberg.
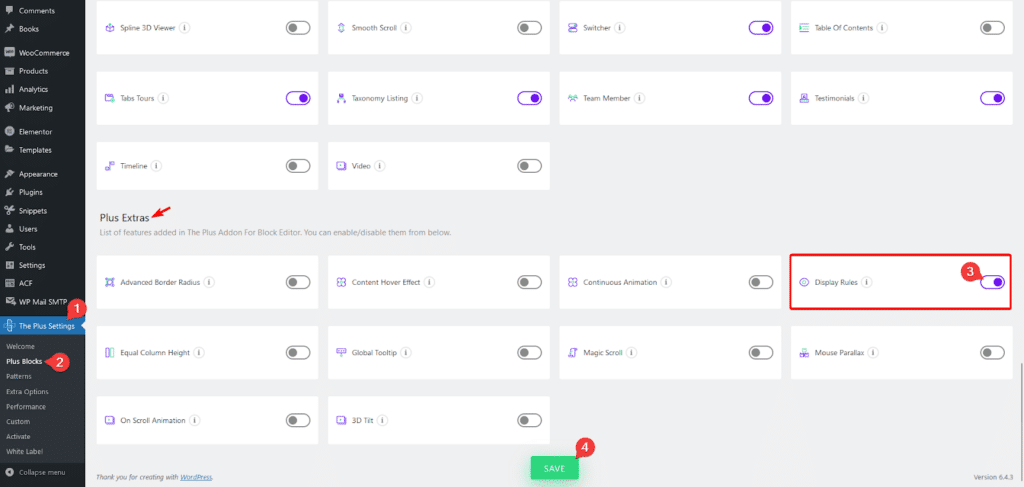
How to activate the Display Rules?
Go to
- The Plus Settings → Plus Blocks
- Scroll down to Plus Extras and look for the extension turn on the toggle then click Save.
Key Features
- Multiple display conditions – You can set multiple display conditions together on a block.
- User based condition – You can easily set different display conditions based on the user status like login, browser, and more.
- Date and Time based – You can set display conditions based on different dates and times.
- Single page based – You can target different single page templates to set visibility conditions on content.
- Archive page based – You can target different archive page templates to set display conditions for your content.
- Display condition for Custom fields – You can target different custom fields created with the ACF plugin to set different display conditions.
How to Use the Display Rules?
To use the display rules, add any block from The Plus Blocks for Gutenberg to the page, go to Advanced > Plus Extra: Display Rules, and turn on the Display Rules toggle.
Note: For default WordPress blocks, you’ll get the option directly.
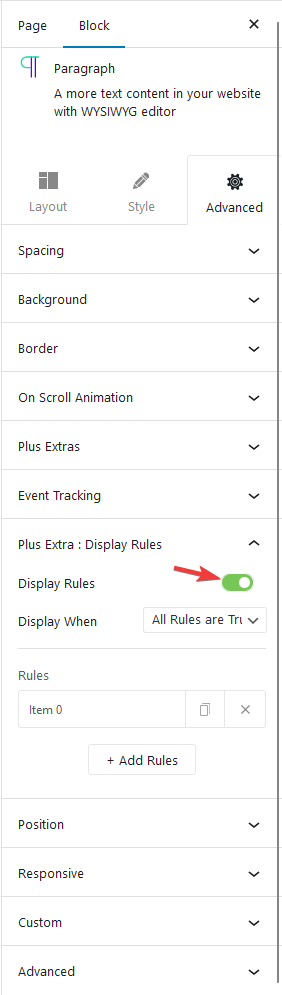
Then you have to choose when the display conditions are applied from the Display When dropdown. Here you’ll find two options –
All Rules are True – In this option, whichever rules you’ve set in the Rules section all has to be true for the display rules to work.
Any one Rule is True – In this option, any one rule has to be true for the display rules to work.
Then in the Rules section, you have to set the actual display condition. You can have one or multiple conditions/rules.
To set the rule click on the Item 0 tab. You’ll find different options to set your display condition in the Rule dropdown.
Visitor: This sets display rules based on the different statuses of a visitor.
- Login Status (Free) – Based on the user’s login status. Like Logged In or Logged Out..
- User Role (Pro) – Based on different WordPress user roles. Like Administrator, Editor etc.
- Operating System (Pro) – Based on the user’s operating system. Like Windows, Mac OS, Linux etc.
- Browser (Pro) – Based on the user’s browsers. Like Google Chrome, Mozilla Firefox etc.
Date & Time: This sets display rules based on date and time.
- Current Date (Pro) – For targeting a specific date range. Like 25th Dec to 1st Jan.
- Time of Day (Pro) – For targeting a particular time of the day. Like 11:59 pm.
- Day of Week (Pro) – For targeting a specific day of the week. Like Monday, Friday etc.
Single: This sets display rules for single page templates.
- Page (Pro) – For different pages of the site. Like About Us, Contact Us etc.
- Post (Pro) – For different posts on the site. Like different blog posts.
- Static Page (Pro) – For different static pages. Like Home Page, Blog Page, 404 Page etc.
- Post Type (Pro) – For different post types like Pages, Posts etc.
- Term (Pro) – For different terms of Categories, Tags etc. Like Clothing, Fashion etc., for a Clothing website.
Archive: This sets display rules for archive templates.
- Taxonomy (Pro) – For different taxonomies like Category, Tags etc. of an archive template.
- Post Type Archive (Pro) – For different post types like Pages, Posts etc. of an archive template.
- Date Archive (Pro) – For different date archive templates.
- Author Archive (Pro) – For the author archive template.
- Term (Pro) – For different taxonomies like Category, Tags etc. of an archive template.
If you are using Advanced Custom Fields (ACF), you’ll find additional display condition options for its fields.
AFC: This sets display rules for the Advanced Custom Fields.
- ACF : Text Fields (Pro) – For different ACF text fields (includes text, number, range, email, url, password and text area).
- ACF : Selection (Pro) – For different ACF select elements like select, radio button and checkbox.
- ACF : Button Group (Pro) – For ACF buttons.
- ACF : Boolean (Pro) – For ACF boolean value (True or False).
- ACF : Date / Time (Pro) – For ACF date and time.
Then you can make the status true or false by choosing Is or Not from the dropdown below.
You’ll get relevant dropdown options based on the selected option in the Rule dropdown. Select the appropriate option to set the condition.
You can add multiple rules by clicking on the +Add Rules button.