WordPress is a powerful content management system that makes creating a website or blog easy. However, customising your WordPress site to meet your specific needs can be a bit of a challenge. One of the most common customisation requests is the ability to set display conditions based on a single page template in WordPress. This type of customisation allows you to control what content is displayed for a particular page and can be a great way to create a more tailored user experience.
The Display Rules extension from The Plus Blocks for Gutenberg allows you to set different visibility rules for different single page templates like posts, pages, terms etc. of your website.
Note: These display conditions should be applied to the content in common templates like Header, Footer, Sidebar or Specific template.
To check the complete feature overview documentation of The Plus Blocks for Gutenberg Display Rules extension, click here.
Requirement – This extension is a part of The Plus Blocks for Gutenberg, make sure it’s installed & activated to enjoy all its powers.
Note: Here, we are using blocks from The Plus Blocks for Gutenberg.
To add display conditions for single page templates, add any block from The Plus Blocks for Gutenberg on the page.
1. Go to Advanced > Plus Extras : Display Rules.
2. Turn on the Display Rules toggle.
3. After selecting the appropriate option from the Display When dropdown, go to the Rules section. Here you have to set the actual display condition. You can have one or multiple conditions/rules.
4. Then click on the Item 0 tab. In the Rule dropdown, you’ll find different options under the Single label.
How to Set WordPress Set Display Condition Based on Page?
With this option, you can set display conditions for content on specific pages of your website.
To set display conditions for specific pages –
1. Select Page from the Rule dropdown under the Item 0 tab.
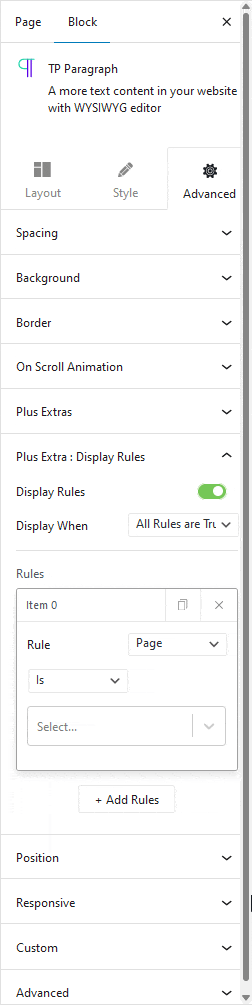
2. Then in the second dropdown, you have two options –
Is – This will make the statement true.
Not – This will make the statement false.
3. In the last dropdown, select the pages.
For example, we only want to show a contact number in the contact us page header. To do this, go to the header template and select the block with the contact number.
After selecting Page from the Rule dropdown, choose Is from the second dropdown.
Then in the last dropdown, select the Contact Us page.
This will show the contact number only on the Contact Us page.
If the option is set to Not in the second dropdown, it will reverse the condition.
Note: You can add multiple pages together.
How to Set WordPress Set Display Condition Based on Post?
This option works similarly to the Page option. With this option, you can target different posts on your site to set display conditions. Using this option, you can show specific content related to a blog post in some common places on your website.
To set display conditions for specific posts –
1. Select Post from the Rule dropdown under the Item 0 tab.

2. Then in the second dropdown, you have two options –
Is – This will make the statement true.
Not – This will make the statement false.
3. In the last dropdown, select the posts.
Note: You can add multiple posts together.
For example, you can add a featured section, highlight certain elements, or apply a different styling to enhance the presentation of any specific post.
How to Set WordPress Set Display Condition Based on Static Page?
This option allows you to set display conditions on various static pages like Homepage, Blog, 404 Page etc.
This can be useful to target these pages if you’ve not set any specific template for some of these pages like a 404 Page.
To set display conditions for static pages –
1. Select Static Page from the Rule dropdown under the Item 0 tab.
2. Then in the second dropdown, you have two options –
Is – This will make the statement true.
Not – This will make the statement false.
3. In the last dropdown, select your static page.
For example, we want to show a different version of the logo on the homepage only. To do this, go to the header template. You should have both versions of the logo there.
First select the block with the normal logo.
After selecting Static Page from the Rule dropdown, choose Not from the second dropdown.
Then in the last dropdown, select Static Homepage.
This will hide the normal logo on the homepage.
Then select the other version of the logo and follow the same process, just make sure to choose Is from the second dropdown.
This will show the different version of the logo on the homepage only.
Note: Default Homepage is the default homepage set by WordPress itself.
How to Set WordPress Set Display Condition Based on Post Type?
With this option, you can set display conditions for content based on different post types like pages, posts, custom post types etc. This can be used if you want to show additional content on a specific post type.
To set display conditions for specific post types –
1. Select Post Type from the Rule dropdown under the Item 0 tab.
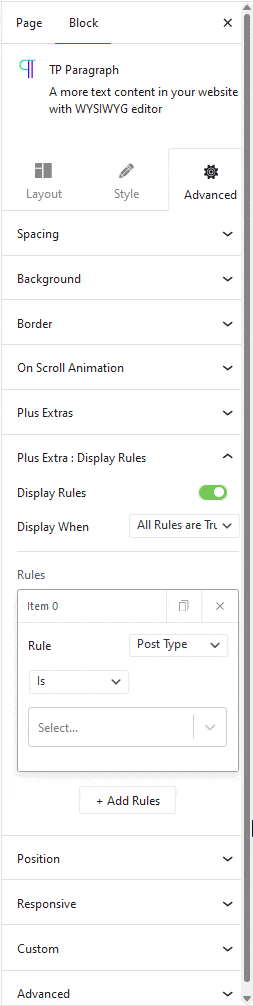
2. Then in the second dropdown, you have two options –
Is – This will make the statement true.
Not – This will make the statement false.
3. In the last dropdown, add the post type names.
Note: If left blank, it will be applied to all post types.
Note: You can add multiple posts types together.
Let’s say you have a WordPress website for a photography portfolio, and you have a custom post type called “Gallery” to showcase your photography projects. You want to display a specific message on the archive page for the “Gallery” post type.
By setting a display condition based on the post type, you can customize the content specifically for the gallery archive.
How to Set WordPress Set Display Condition Based on Terms?
With this option, you can set display conditions for content based on different categories, tags, custom taxonomies etc. This can be useful for displaying additional content based on different terms.
To set display conditions for different terms –
1. Select Term from the Rule dropdown under the Item 0 tab.
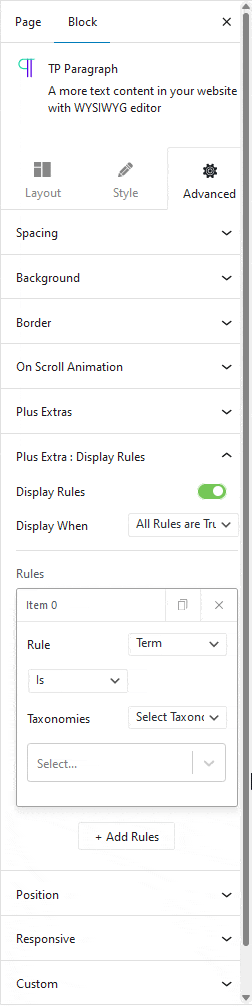
2. Then in the second dropdown, you have two options –
Is – This will make the statement true.
Not – This will make the statement false.
3. Then from the Taxonomy dropdown, choose the appropriate taxonomy.
4. In the last dropdown, add the term names.
For example, we want to show an additioanl text block on the posts for the Clothing category.
To do this, go to the single post template and select the block.
After selecting Term from the Rule dropdown, choose Is from the second dropdown.
Then from the Taxonomy dropdown, choose Categories.
In the last dropdown, select the term name as Clothing.
If the option is set to Not in the second dropdown, it will reverse the condition.
Note: You can add multiple terms together.
Also, read How to Set WordPress Display Conditions Based on Archive Page Content.