Creating a portfolio page on WordPress is an essential step in building an online presence and showcasing your work. With WordPress, you can create a portfolio page that looks great and is easy to manage, customise and update. Whether you’re a freelancer or business owner, having a portfolio page is an essential marketing tool that helps you get your work seen and serve as an online representation of your brand.
Having your work on a portfolio page is an asset for any business. But showing your creative work inside a device mockup can give your portfolio page a unique and attractive look.
The Dynamic Device block from The Plus Blocks for Gutenberg is a powerful block that allows you to add and interact with different types of content inside a device mockup.
Required Setup
- Make sure the default WordPress Block editor is active.
- You need to have The Plus Blocks for Gutenberg plugin installed and activated.
- This is a premium block, you need the PRO version of The Plus Blocks for Gutenberg.
- Make sure the Dynamic Device block is activated, to verify this visit Plus Settings → and Search for Dynamic Device and activate.
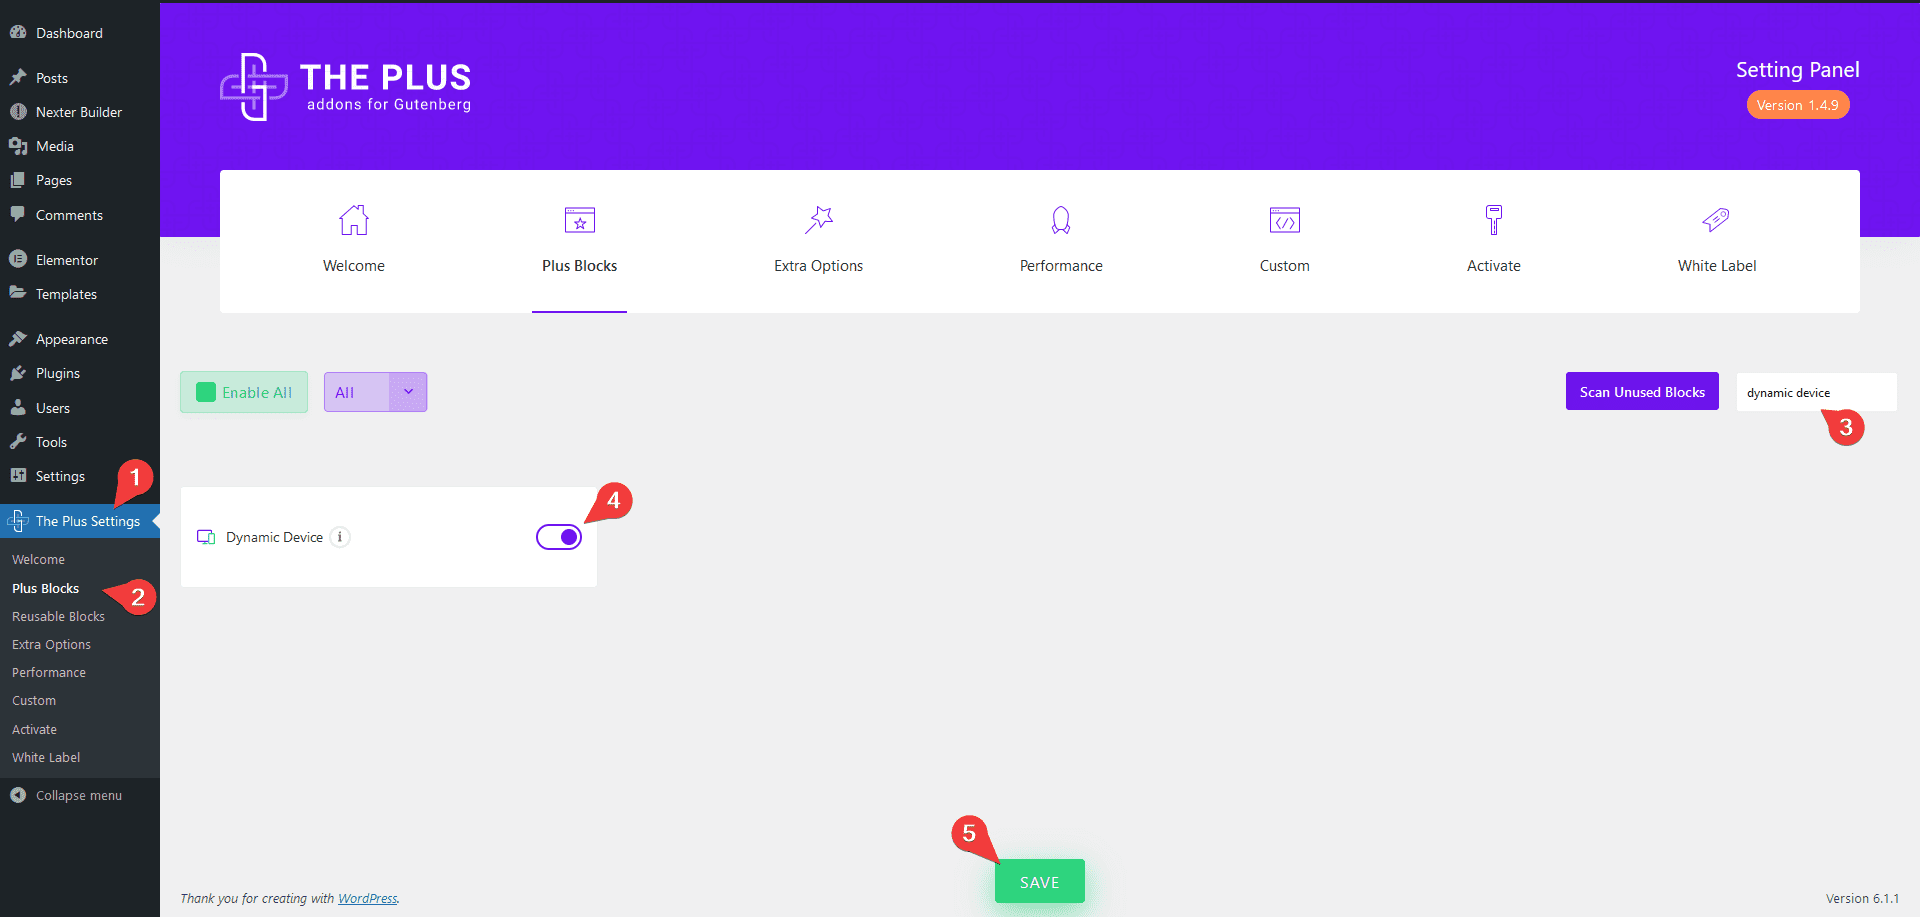
How to activate the Dynamic Device Block?
Go to
- The Plus Settings → Plus blocks
- Search the block name and turn on the toggle then click Save.
Key Features
- Different types of content – You can show different types of content like Image, Reusable Block and iFrame.
- Multiple layouts – You can either show your content in a static mockup or a slider.
- Multiple device options – You can choose from multiple device options or you can add your custom mockup as well.
- Image scrolling effect – Easily create an image scrolling effect inside a device mockup.
- Manual scrolling – You can also add a manual scrolling effect to your image.
- Dynamic Device Connection ID – You can connect multiple Dynamic Device blocks to create a simultaneous scrolling effect.
How to add Dynamic Device Block on WordPress websites?
There are multiple ways you can add the Dynamic Device block or any other block in the WordPress block editor.
Click on the + icon at the top left of the editor or the + icon in the editor and search for the name of the block or widget, for instance, Dynamic Device Block, then click on the block to add to the page.
Or you can type / (forward slash) in the editor and type the name of the block, and then click on it to add.
This way, you can add a Dynamic Device block or any other Gutenberg block.
How to add content in the Dynamic Device Block in WordPress?
Once the Dynamic Device block is added to the page, you’ll see a mockup device.
In the Layout dropdown under the Dynamic Device tab, you’ll find two options –
Normal – For creating a normal mockup layout.
Carousel – This option lets you create a slider inside the mockup. Learn more about the process.
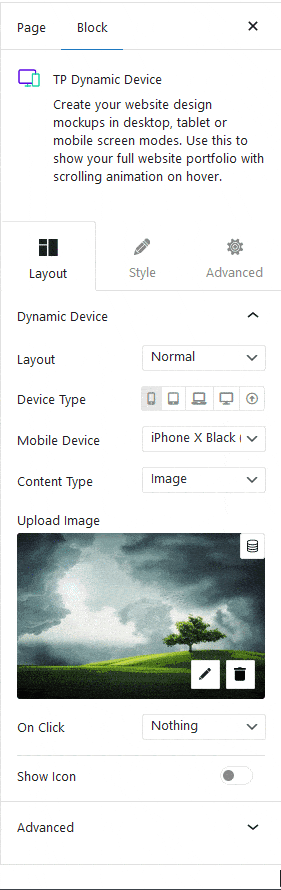
When you set the layout to Normal, from the Device Type section, you can choose different device types like Mobile, Tablet, Laptop, Desktop, or even upload a custom mockup.
Depending on the device type, you’ll get to choose relevant device mockups from the Device dropdown.
Then from the Content dropdown, you’ll have to select the content type. Here you’ll find three options –
Image – In this option, you can use an image as the content of your mockup device. You can add a link to your image with an option to open it in a normal browser or popup.
Using this option, you can create a scrolling image effect inside the mockup device. Learn more about the process.
Reusable Block – Using this option, you can add different types of content like video, products or even an entire layout inside the mockup, making it a very powerful option. Learn more about it.
IFrame – If you want to show a third party website inside your mockup device, you can use this option. Learn the process.
When you use Image or Reusable Block as the content type, you can add an icon to your mockup using the Show Icon toggle.
How to style Dynamic Device Block in WordPress?
If you want to adjust the styling of your device mockup content, you can do that from the Style tab. Depending on the choice of the Layout and Content type, styling options will vary.
Layout Type – Normal
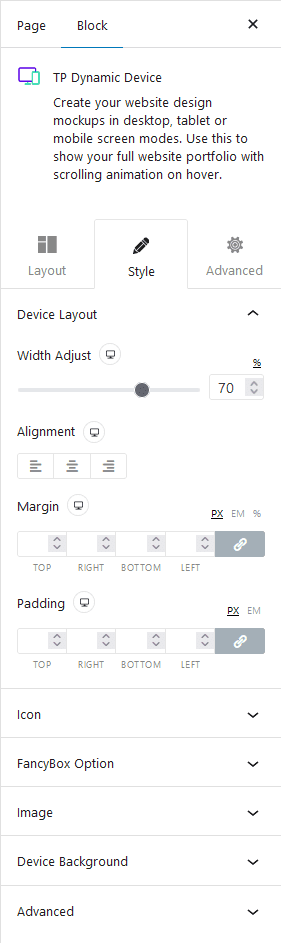
Device Layout – You can adjust the mockup layout width, alignment, padding and margin from this tab.
Icon – If you have added an icon to your device mockup, you can manage the style from here, adjust the icon size, add animation to the icon etc.
FancyBox Option – You can add some buttons to the image link popup from this tab.
Image – If you select the image option as the content type, you’ll see this option. From here, you can add an image scrolling effect, set transition duration, add manual scrolling, and adjust the image border radius.
If you add manual scrolling, you’ll get the option to style the scroll bar.
You can also connect multiple Dynamic Device blocks from this section. Learn more about the process.
Device Background – From this tab, you can add a drop shadow effect to your content for normal and hover states.
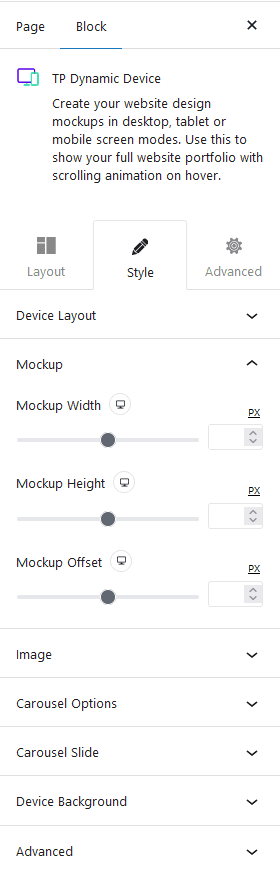
Layout Type – Carousel
Device Layout – You can adjust the mockup layout width, alignment, padding and margin from this tab.
Mockup – From this tab, you can manage the mockup height, width and position for different devices.
Image – You can adjust the image border radius, height, width and position for different devices from this tab. You can manage the image Z-Index as well.
Carousel Options – From here, you can choose the carousel columns to be Single or Multiple. You can adjust the carousel speed, turn the carousel into an infinite loop slider. You can also make the carousel autoplay and adjust its speed.
You can add dots and arrows navigation to the carousel. With both navigation types, you’ll get relevant styling options as well.
If you are using the Multiple column option, you can use Center Padding, Center Slide Effect, Box Shadow and Normal Slide Opacity options to differentiate the center slide item from the rest of the slides.
Carousel Slide – You can adjust slide margin, width and space between slides for different devices.
Device Background – From here, you can add a box shadow to your content for normal and hover states.
Advanced – This is our global extension available for all our blocks. From here you can add a custom CSS class in the Additional CSS class(es) field. If you know CSS you can use this class to further finetune the style by using your own custom CSS.
Advanced options remain common for all our blocks, you can explore all it options from here.