Seeing a “Sorry You Are Not Allowed to Access This Page” pop up on your screen when you are trying to access your website can be frustrating.
Being locked out of your website can be a challenge, as it disrupts your workflow and poses a risk to your online presence.
The “you need permission to access this site” issue can prevent you from updating your site, managing your content, or responding to urgent issues. This may harm your site’s reputation and cause traffic loss.
This issue can be particularly difficult to address as the reason why you are locked out of your site may not be immediately apparent.
This means you will have to try a few different resolution methods before you can pinpoint a source and correct the error.
In this article, we will explore various courses of action with which you can troubleshoot the access issue and log back into your website through WordPress.
Stay ahead of the curve with our exclusive insights and analysis on the latest WordPress trends and techniques - subscribe to our newsletter today.
What is the “Sorry You Are Not Allowed to Access This Page” Error in WordPress?
The “Sorry You Are Not Allowed to Access This Page” error in WordPress is a common issue that locks you out of your website. However, at its core, this error is a security feature designed to protect your website.
When it appears, it indicates that there’s a permissions or security concern that needs to be addressed to ensure your site remains secure and functions correctly.
Diagnosing this error can be challenging, primarily because it results in being locked out of parts of your website.
This lockout can occur for various reasons, including configuration errors, plugin or theme conflicts, or issues with user roles and permissions.
It requires a detailed inspection of your site’s settings and configurations to identify and resolve the underlying cause of the access denial.
What are the Common Causes of the “Sorry You Are Not Allowed to Access This Page” Error in WordPress?
When managing a WordPress site, encountering the “Sorry You Are Not Allowed to Access This Page” error can be a common yet frustrating experience.
The difficulty in diagnosing the source of this issue stems from the fact that it can be triggered by a variety of factors.
Understanding the various causes is only the first step in resolving the issue. Let’s look at some of the common reasons why you may not be able to access your page.
1. Mismatched Data
At times, the data between your website’s files and the database may not align properly. This misalignment often occurs after updating themes, plugins, or the WordPress core itself.
Each component of your site is designed to work in harmony.
However, if one part updates and changes its data structure without the others being aware, it can lead to discrepancies such as the “Sorry you are not allowed to access this page” issue.
2. File Permissions
File permissions are rules that dictate who can read, write, or execute the files on your website. Incorrect settings can lock you out, preventing access to certain pages.
3. PHP Version
PHP is the programming language that powers WordPress.
Using an outdated version of PHP can cause compatibility issues which leads to errors where you are not allowed to access your website.
4. Configuration Issues
The wp-config.php file is the foundation of your WordPress site’s configuration. It contains essential settings like your database connection details.
If there are errors in this file or mismatches in the database prefix, it can result in access issues.
5. Plugin and Theme Conflicts
Plugins and themes add functionality and style to your site but can sometimes conflict with each other or with WordPress itself.
This is especially true when they’re newly installed or updated.
Some plugins may interfere with your website’s normal operation and cause “you do not have permission to access this page” issues.
6. User Role Changes
WordPress includes a system of user roles and permissions, which defines what each user can and cannot do.
If these roles or permissions are altered incorrectly, it might inadvertently block access to certain pages.
How to Fix “Sorry You Are Not Allowed To Access This Page” Error in WordPress [Proven Ways]
Addressing the “Sorry You Are Not Allowed To Access This Page” error in WordPress often involves a trial-and-error method to pinpoint the root cause.
This error can arise from a variety of issues related to themes, plugins, user permissions, or even your WordPress configuration.
The key to a successful resolution lies in systematically eliminating these potential causes one by one. This process requires patience and careful attention to detail.
Before starting the troubleshooting process, make sure to back up your website.
A backup ensures that no matter what changes you make during the diagnostic process, you can always restore your site to its previous state if something goes wrong.
To back up your website, follow these steps:
- Choose a Backup Solution: Select a backup plugin from the WordPress repository or utilize your hosting provider’s backup solution if available.
- Perform the Backup: Follow the plugin’s or hosting provider’s instructions to initiate a complete backup. This should include your website’s files and database.
- Store the Backup Safely: Ensure your backup is stored in a secure location, preferably off-site. Cloud storage services are a good option for this.
Now let us look at the different strategies you can use to resolve the “you do not have permission to access this page” issue on WordPress.
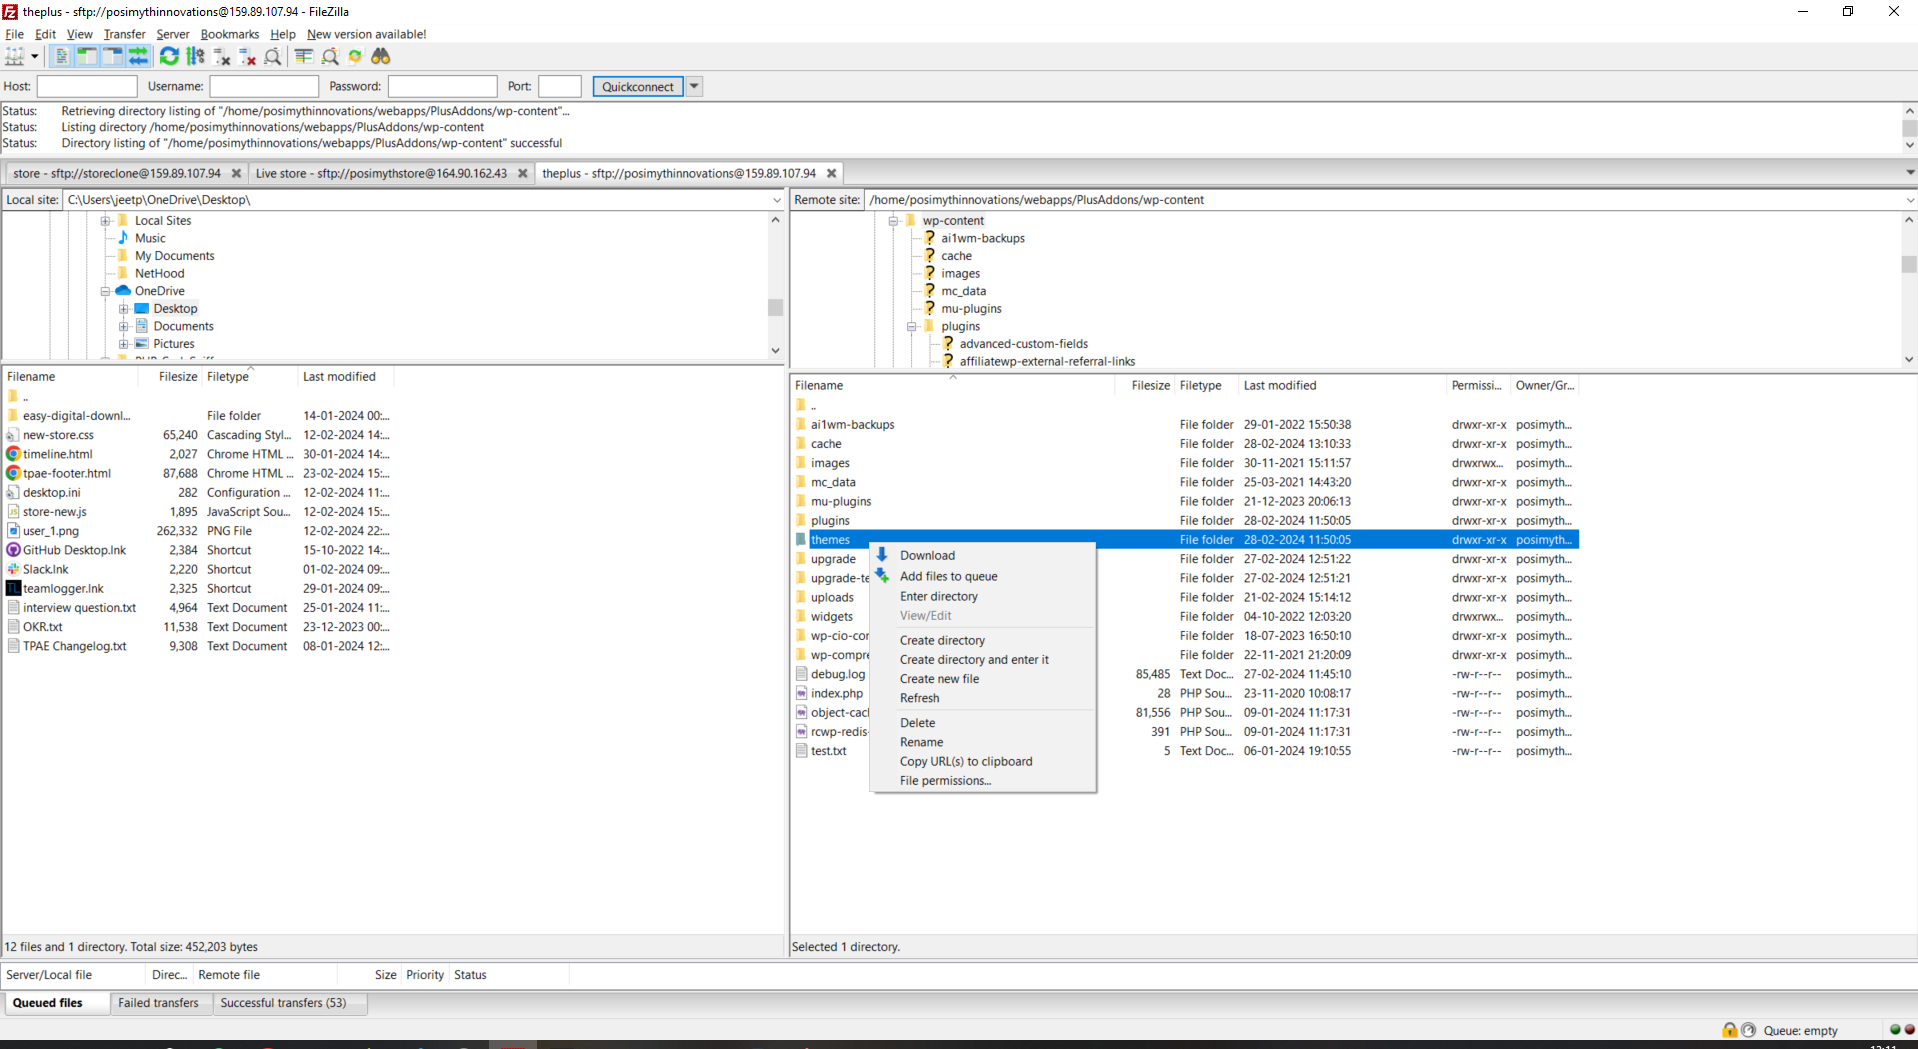
1. Disable All Your Themes & Plugins
Disabling all your themes and plugins is a reliable first step to isolating the issue. This process can be done via FTP or directly through the WordPress dashboard.
Both methods aim to identify if a specific theme or plugin is causing the error by temporarily removing them from the equation and then reintroducing them one by one.
A. Using the WordPress Dashboard
- Log into your WordPress Dashboard: Navigate to your website’s login page and enter your credentials to access the dashboard.
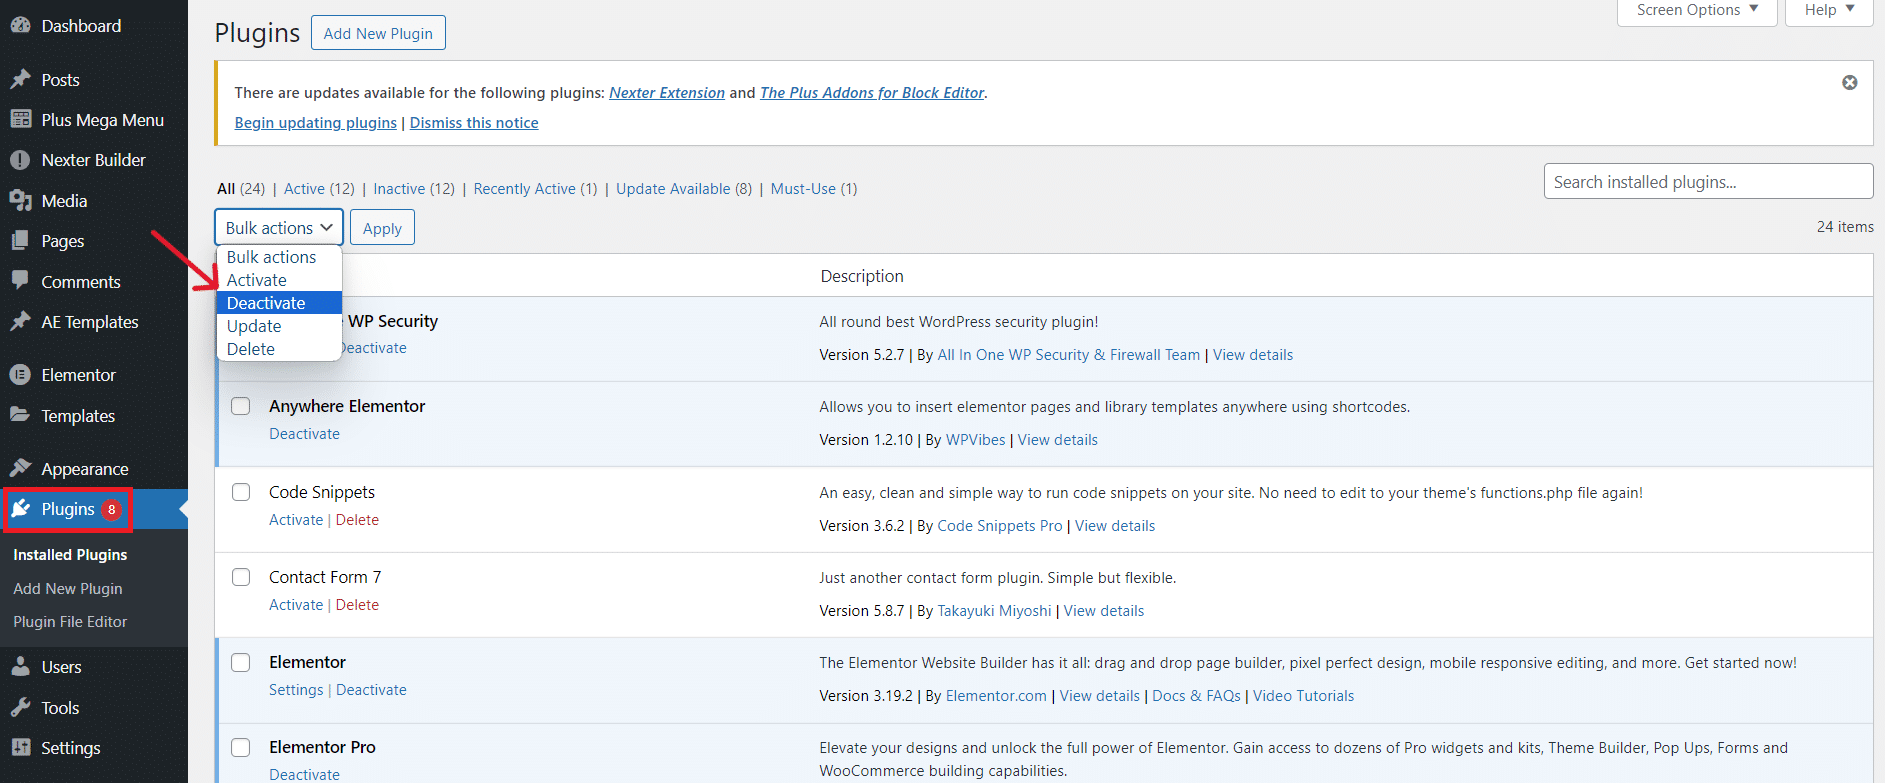
- Deactivate Plugins: Click on “Plugins” in the dashboard menu. You’ll see a list of all installed plugins. At the top, select “Bulk Actions” > “Deactivate” and click “Apply.” This action deactivates all your plugins at once.
3. Switch to a Default Theme: Navigate to “Appearance” > “Themes“. Activate one of the default WordPress themes
B. Using FTP
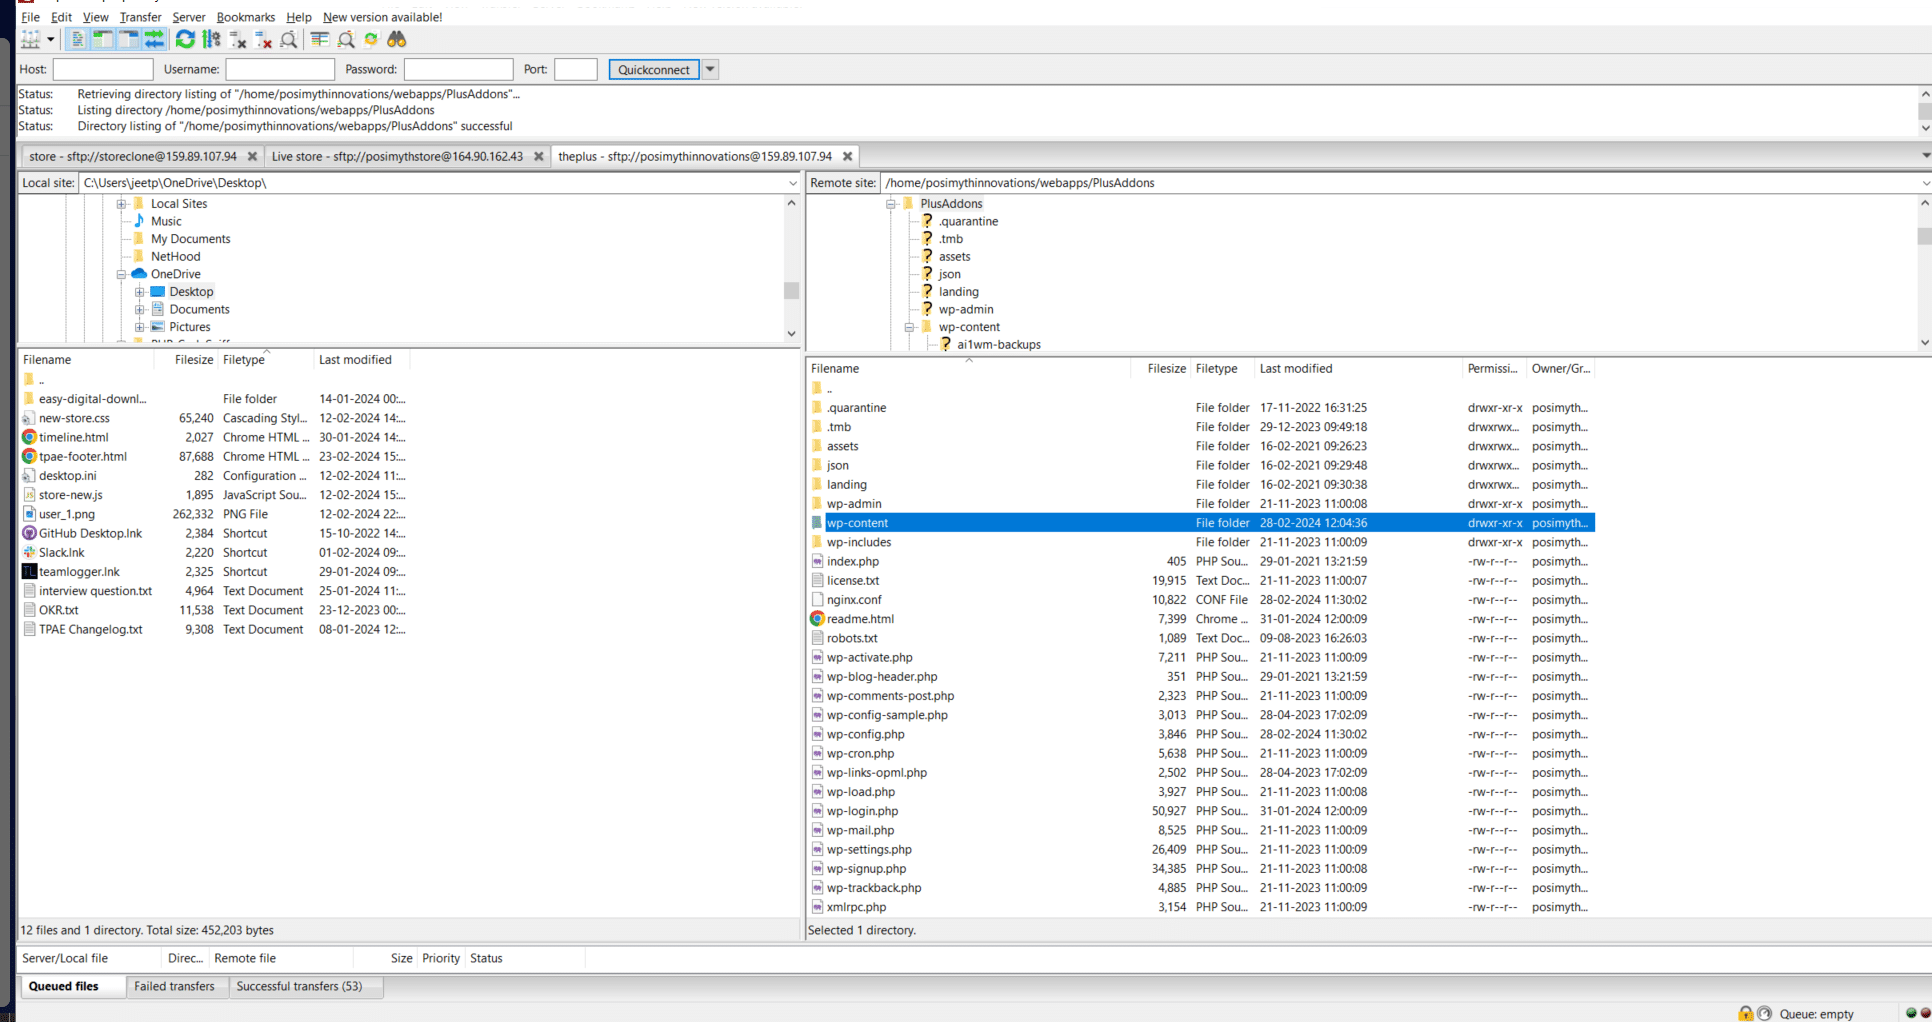
- Connect to Your Website via FTP: Open your FTP client and connect to your website using the FTP login credentials provided by your hosting service.
- Navigate to wp-content: Once connected, find the “wp-content” folder. This folder contains both your plugins and themes folders.
3. Disable Plugins: Rename the “plugins” folder to something like “plugins_disabled”. This action deactivates all plugins since WordPress can no longer locate them.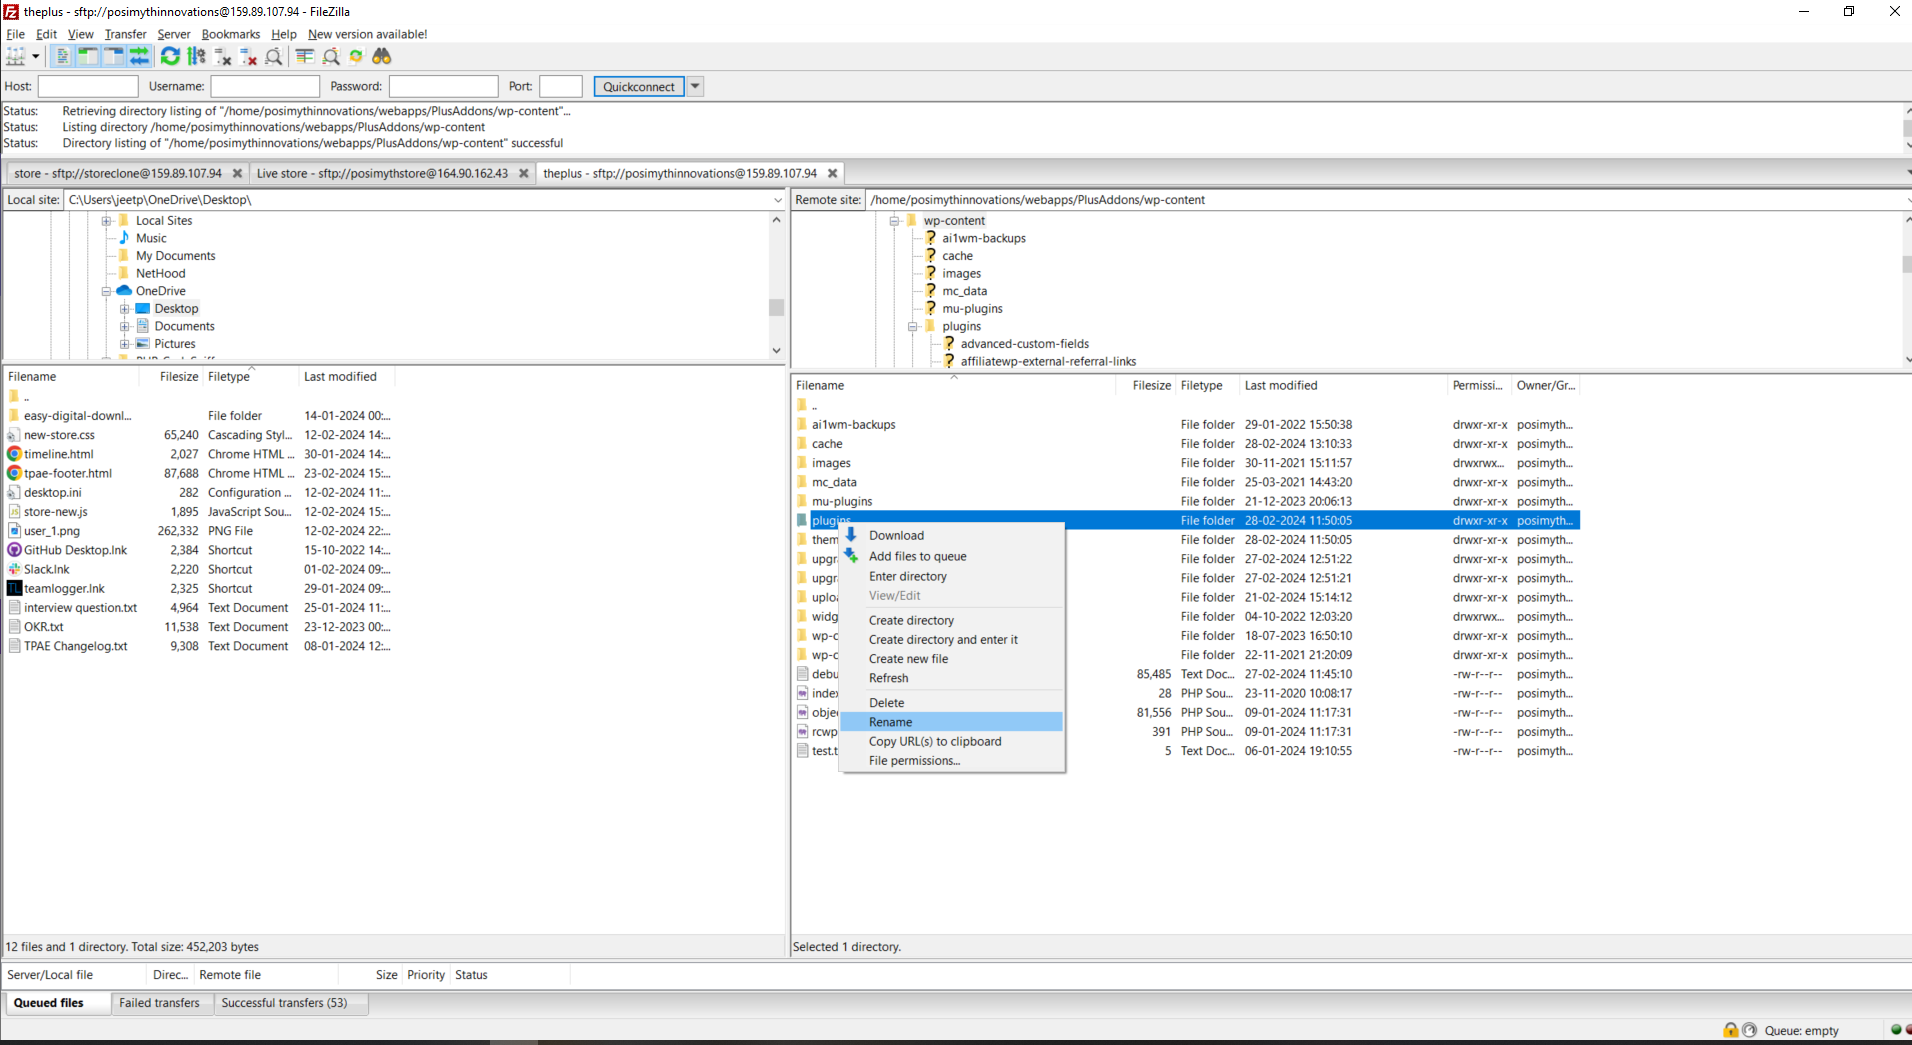
4. Disable Themes: Similarly, rename your “themes” folder to “themes_disabled” to deactivate all themes. WordPress will automatically revert to a default theme if available.
Want to keep themes and plugins relevant and prevent access issues? Here’s why you should update WordPress Core, Themes and Plugins to the latest version.
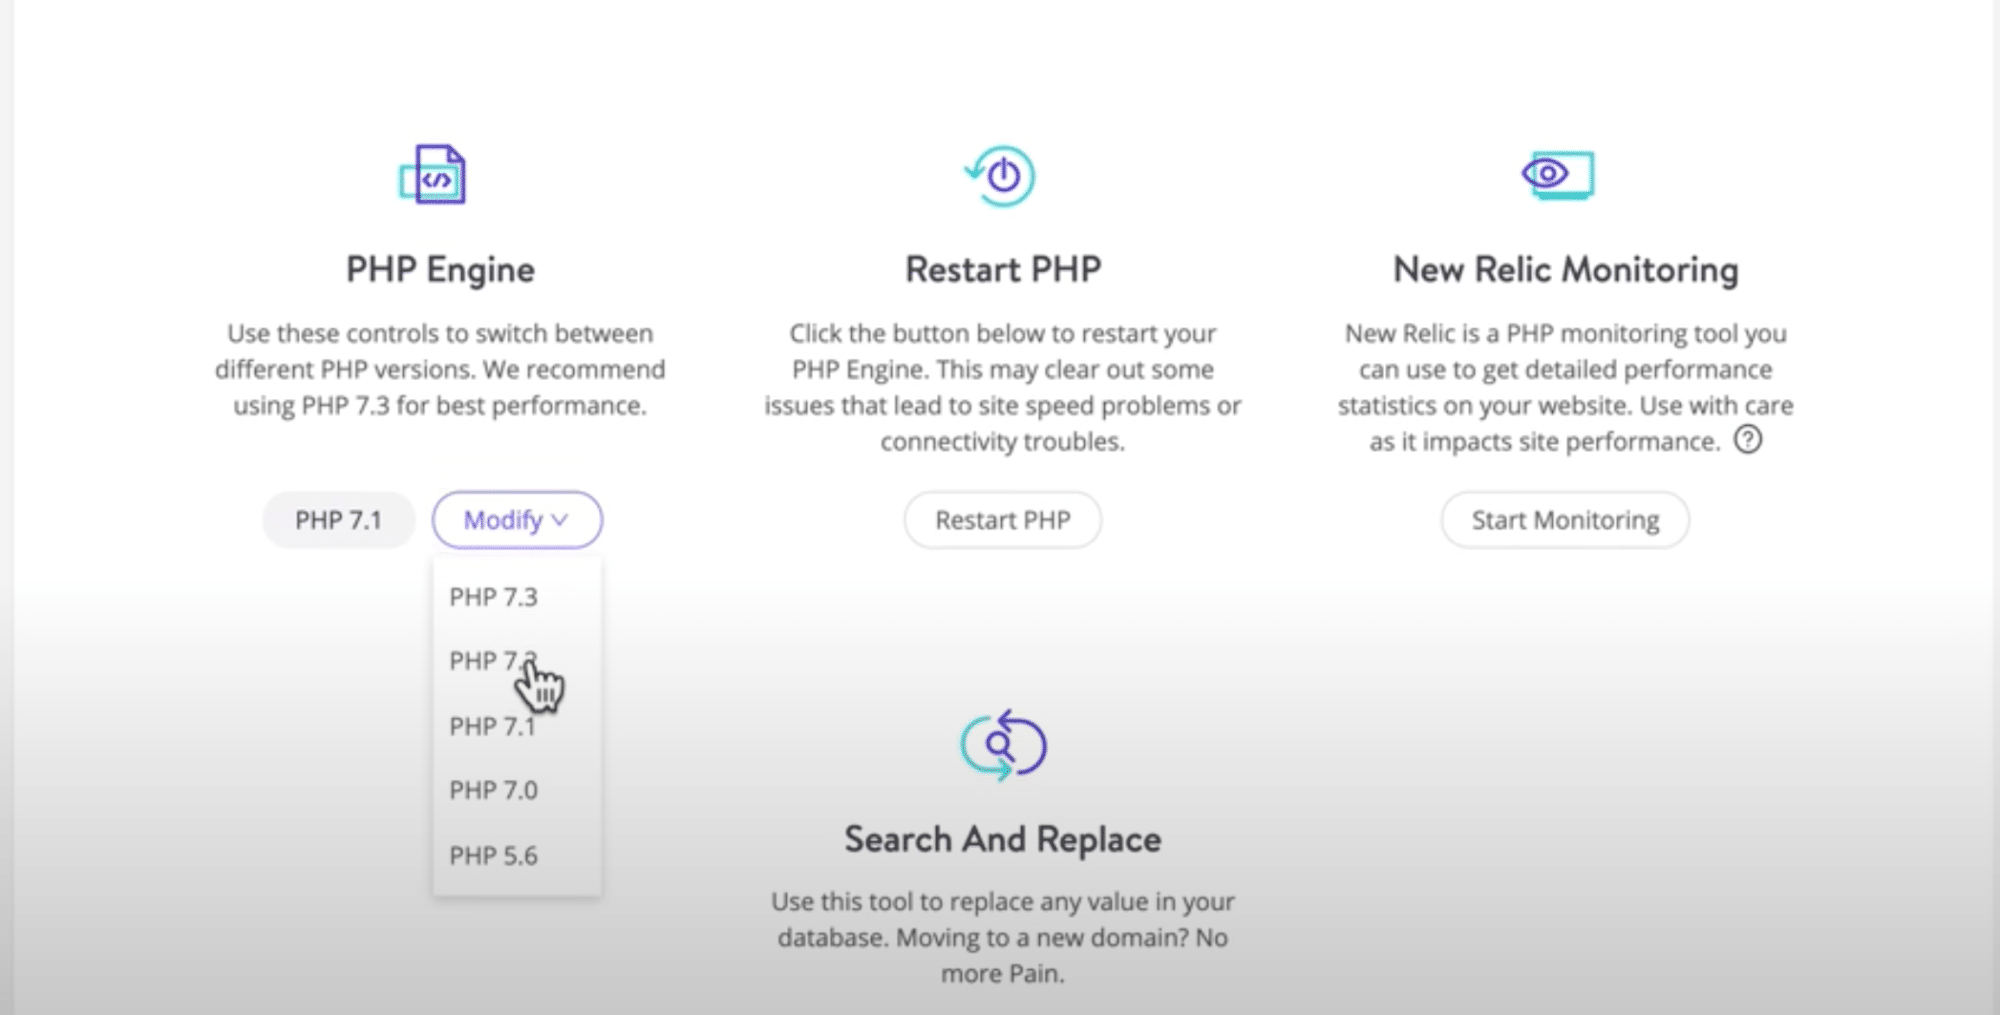
2. Update to the Most Recent PHP Version Available
Keeping your WordPress site running smoothly and securely often involves ensuring you’re using the most up-to-date PHP version.
PHP, the scripting language that powers your WordPress site, receives regular updates.
These updates not only introduce new features but also patch security vulnerabilities and improve performance.
When your PHP is not up-to-date, WordPress may perceive this as a security threat and lock you out of the website.
To update your PHP version:
- Log into your web hosting account. Once in, navigate to the control panel.
- Search for a tool or section that handles PHP settings.
- If your hosting setup involves multiple domains or subdomains, you might need to specify which one you’re updating. Choose the appropriate domain from the list provided.
- You’ll see a list of PHP versions available for use. Opt for the latest version listed.
- Apply the changes.
Need to update your PHP version? Here’s How to Check and Update WordPress PHP Version.
3. Restore a Previous Error Free Version of Your Site
Restoring a previous, error-free version of your WordPress site is an effective way to resolve issues like the frustrating “sorry not available” error.
This method is particularly valuable because it allows you to bypass the time-consuming process of identifying and fixing the specific cause of the problem.
By reverting your site to a state before the error occurred, you effectively roll back any changes that might have introduced the issue, whether it was a problematic update, a new plugin installation, or a configuration issue.
Here’s how to restore a previous error-free version of your site:
1. Open your website’s backup tool; this could be a plugin or a tool from your hosting provider.
2. Access your backup tool’s control panel and identify a backup taken before the error manifested on your site. These backups are typically listed with dates, making it easier to select an appropriate version.
3. Look for a “Restore files” or “Rollback” option next to the backup you wish to use and initiate the process. Restoration times vary based on your site’s size and the backup solution’s efficiency.
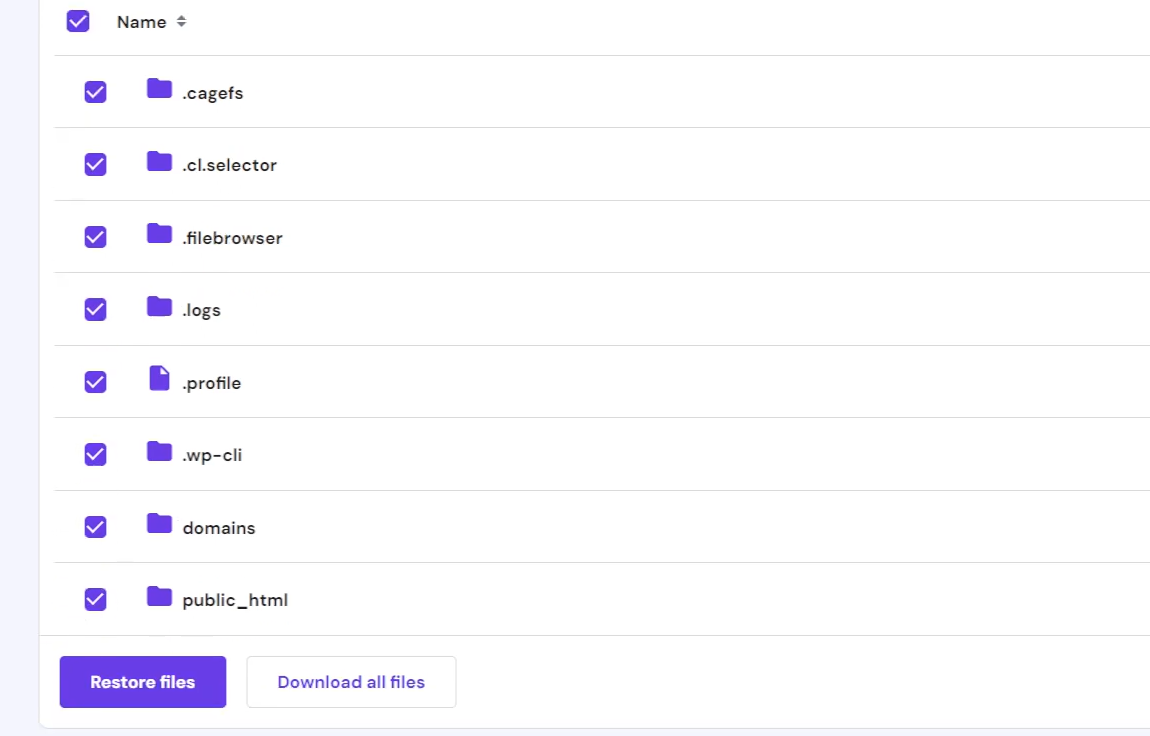
4. Once the restoration is completed, thoroughly check your site to ensure it’s functioning correctly and that the access issue has been resolved.
4. Ensure You’re the Site Administrator
Addressing the “you do not have permission to access this page” error on your WordPress site sometimes boils down to user roles and permissions.
The admin role ensures you have the necessary permissions to access all areas of your WordPress site. If your access is restricted, it may be due to your user role being incorrectly set or modified.
Here’s how you can check and modify user roles and capabilities through the database using phpMyAdmin, a tool provided by most hosting services for managing MySQL databases.
- Access phpMyAdmin: Log into your hosting account’s control panel and locate phpMyAdmin. Open it to access your WordPress site’s database. This tool allows you to view and manage the database tables directly.
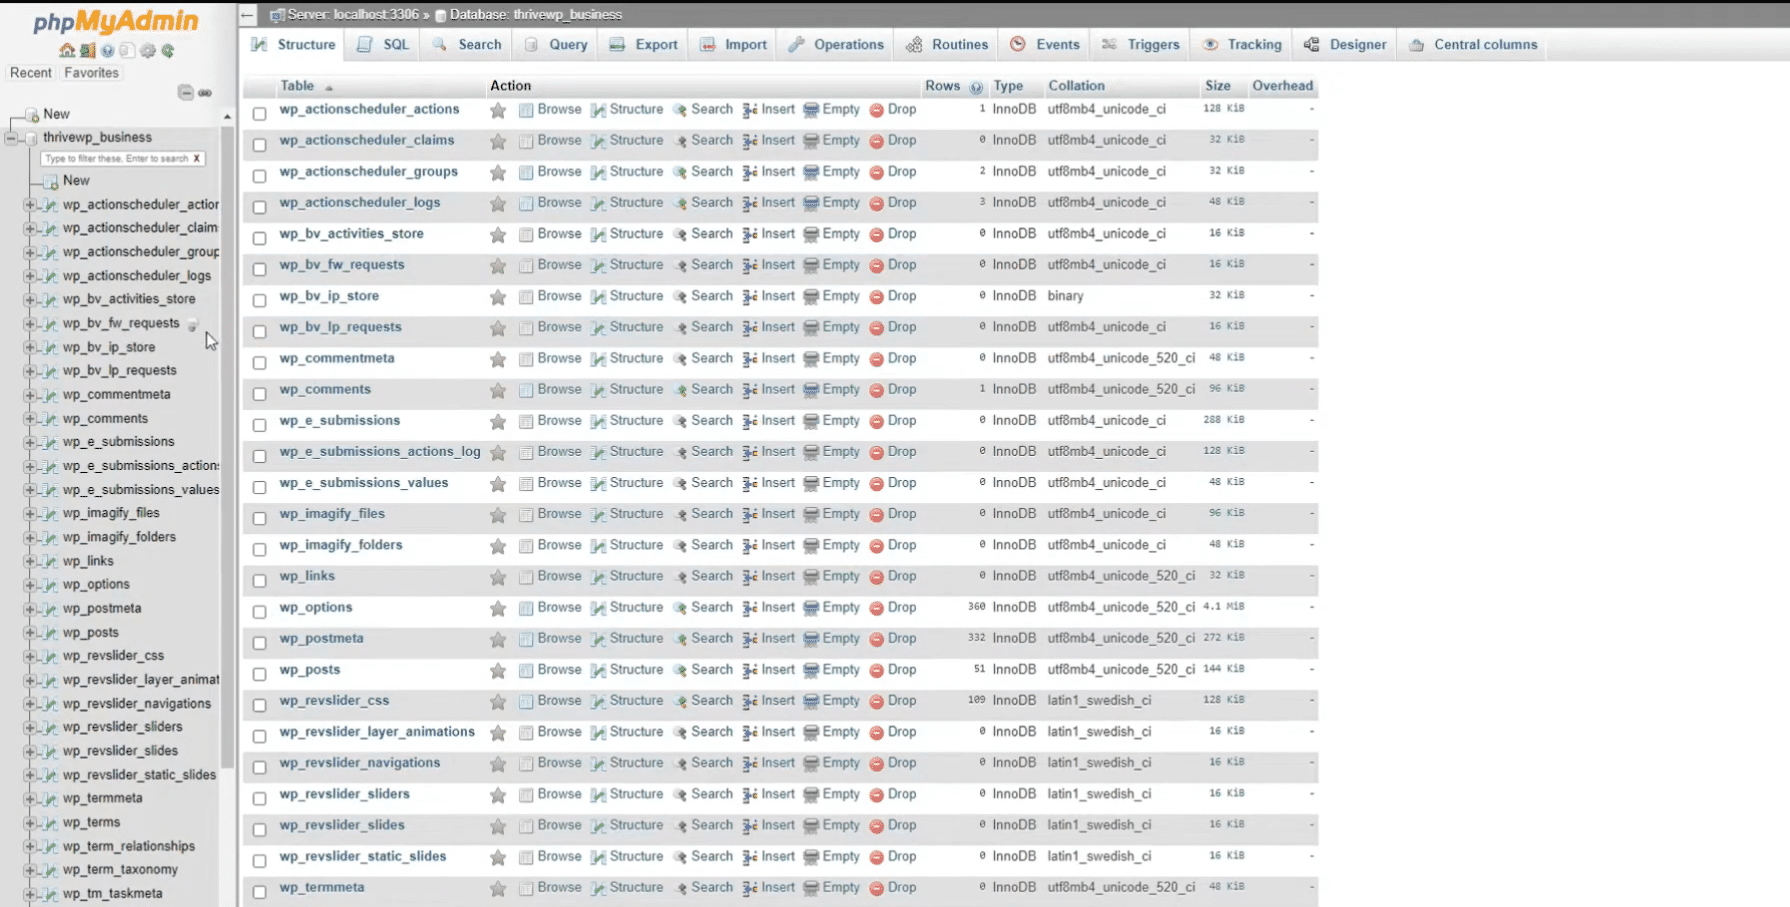
- Find the Users Table: Within phpMyAdmin, navigate to your WordPress database and look for the table named wp_users (the prefix “wp_” might differ if you have customized it). This table contains all the user information for your site.
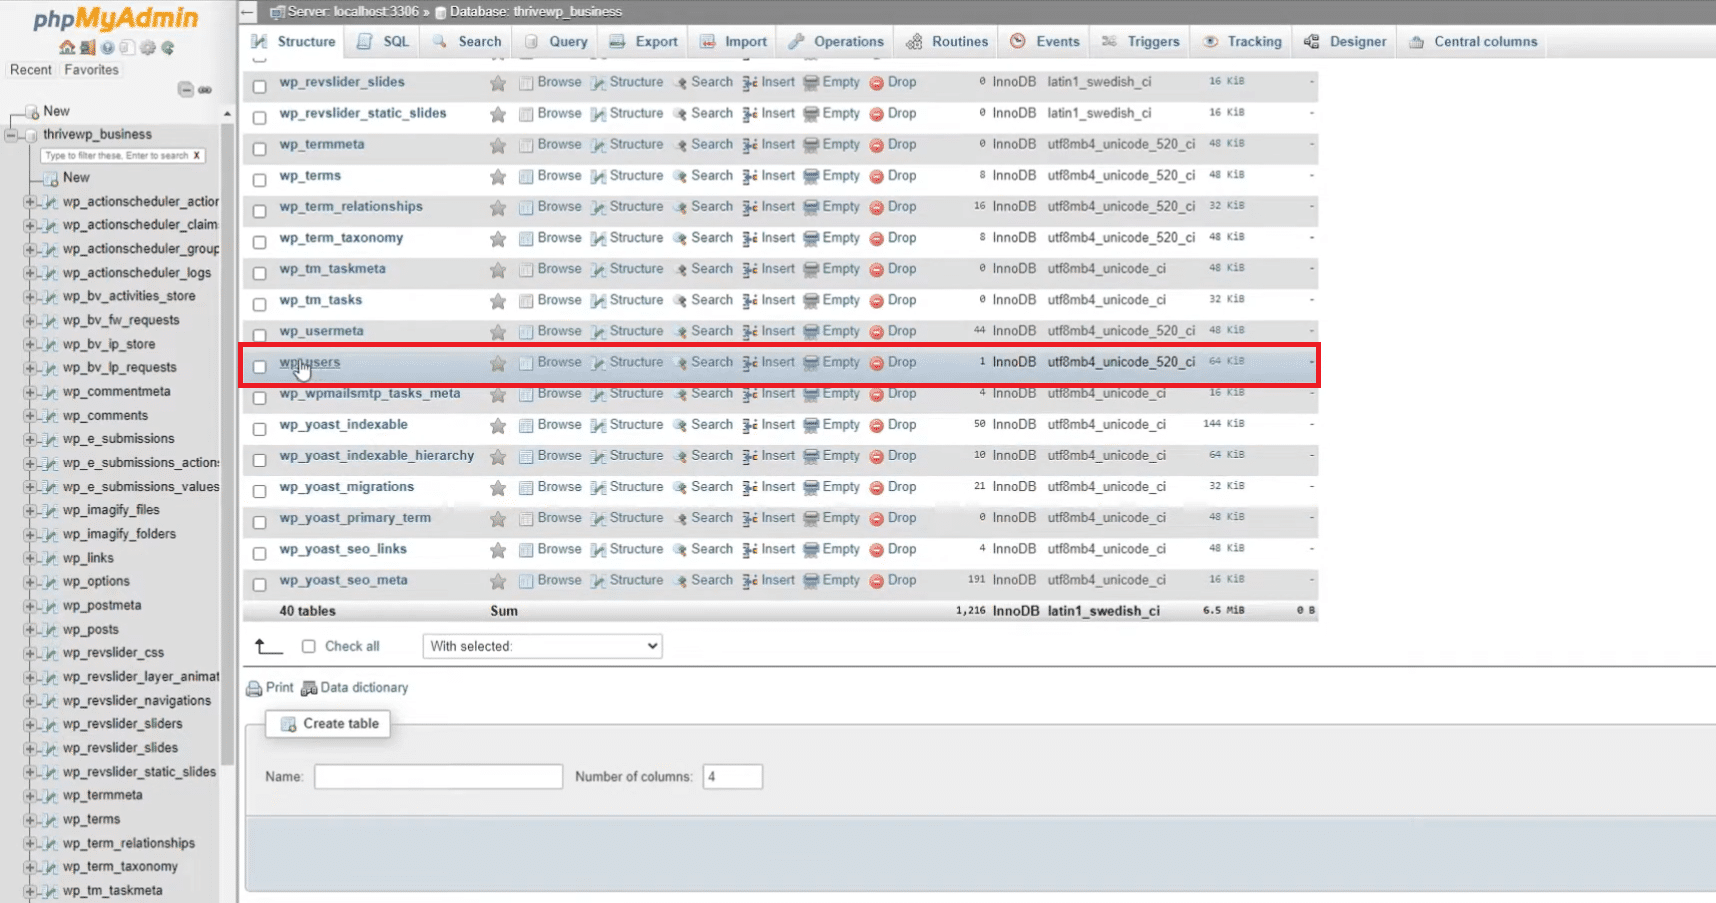
- Identify Your User Account: Browse the list of users in the wp_users table to find your user account. Take note of your user ID for the next steps.
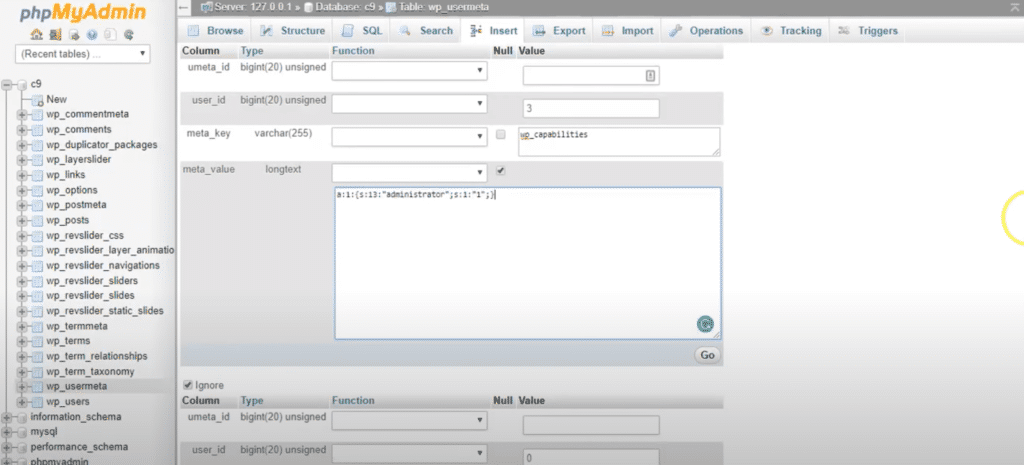
- Check Your User Role: Next, locate the wp_usermeta table. Search for the entry with your user ID and the meta_key named wp_capabilities. This entry defines your user role.
- Modify Your User Role: If your user role is set incorrectly, you can modify it by editing the wp_capabilities entry for your user ID. Ensure it is set to a:1:{s:13:”administrator”;b:1;}, which assigns the Administrator role, granting full access to the site.
Struggling to add a new page to your menu? Here’s how to fix WordPress can’t add page to menu.
5. Make Sure Your Database Prefix is Correct
A mismatch between your site’s database prefix and the one specified in your wp-config.php file can lead to the “you need permission to access this site” error in WordPress.
The database prefix is a string that appears at the beginning of your database tables, helping WordPress to identify and interact with them.
Ensuring that this prefix matches in both your wp-config.php file and your actual database tables is essential for your site’s functionality.
Here’s how you can verify and correct the database prefix:
- Access wp-config.php: The wp-config.php file is located in the root directory of your WordPress installation. Use an FTP client or your hosting account’s file manager to access this file. Once found, open it for editing.
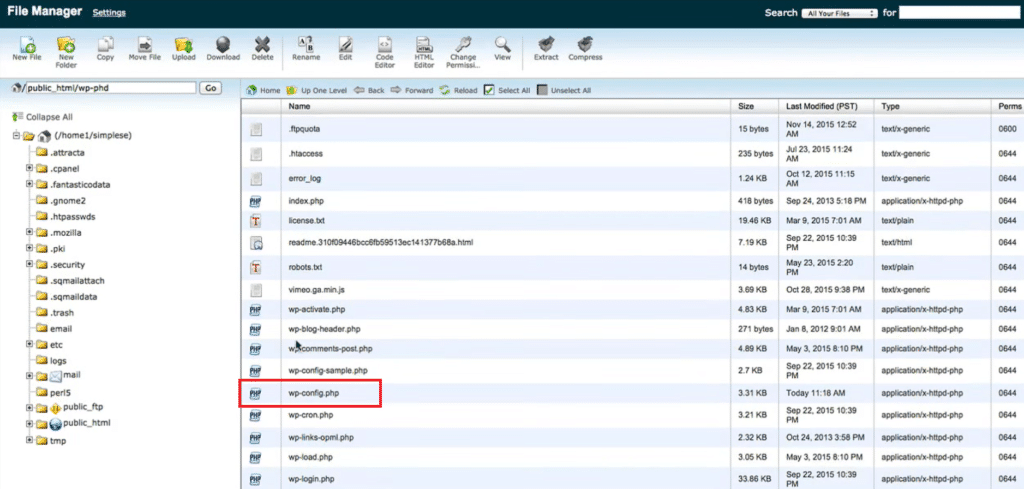
- Locate the Database Prefix Line: Look for the line that defines the $table_prefix. It usually looks something like $table_prefix = ‘wp_’;. Note down the prefix value.

- Access Your Database via phpMyAdmin: Log into your hosting control panel and open phpMyAdmin. Select your WordPress database from the list to view all the tables.
- Compare the Prefixes: In phpMyAdmin, check the prefix of your database tables and compare it to the prefix noted from your wp-config.php file. They must match. If the prefixes are different, you’ve likely found the source of the error.
- Correct the Mismatch: If there’s a discrepancy, you need to update the prefix in your wp-config.php file to match the prefix used by your database tables.
Edit the $table_prefix value in wp-config.php to accurately reflect the prefix observed in phpMyAdmin, then save your changes.
6. Restore Your WordPress Site to its Default Settings
Resetting your WordPress site to its default settings is a drastic measure, but it can be an effective last resort if you’re still facing the “Sorry You Are Not Allowed to Access This Page” error after trying other solutions.
This process wipes your site clean, removing all content, themes, and plugins, and returns it to the state it was in when first installed.
- Backup Your Site: Before proceeding, ensure you have a complete backup of your site. This allows you to restore your content and settings if needed.
- Use a Plugin for Resetting: One of the simplest ways to reset WordPress is by using a plugin designed for this purpose. Install and activate the plugin through your WordPress dashboard.
- Initiate the Reset: Navigate to the plugin’s settings page and choose the option to reset your site. The plugin will typically ask you to confirm this action, as it will delete all your data.
- Reconfigure Your Site: After the reset, you’ll need to reconfigure your site from scratch, including theme and plugin installations.
Get our best WordPress tips, tricks, and tutorials delivered straight to your inbox - Subscribe to our Monthly Email newsletter Today.
Wrapping Up
The “Sorry You Are Not Allowed to Access This Page” error does not have a quick fix. It may take some trial and error to locate the source of your error. Since the issue locks you out of your website, you may have to find alternate ways to access your WordPress settings to resolve the issue.
Using plugins on WordPress that do not cause access issues or interfere with the working of your website can save you a lot of trouble. The Plus Blocks for Gutenberg is one such plugin that fully integrates with WordPress and gives you a smooth and easy-to-use interface to work with.
The Plus Blocks for Gutenberg comes with 85+ Unique Blocks that add functionality to your WordPress site.
These blocks are fully customizable to make your website design engaging and cohesive.
FAQs on “Sorry You Are Not Allowed to Access This Page” Error
Why does WordPress say sorry you are not allowed to access this page?
When WordPress shows “sorry you are not allowed to access this page,” it could be for several reasons: your user role lacks the required permissions, your administrator has not given you access to this item, plugin or theme settings limit your access, or there’s a configuration issue.
How do I restore permissions in WordPress?
To restore permissions in WordPress, contact your site administrator to adjust your user role or permissions. Alternatively, if you’re the admin, navigate to the WordPress dashboard, go to Users > All Users, select the affected account, and modify the user role or permissions accordingly.
What is the 403 error page in WordPress?
The WordPress 403 error signals forbidden access, caused by incorrect file permissions or server configurations. Resolve it by checking permissions, adjusting directory access, and reviewing .htaccess rules.
How to fix it when it appears you don’t have permission to access this page?
If you see “sorry you are not allowed to access this page,” verify your user role for proper permissions. Admins should check plugin and theme settings. Clear browser cache, cookies, and review .htaccess for errors.
How can I check if I have the correct WordPress role to resolve the error?
To confirm your WordPress role, go to Users > All Users in the dashboard. Check the “Role” column next to your name. If it doesn’t match your access needs, contact the site admin for adjustments.
What steps can I take to revert my site to the pre-error state in WordPress?
To undo errors in WordPress, restore a recent backup. Without one, deactivate recent plugins/themes or check the .htaccess file for issues.
What is the process for deactivating all plugins and themes to identify the cause of the error in WordPress?
To easily identify the cause of an error in WordPress, first, deactivate all plugins by navigating to “Plugins > Installed Plugins” in your dashboard, select all, and choose ‘Deactivate’ from the bulk actions menu. Then, switch your theme by going to “Appearance > Themes” and activating a default WordPress theme.