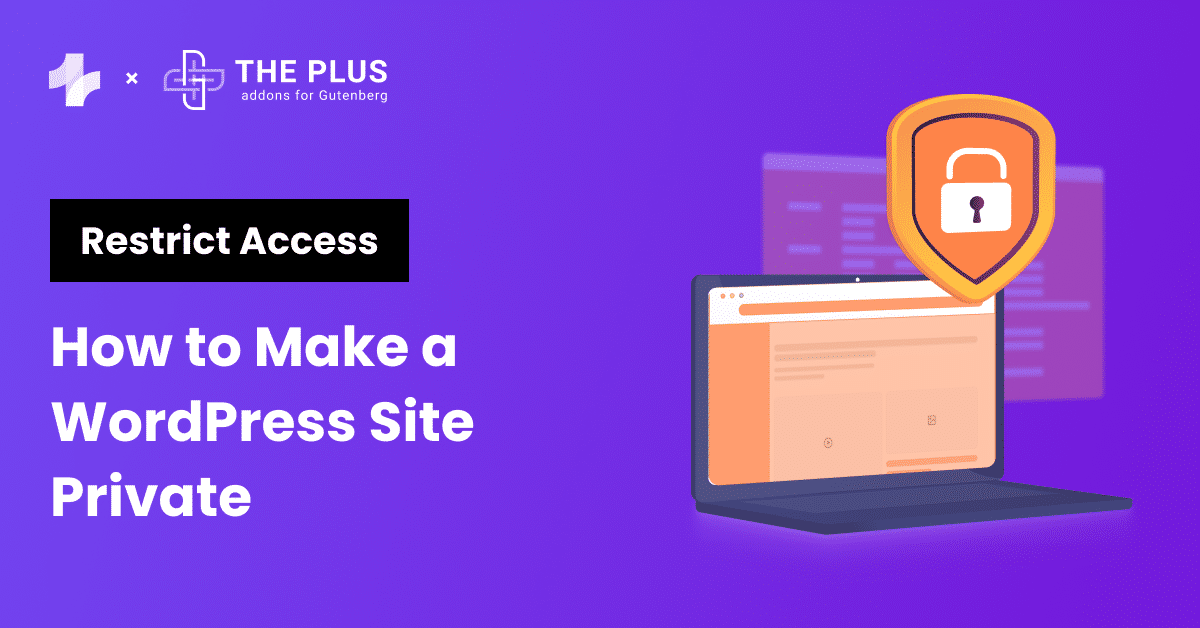
When you are creating or designing your WordPress site you might want to give access to your website to only some.
In that case, you may want to make a WordPress site private.
Making your WordPress site private during development is crucial because it can be frustrating for your visitors to experience an incomplete website which leads to poor user experience.
Whatever your reason, making your WordPress site private is a simple process that can be done in a few different ways.
In this article, we’ll learn some of the different methods to make a WordPress site private with our step-by-step process.
Stay ahead of the curve with our exclusive insights and analysis on the latest WordPress trends and techniques - subscribe to our newsletter today.
What Is a Private WordPress Site?
A private WordPress Site means it is not accessible to the general public.
It can be only accessible to the selected group of people who have been granted permission to access it.
When you make your WordPress site private, you can control who can see your content
Also, there are various user roles like Administrator, Editor, etc that you can assign to different users and control the content visibility of your website.
By making a WordPress site private, site owners have greater control over who can view and interact with the content.
This can be achieved through various means, such as password protection, IP address restriction, or by requiring users to be logged in to view the content.
This can be particularly valuable for businesses, professionals, and organizations that need to maintain confidentiality, manage membership-based content, or provide a secure online environment for their community.
What Is The Need To Make Your WordPress Site Private?
Making your WordPress site private has become increasingly important due to growing concerns about online privacy and security.
Here are some reasons why you need to make your WordPress Site Private –
- Modifying content or design: Making the WordPress site private until launch, allows you to make changes, test new features, and experiment with designs without these alterations being visible to the public eye.
- Access Control: Making pages private lets you control exactly who can view and access the content by requiring login or permission checks. This helps manage visibility at a granular level.
- Improve Security: Making your WordPress site private can also help improve security. By limiting access to your site, you can reduce the risk of hacking attempts and other security threats.
- Preventing Search Engine Indexing: Keeping your site private can prevent search engines from indexing its content, which can be useful if you’re still working on SEO or if you want to keep certain pages hidden from search results.
Benefits Of Making Your WordPress Site Private
Making your WordPress site private offers several benefits:
- Enhanced Security: By limiting access to your site, you can better protect sensitive information and reduce the risk of unauthorized access.
- Exclusive Access: A private site can be used to provide exclusive content to a select group of users, such as members, subscribers, or clients.
- Control over the content: A private WordPress site helps you maintain the integrity and confidentiality of your content. Also gives you the freedom to organize and manage the information in a manner that aligns with your objectives and security requirements.
- Better SEO: Private sites can be used to improve your SEO by creating exclusive content for a select group of users. This can help increase engagement and loyalty, which can lead to better search engine rankings.
How To Make a WordPress Site Private [Proven Methods]
Here are some working methods that you can use to make your WordPress Site Private:
Method 1: Hide Your Website From Search Engines
One of the easiest ways to do so is by hiding it from search engines.
This means that your website won’t be visible in the search results, and only people who have the direct link to your site will be able to access it.
To Hide your Website from search engines follow these steps:
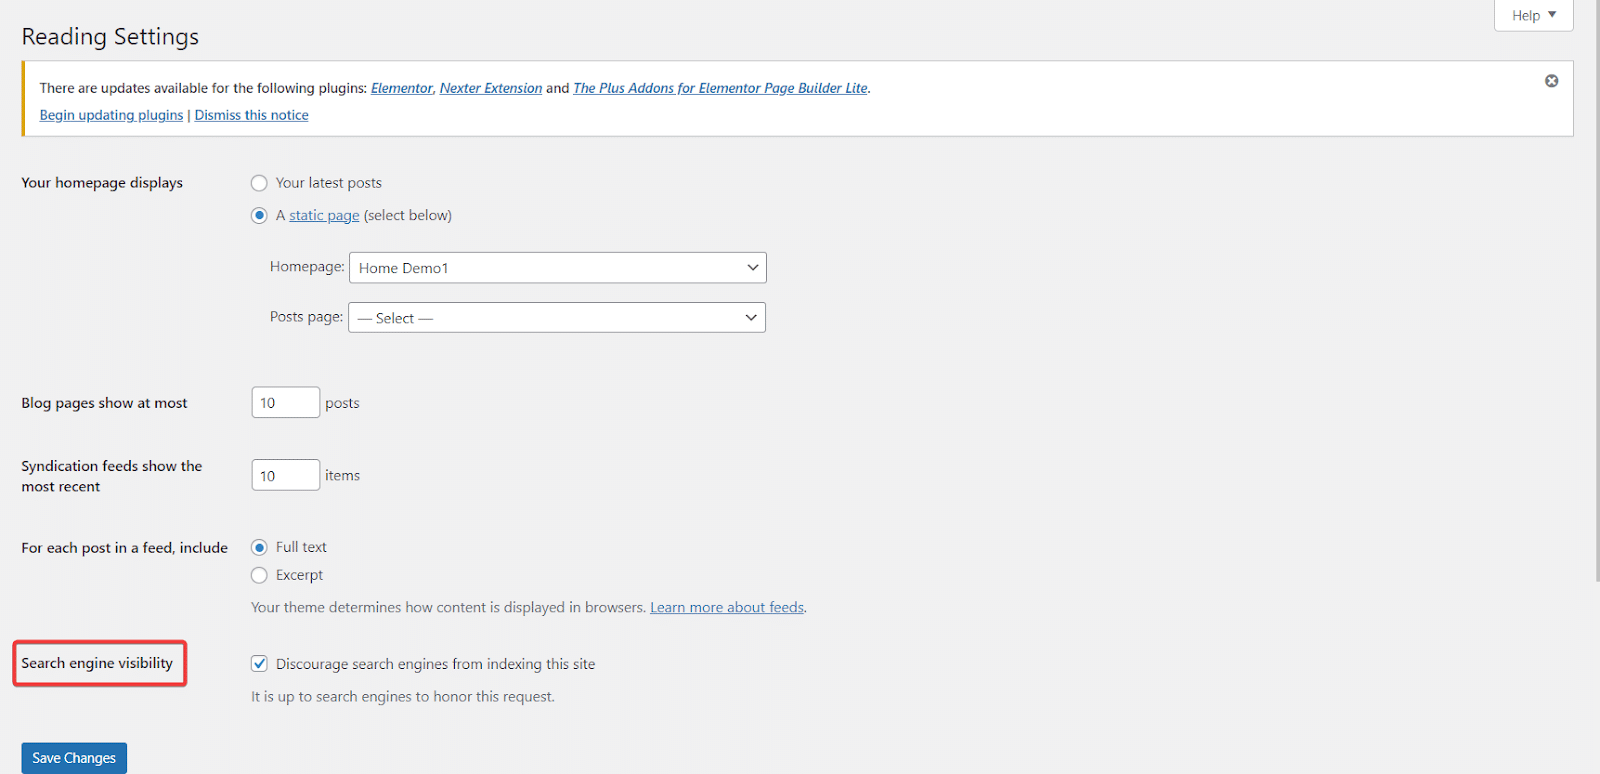
Step 1. In your WordPress dashboard Go to Settings and click on Reading.
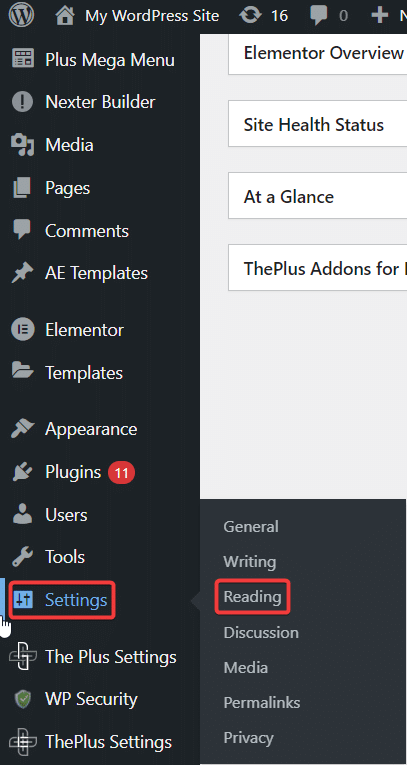
Step 2. Then in Reading Settings, you will see the option for Search Engine Visibility simply check that box – Discourage search engines from indexing this site, and click Save Changes.
Once you are done with editing or modifying your site head back to this page and deactivate the settings you applied to make your site live.
Read Further: 5 Best Maintenance & Coming Soon Mode WordPress Plugins
Method 2: Use a Plugin To Make Your Site Private
Plugins designed for this purpose typically offer more control over the privacy settings of your site, allowing you to customize who can access it and how.
Using a plugin can be considered as one of the best ways to make a WordPress site private. Here’s how to do it.
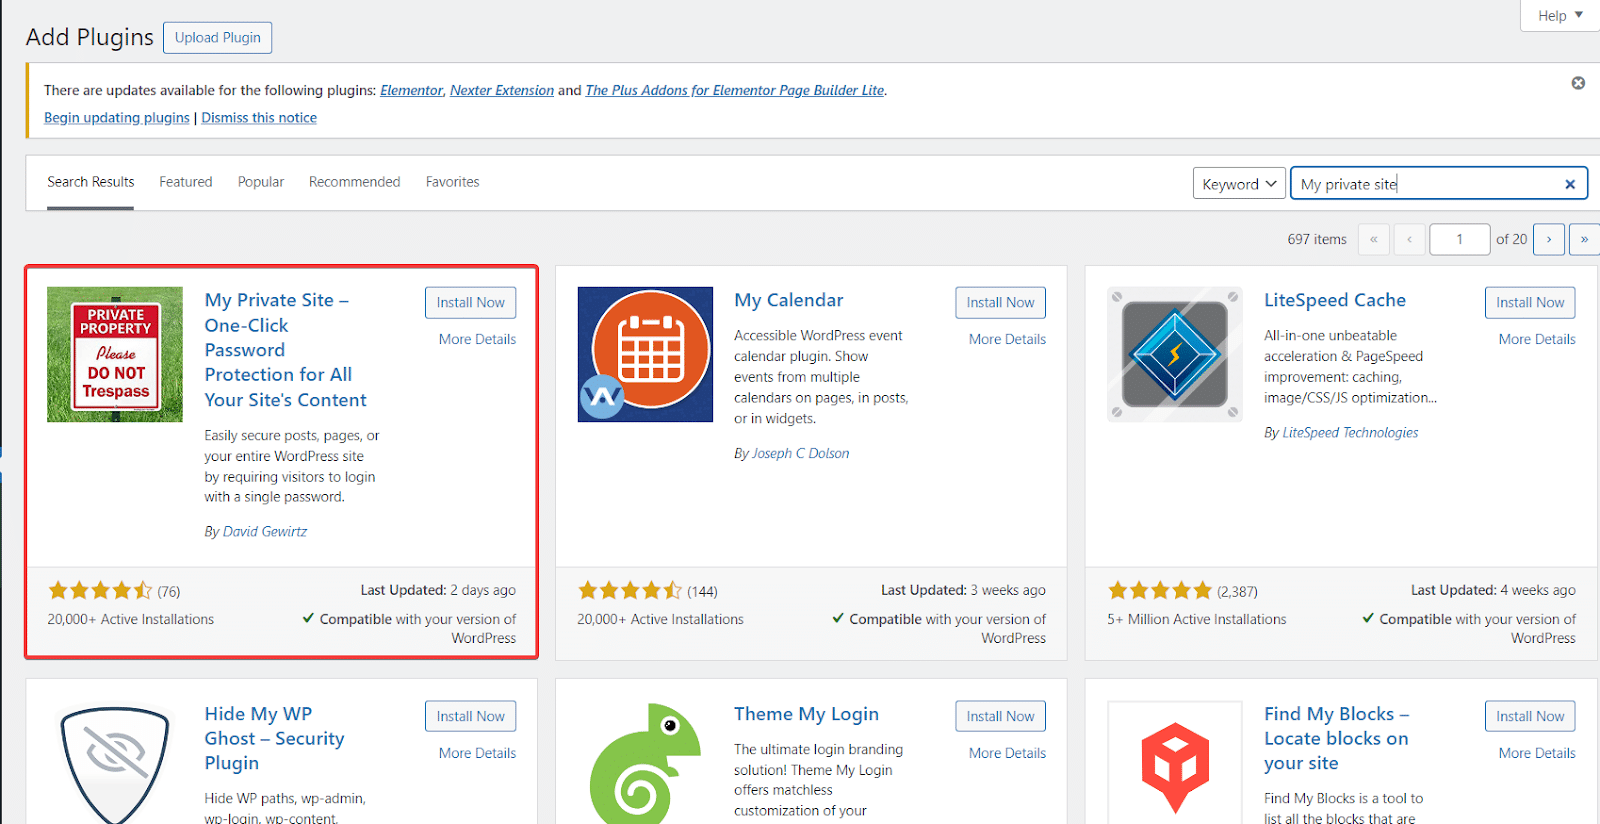
Step 1. Go to your WordPress dashboard and click on Plugins in the left-hand menu.
Step 2. Click on “Add New” and search for a privacy plugin like “My Private Site”. Install and activate the plugin.
Step 3. Then navigate to the WordPress dashboard sidebar, hover on My Private Site icon and click on Site Privacy.
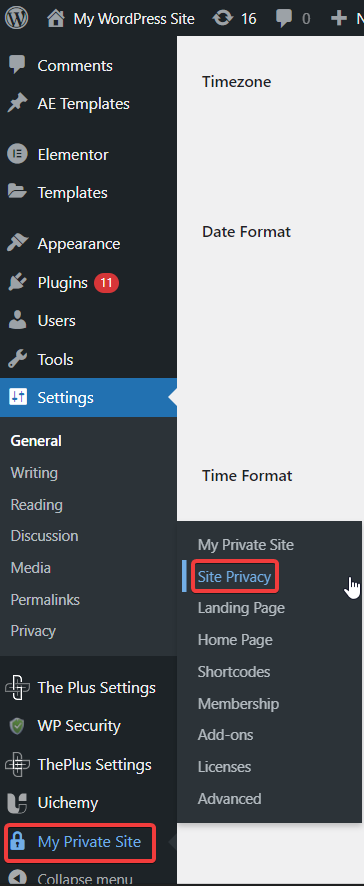
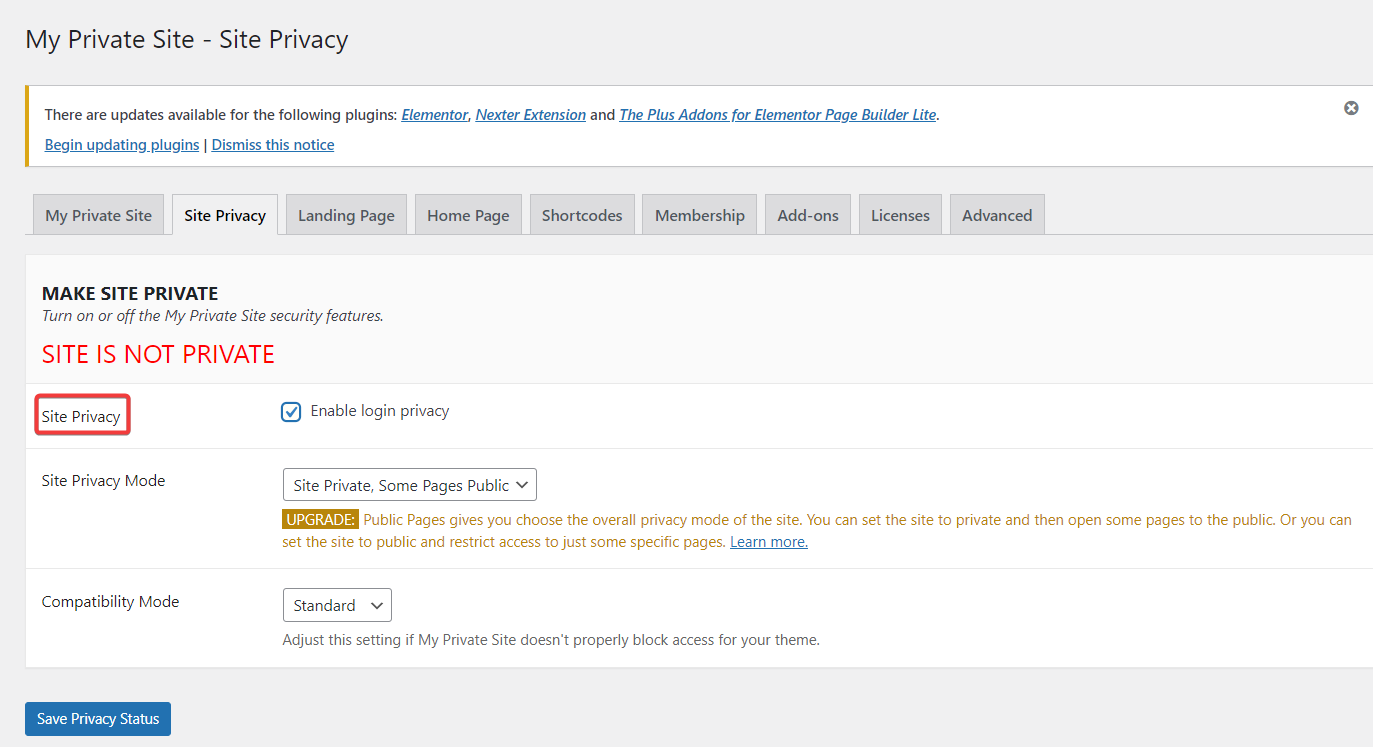
Step 4. Then in the Make Site Private section look for Site Privacy, tick the Enable login privacy checkbox, and click on Save Privacy Status.
Read More: How to Fix WordPress Cant Add Page To Menu [5 Easy Methods]
Method 3: Make Your Site Private Without a Plugin
You can also make your WordPress site private without a plugin. You can do this by using a code
Using code to make your WordPress site private offers a more lightweight and efficient solution compared to using a plugin.
Additionally, code-based solutions are not dependent on third-party plugins, reducing the risk of compatibility issues and security vulnerabilities.
To private your site without a plugin follow these steps:
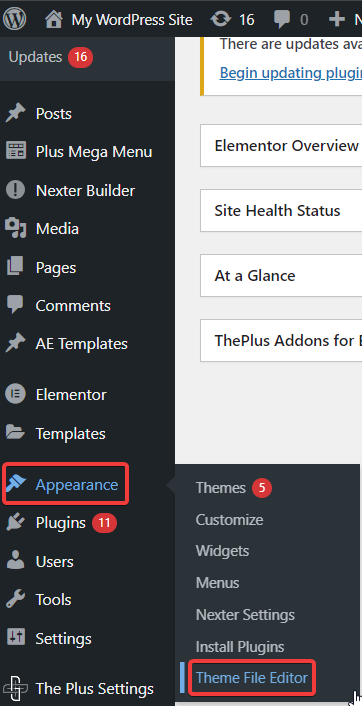
Step 1. From your WordPress dashboard go to Appearance and select Theme File Editor.
Step 2. In the Theme File Editor, click on the Theme Functions on the right side of the page and copy the below code snippet in the function.php file, and click on update.
function make_private_website(){

  global $wp;

  if (!is_user_logged_in() && $GLOBALS['pagenow'] !== 'wp-login.php'){

    wp_redirect(wp_login_url($wp -> request));

    exit;

  }

}

add_action('wp', 'make_private_website');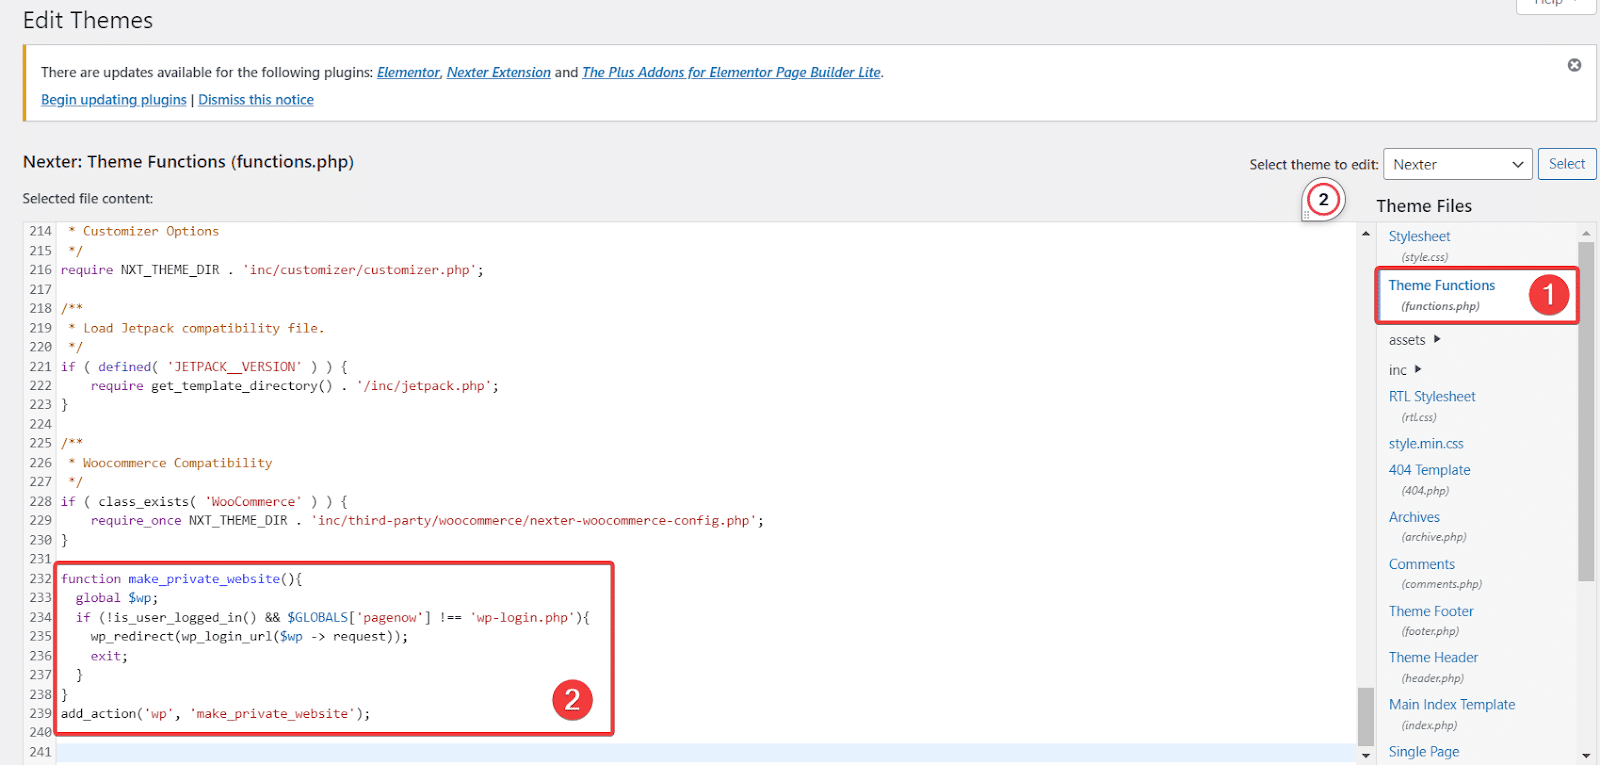
This code makes your WordPress site private by redirecting anyone who isn’t logged in to the login page. As only users who are logged in will be able to access its content.
Return to the same dashboard and delete the code to make your website public again.
Suggested Reading: 5 Best WordPress Content Protection Plugins
How To Make Individual WordPress Pages/Posts Private?
Making individual pages or posts private in WordPress allows you to control who can access specific content on your site.
This can be useful for restricting access to certain information or resources to only authorized users.
If you want to make a specific page private on your WordPress site, you can do so by following these steps:
Step 1. Log in to your WordPress dashboard and navigate to the page/post you want to make private.
Step 2. Click on the Edit button to open the page editor.
Step 3. On the right-hand side of the editor, you will see a box labeled Visibility Click on the Edit link next to it.
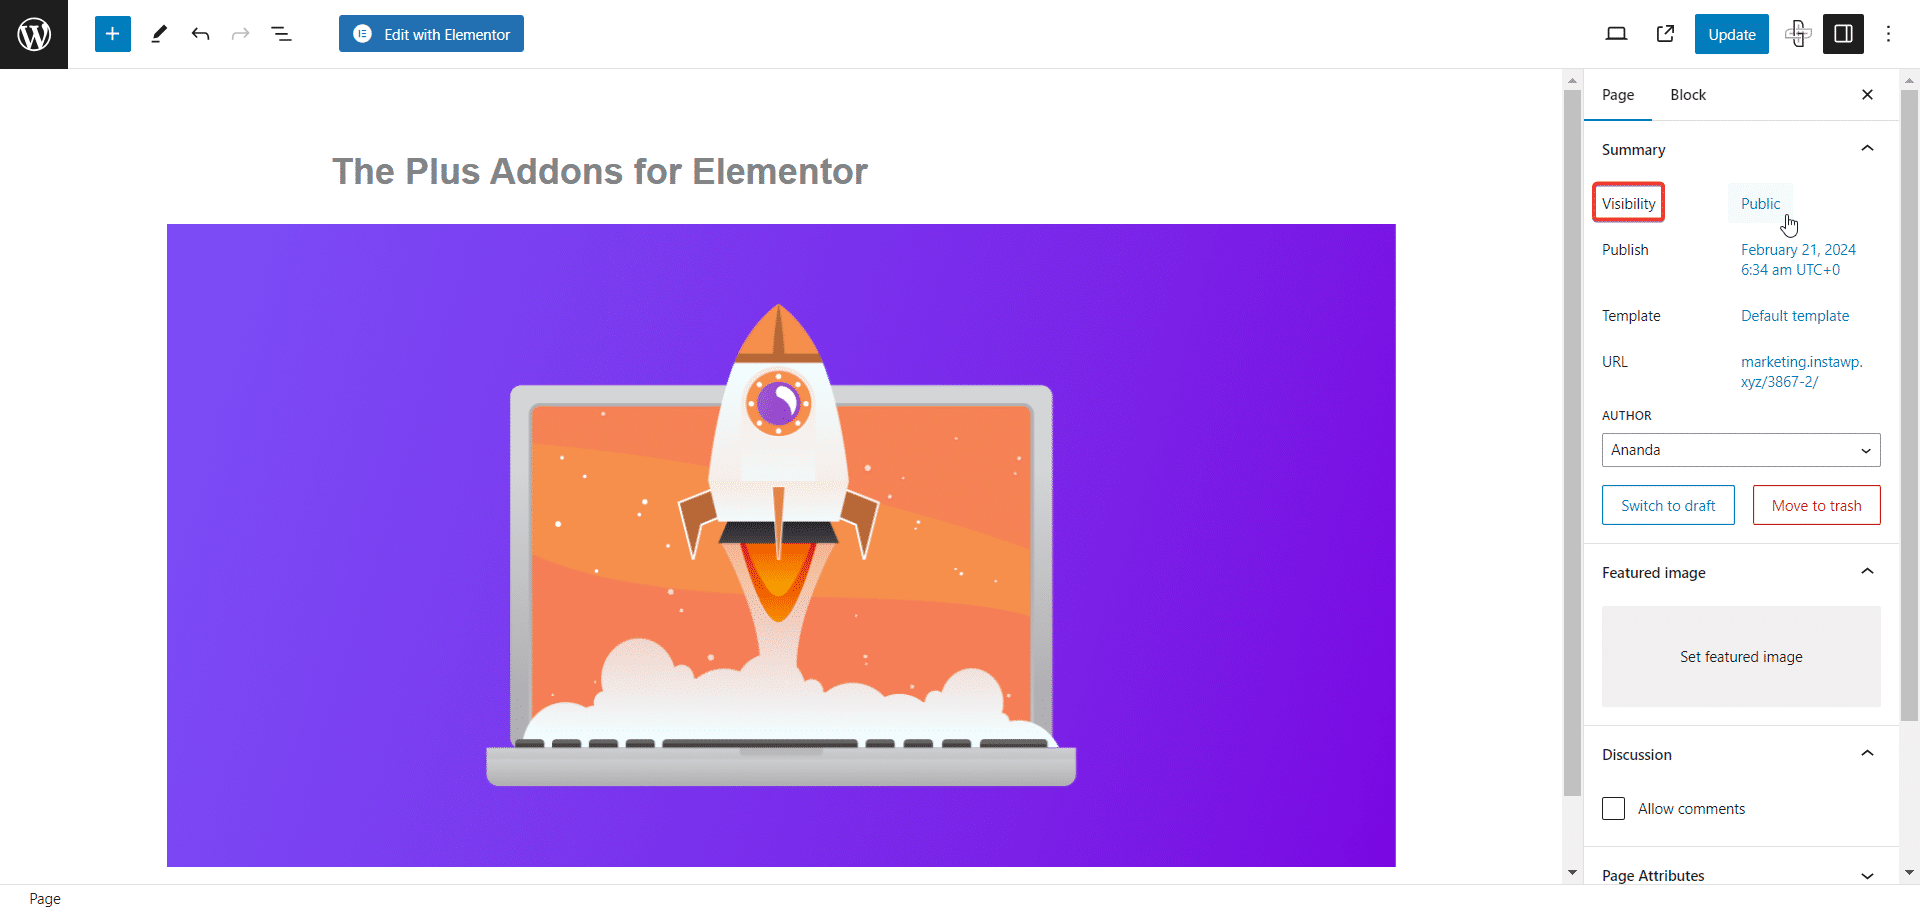
Step 4. In the dropdown menu that appears, select Private click OK, and then Update.
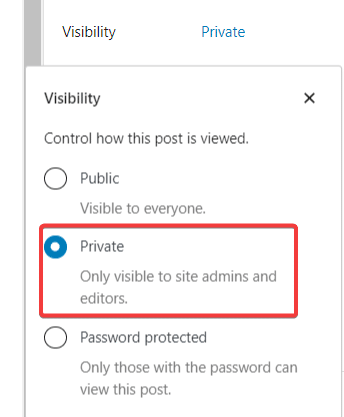
Once you’ve made a page/post private, only users who have been granted access to it will be able to view it.
You can also make your page/post password-protected. In the Visibility Drop-down menu, Select the Password protected option set the password you want, and click Update.
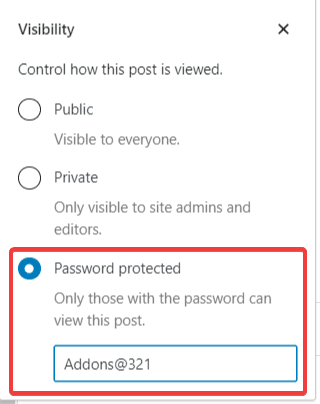
Now, only those users can access the page/post who have the password.
Learn More: How To Edit Your Homepage in WordPress in 2024
How To Grant Access To Members In WordPress Website?
To grant access to members on a WordPress website follow these steps:
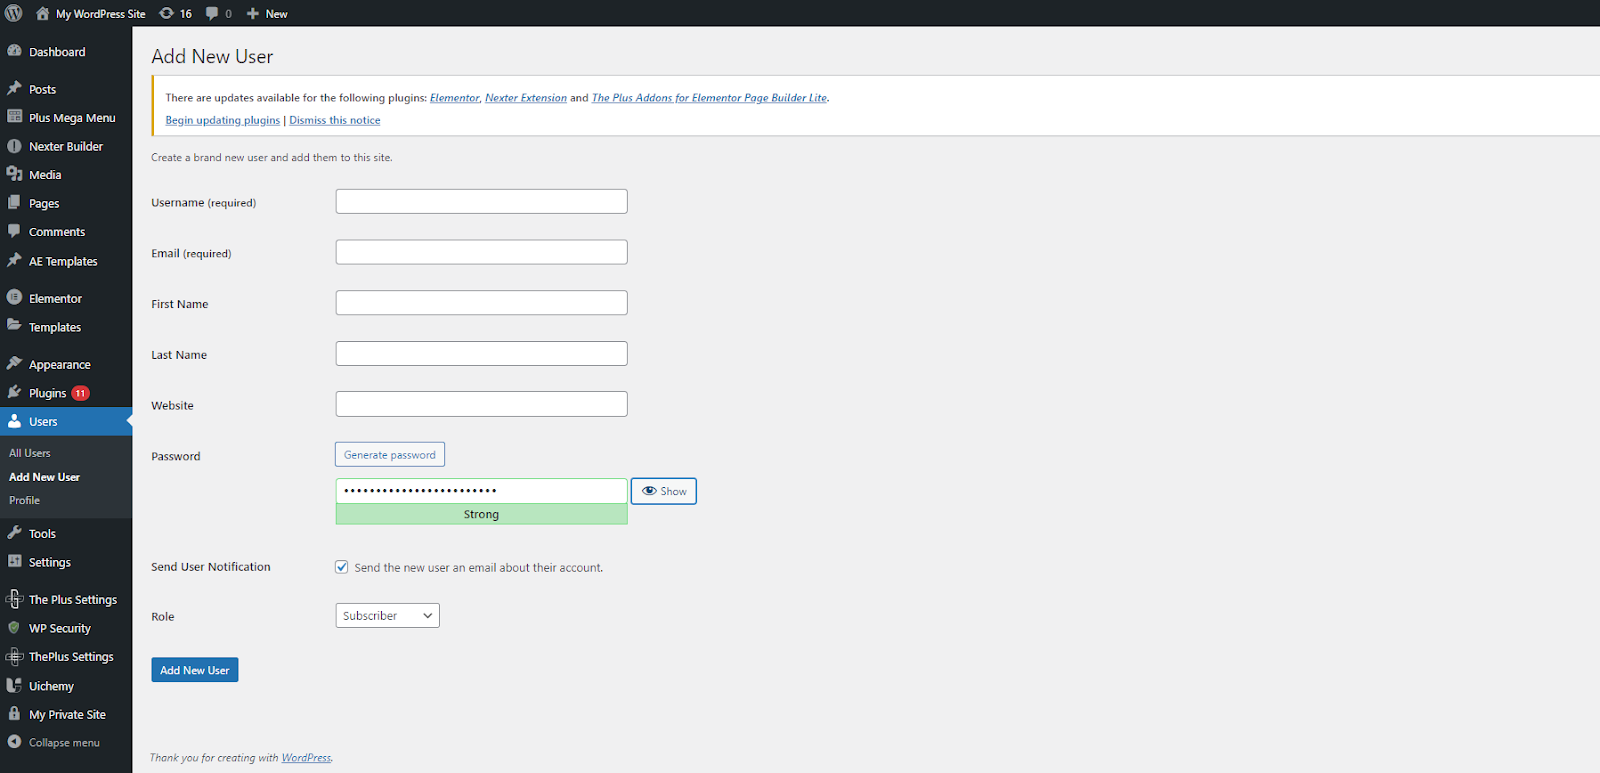
Step 1. In the WordPress dashboard, click on Users in the left-hand menu to open the Users screen.
Step 2. Then under the user’s settings click on the Add new user. Fill up the user details and select the role you want to give to the new user.
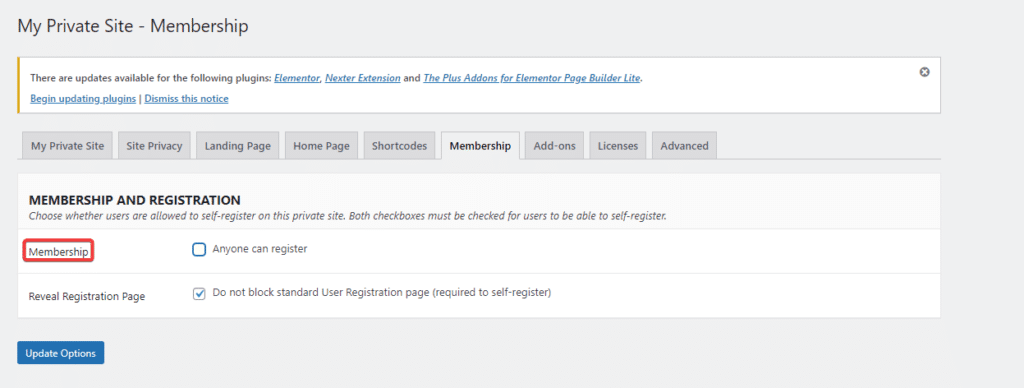
Also, Disable the box labeled Anyone can register in My Site Private Plugin in the membership option. This will prevent people from creating accounts and accessing your website.
When you grant members access on your WordPress website, it makes them feel more involved and connected.
This can encourage them to participate more actively and engage with your site regularly.
Suggested Reading: 5 Best WordPress Security Plugins to Protect Your Site
Get our best WordPress tips, tricks, and tutorials delivered straight to your inbox - Subscribe to our Monthly Email newsletter Today.
Wrapping Up
Making your WordPress website private is important for keeping your content safe.
You can control who can access your site and keep sensitive information secure.
Whether you’re managing a membership site, Making a WordPress site private during development that is not ready for the public yet or just want to maintain privacy, these measures will help you achieve your goals.
By managing who can see and interact with your site, you can feel more confident about your online presence and protect your digital content.
Lastly, if you’re using the default Gutenberg editor to build your WordPress site, we would recommend you check out The Plus Blocks for Gutenberg.
This all-in-one plugin offers 85+ unique blocks that will help enhance the functionality of your default WordPress editor.
Check 85+ Blocks Library from The Plus Blocks
Whether you want to add beautiful image galleries, attractive sliders, or interactive call-to-action buttons, these blocks can help.
They are designed to be user-friendly, so you can create professional-looking designs without needing to know how to code.
FAQs on Making a WordPress Site Private
What is private mode in WordPress?
Private mode in WordPress allows you to hide your website from the public. It restricts access to your site so that only logged-in users with specific permissions can view content. This is useful for developing or testing a site before making it public.
How do I make my private website secure?
To make your private website secure, ensure you use strong passwords, keep your software up to date, use SSL/TLS certificates, regularly backup your data, restrict access to sensitive information, and use security plugins or services to protect against malware and other threats.
What is the purpose of private mode?
The purpose of private mode is to restrict access to certain content or features on a website to a specific group of users, such as members or subscribers. It can be used to create exclusive or premium content, protect sensitive information, or control access to specific areas of a website.
How to Make a WordPress Blog Private?
To privatize a WordPress blog, access the WordPress dashboard. Navigate to the blog section, select the desired blog, and choose Quick Edit. In the Quick Edit options, locate the checkbox labeled Private, check it, and then click “Update” to save the changes.
What steps are involved in setting a WordPress site to private mode?
To set a WordPress site to private, go to Settings > Reading in the dashboard, check “Discourage search engines from indexing this site“, and install the “My Private Site” plugin to limit access to logged-in users. Save changes to make the site private.
What is the process for making a WordPress page visible only through a direct link?
To make a WordPress page visible only through a direct link, you can set the page’s visibility to “Private” in the page editor. This will hide the page from your site’s navigation menus and search results. To access the page, users will need to use the direct link you provide.
How does one manage who can view a WordPress website when privacy settings are enabled?
When privacy settings are enabled on a WordPress website, you can control who can view the site. You can allow or disallow search engine indexing, enable or disable comments, and use plugins to manage user roles and restrict access to specific content.